Welcome
Thanks for taking the time to read through this documentation.
Table Of Contents
- Quickstart
- Reference Manual
- Configure Your Apple Watch
- Controller Panel List
- Controller Panel Structure
- Knobs & Buttons Panel
- Motion Panel
- Stepper Panel
- Transport Panel
- XY Panel
- Preset List
- Settings
- Bluetooth LE MIDI
- Thanks for reading
Quickstart
MidiWrist Unleashed turns your Watch into a MIDI controller that directly connect to any Bluetooth LE MIDI device.
Install Animoog Z
This quickstart walks you through the steps to connect MidiWrist Unleashed to a synthesizer running on your iPhone or iPad. If you don't have a synthesizer app available, Animoog Z is a great synth that you can download freely.
Once Animoog Z is installed, launch it by tapping its icon, press the HOLD button and tap several keys on the keyboard to hear an arpeggio playing.

Advertise your iPhone
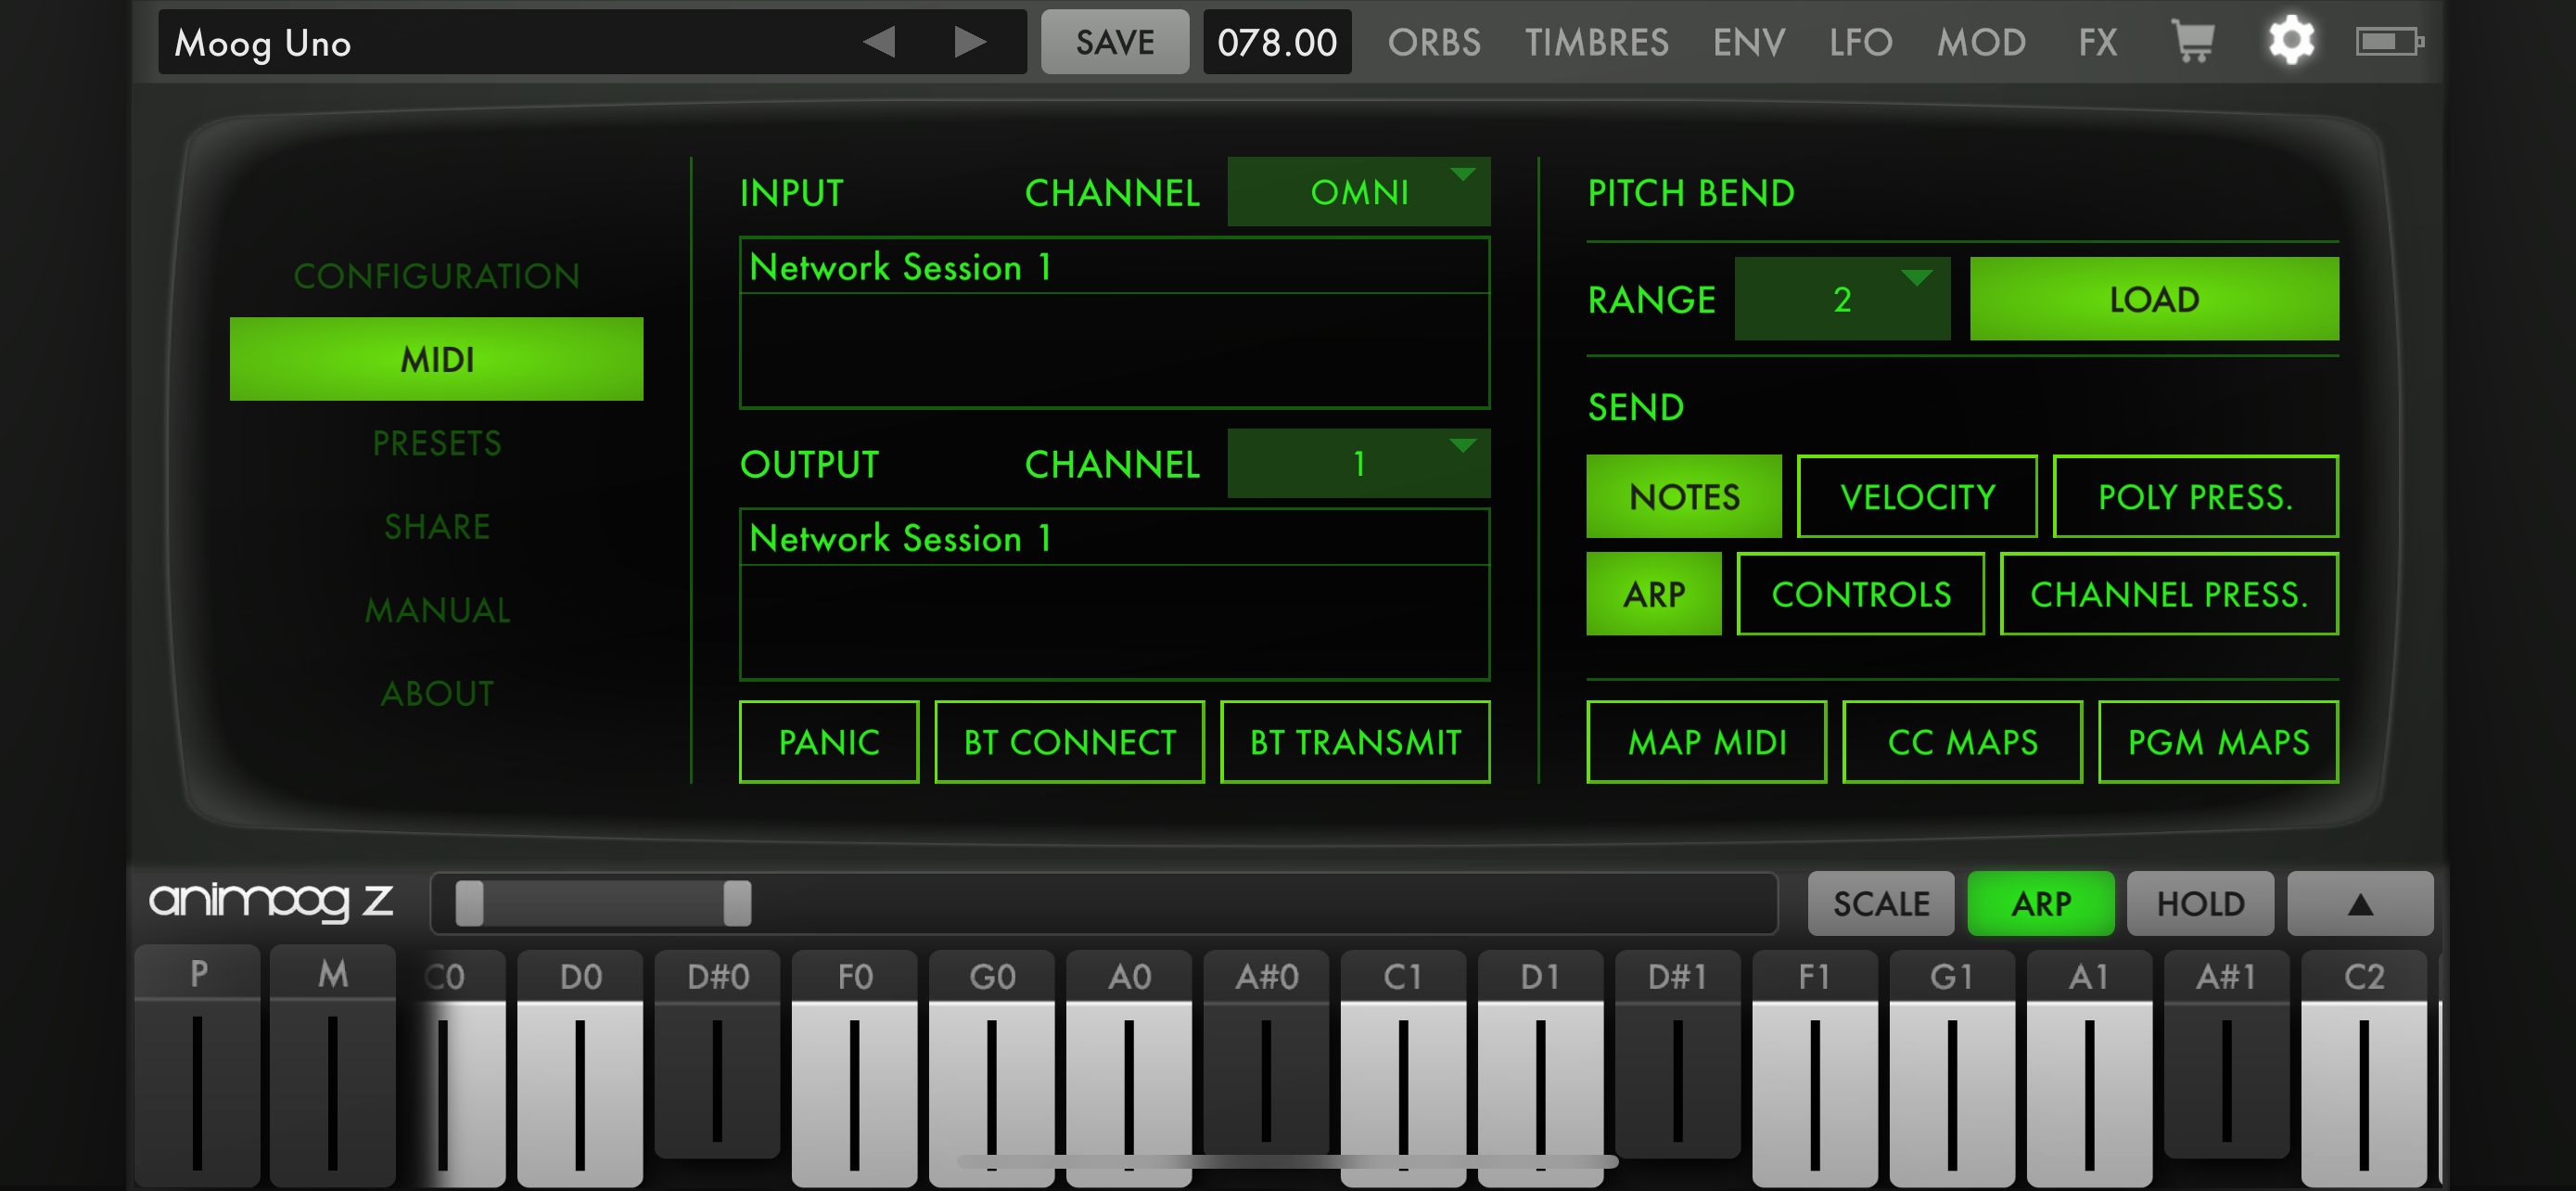
Next, open the settings panel with the gear icon, and activate the MIDI section in the left navigation panel. Press BT TRANSMIT to open the Bluetooth configuration panel for your iOS device. There, enable Advertise MIDI Service to advertise your iPhone as a Bluetooth MIDI peripheral and press DONE.

Connect MidiWrist Unleashed
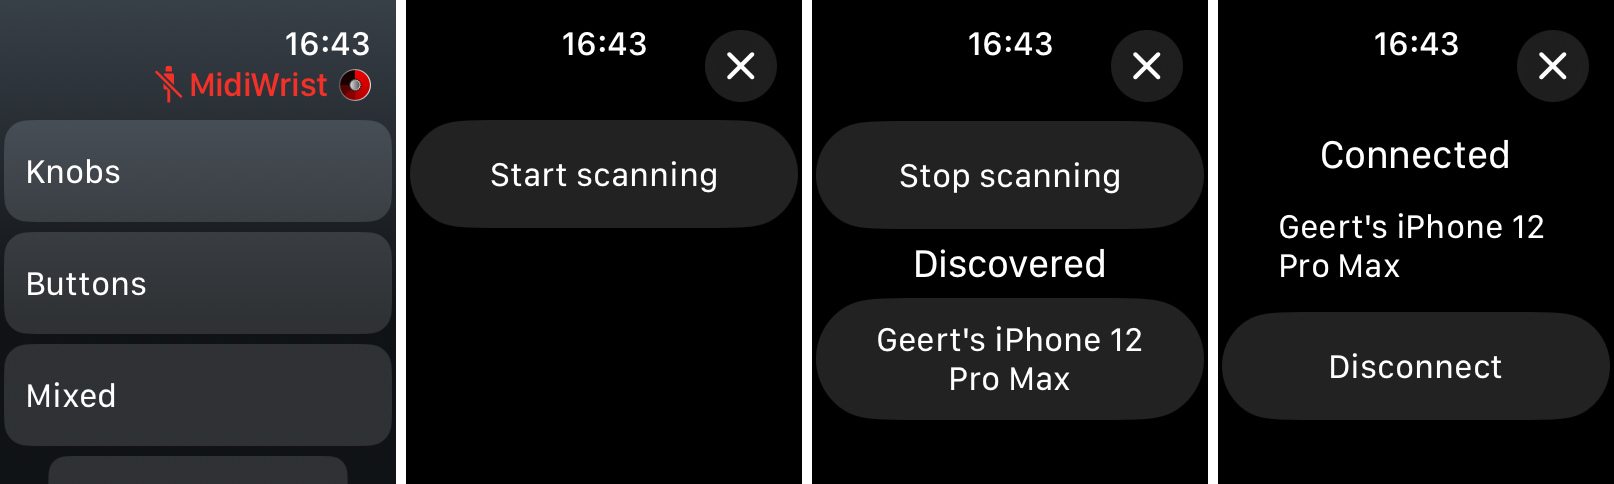
Launch MidiWrist Unleashed on your Apple Watch and notice that the MidiWrist preset name is red with a broken connection icon its left. This means that no Bluetooth MIDI connection is active. Tap the title to open the connection page.
In the connection page, start the discovery of Bluetooth LE MIDI devices by pressing the Start scanning button. You'll see your iPhone appear in the list below, tap the name of your iPhone to create a Bluetooth LE MIDI connection. Once connected, press the X icon in the top right corner to close the connection page.
Enable MIDI input from your watch in Animoog Z
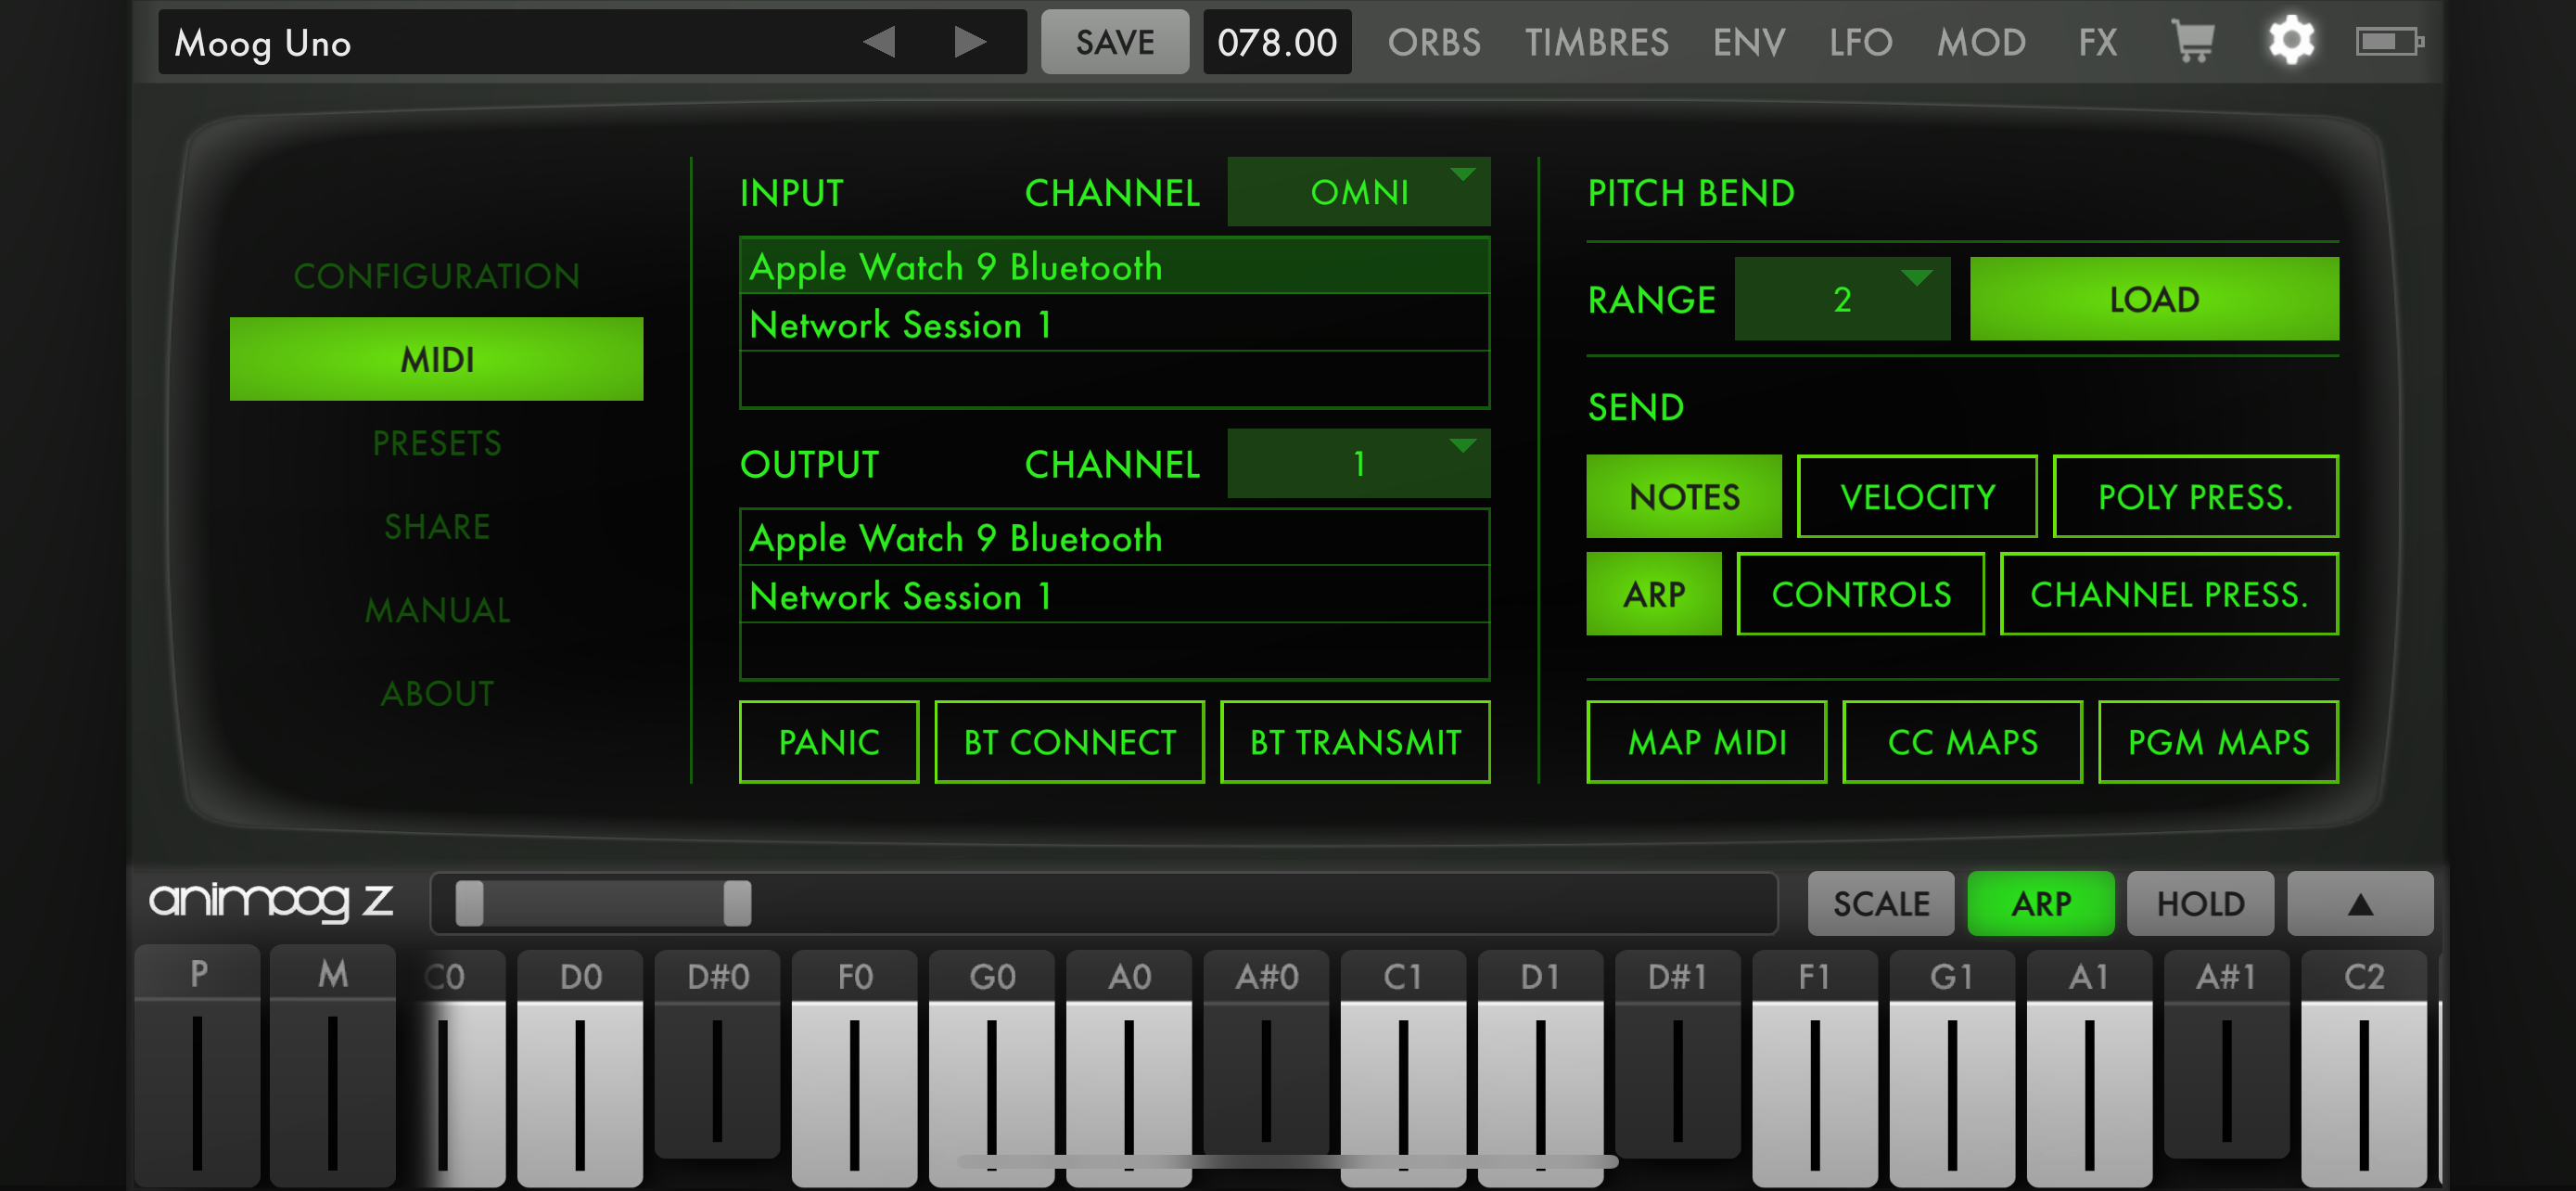
Back on your iPhone, you'll now see your watch as one of the MIDI input ports. Press it, so that it becomes highlighted, meaning that Animoog Z will be listening to MIDI messages coming in from your watch. Also make sure that the INPUT CHANNEL is set to OMNI.
Map Animoog Z controls to MidiWrist Unleashed messages
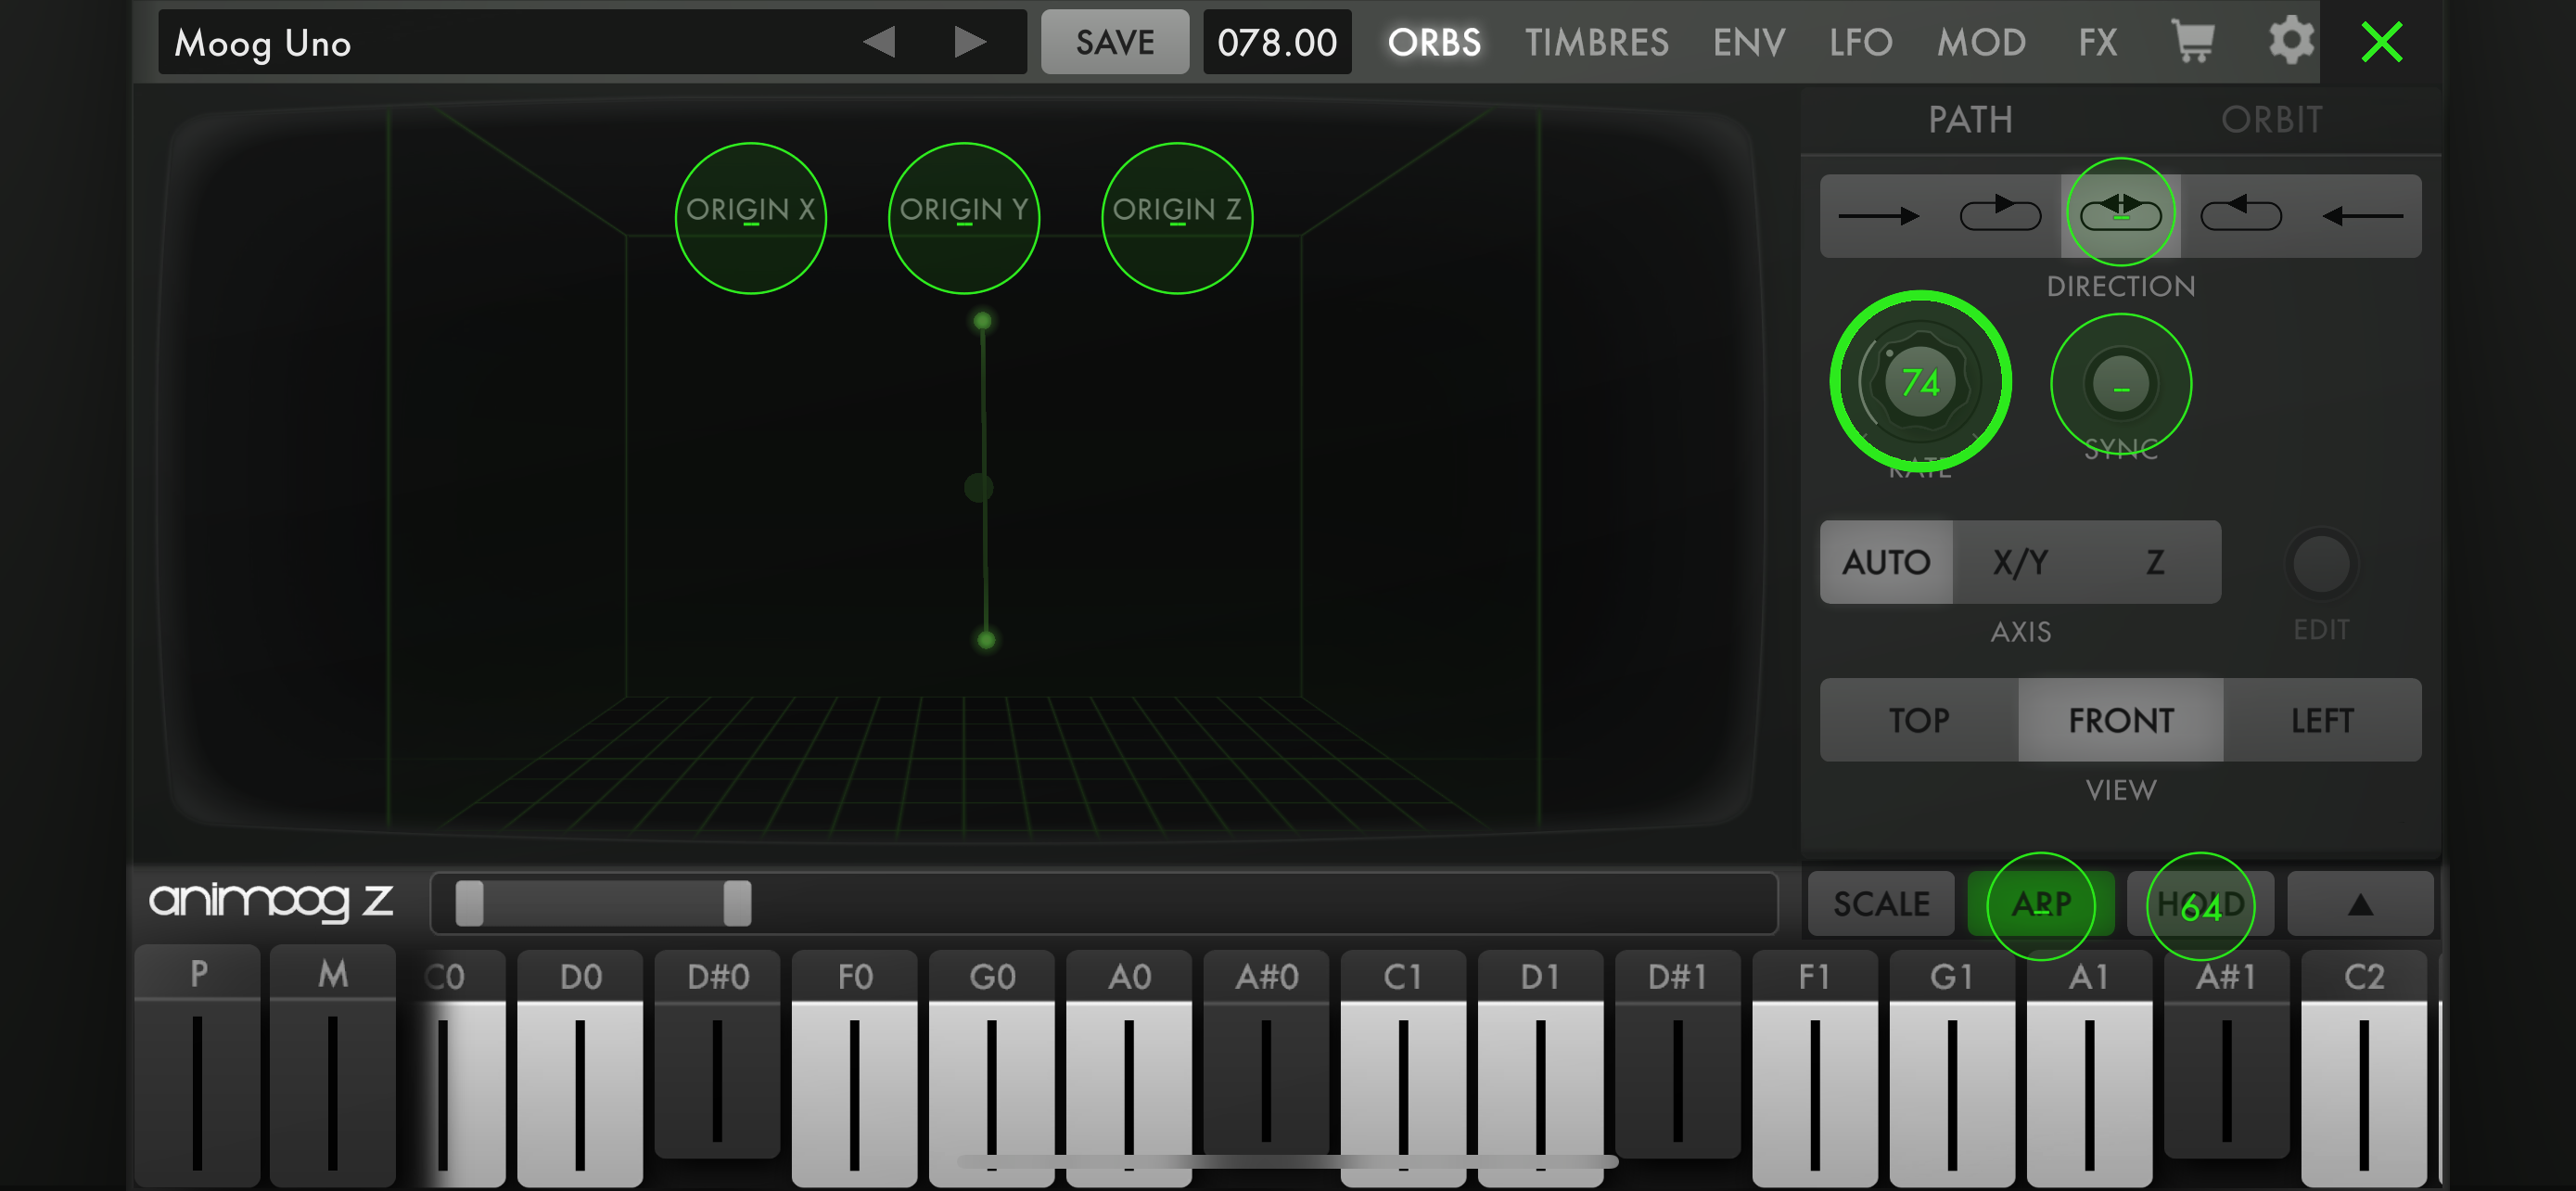
Now that MidiWrist Unleashed and Animoog Z are talking together, you need to let Animoog Z know what to do with the messages it receives. A convenient way to do this is to use MIDI mapping. In the Animoog Z MIDI settings panel, press MAP MIDI and the ORBS panel will appear with circles over the controls. Tap the circle over the RATE knob to make it start listening for MIDI messages.

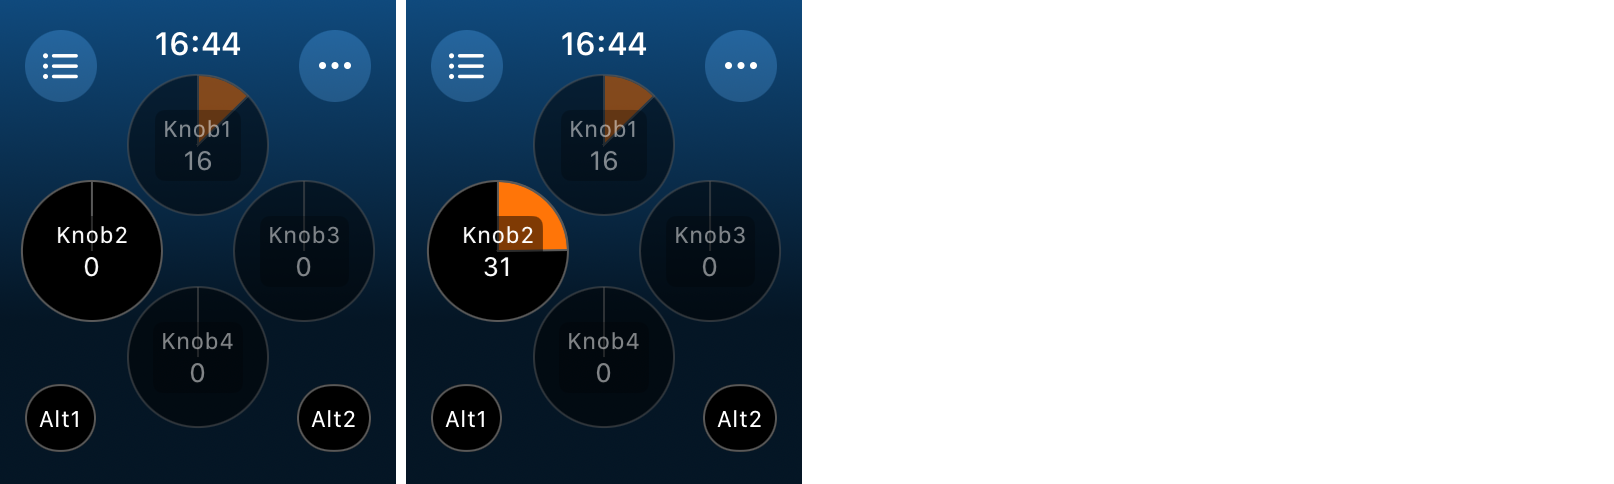
On your watch, tap the Knobs button to open the knobs panel. Make sure that only Knob 1 is enabled and that the other three knobs are grayed out. Tapping each knob allows you to enable or disable it. Now turn the digital crown to change the value of Knob 1.
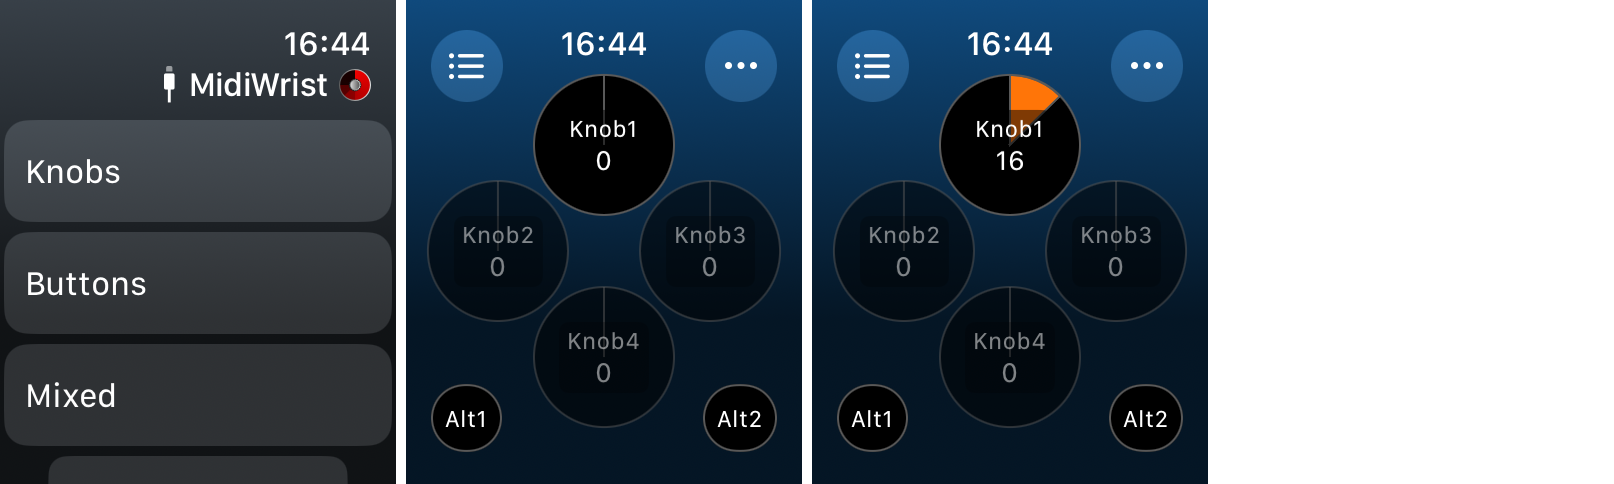
As soon at Animoog Z receives the MIDI message that was sent by MidiWrist Unleashed's knob, it will detect what the number of the CC message is and assign that to the RATE knob. You'll see the number 74 appear in the highlighted circle.
Now tap on the circle that's over ORIGIN X in Animoog Z to learn the message that this control should respond to.
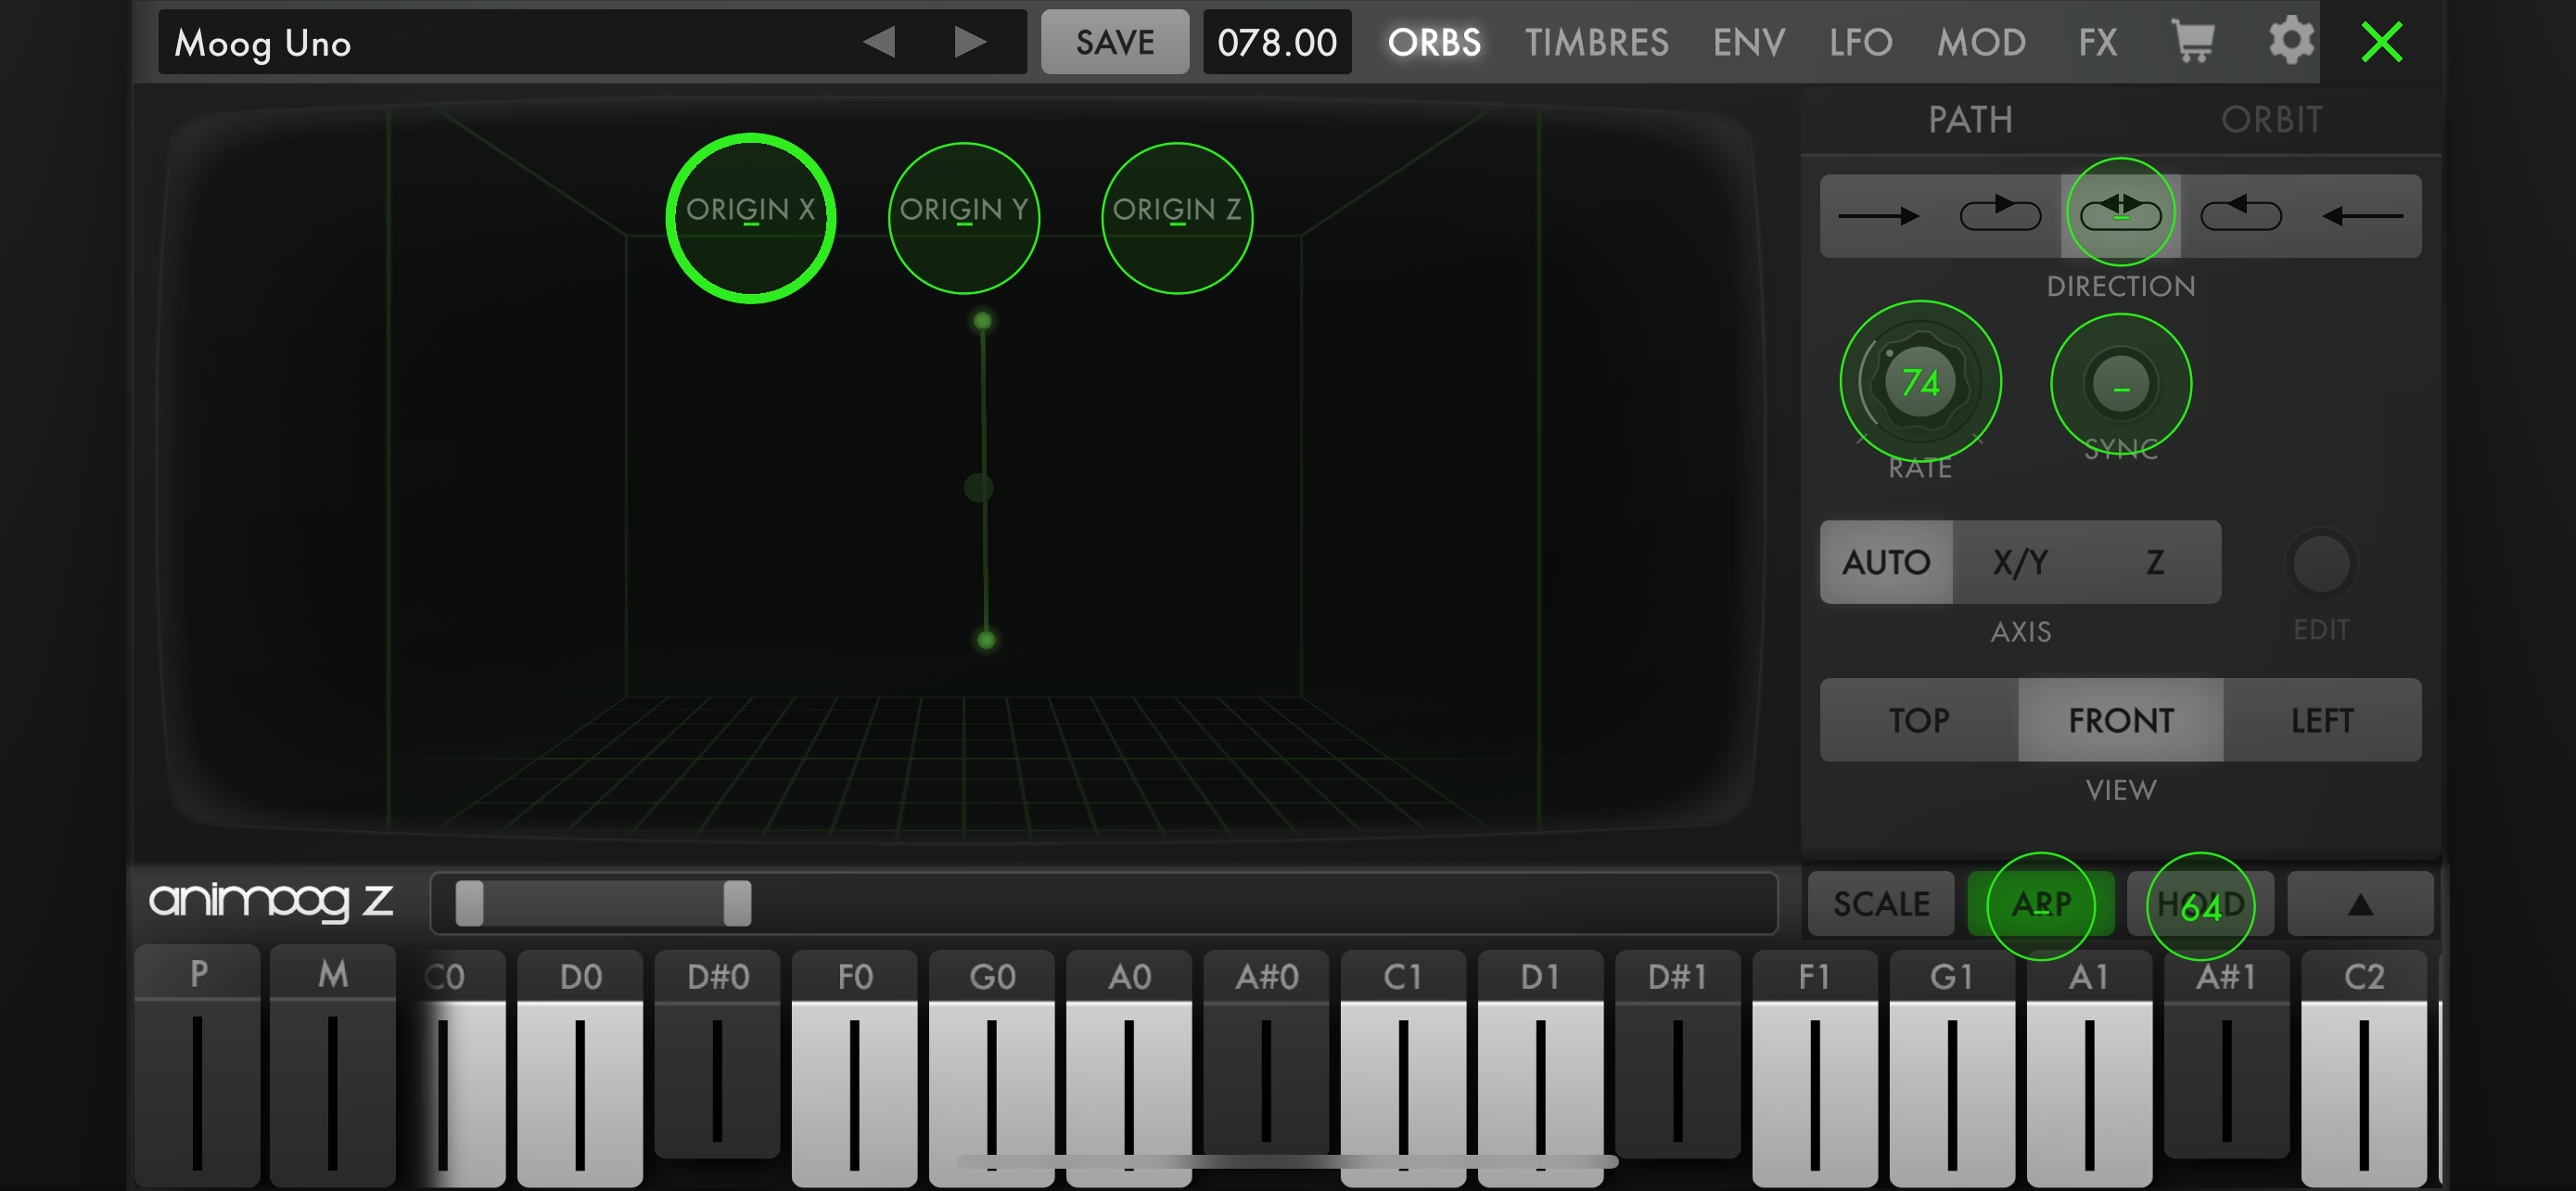
Back in MidiWrist Unleashed, tap Knob 1 to disable it, and tap Knob 2 to enable it. Knob 2 should be clearly visible and the other three knobs should be grayed out. Now turn your watch's digital crown again to change the value of Knob 2.
Animoog Z will now learn that ORIGIN X should respond to the MIDI CC message 71.
Finally, press the X button in the top right corner of Animoog Z to leave MAP MIDI mode.

Control Animoog Z with MidiWrist Unleashed
While the arpeggio is playing in Animoog Z, experiment with turning all four knobs in MidiWrist Unleashed with your digital crown. You'll notice that you can select any number of them to be controlled at once.
Knob 3 and Knob 4 by default already used messages that are standard for most synthesizers, allowing you to control the MOD WHEEL position and the VOLUME.
This is what each knob is now set up to control:
- Knob 1 : PATH RATE
- Knob 2 : ORIGIN X
- Knob 3 : MOD WHEEL
- Knob 4 : VOLUME
Congratulations on setting up your first MidiWrist Unleashed connection!
Reference Manual
You can find all the details about the MidiWrist Unleashed app in this section.
Configure Your Apple Watch
In order for MidiWrist Unleashed to be the most predicable and comfortable to use, there are a few recommended Apple Watch Settings.
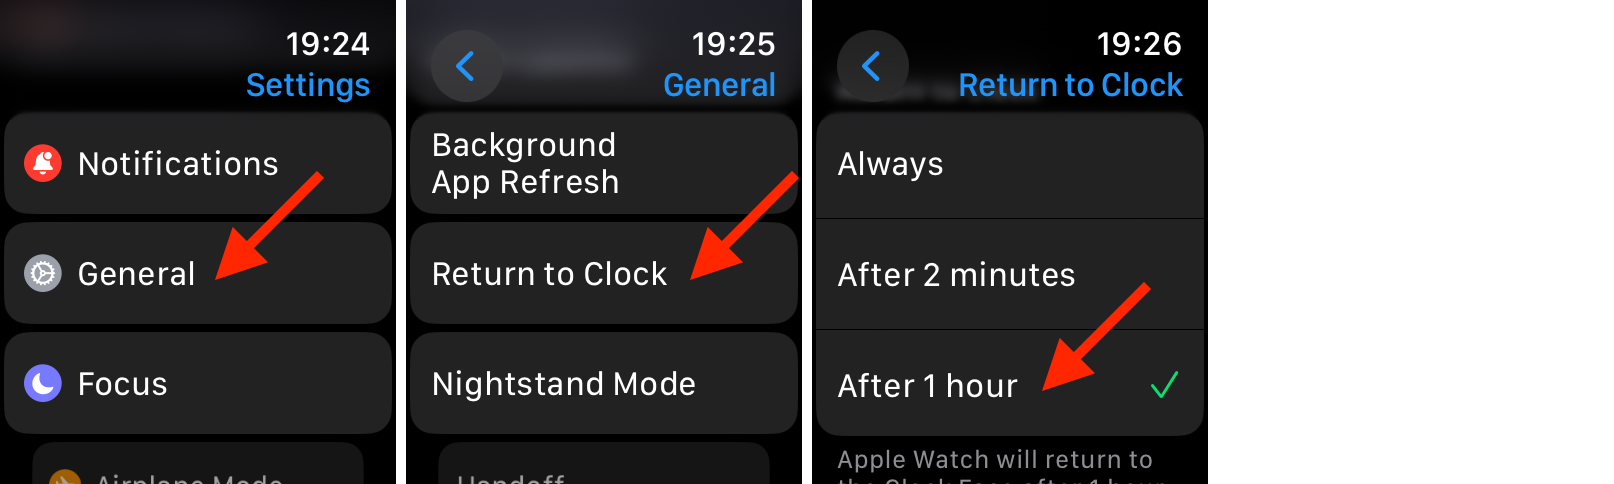
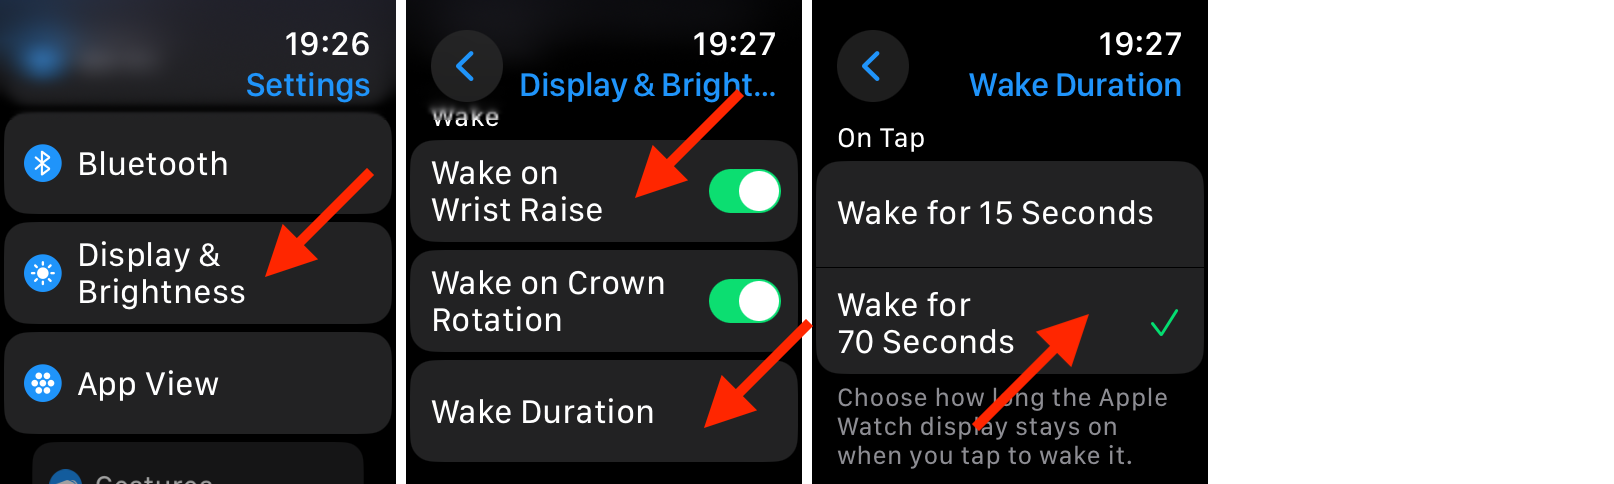
Wake Behavior
To be able to make immediate tweaks, even when a long time has passed, the following settings are a good idea to activate.
- Return to Clock after 1 Hour of displaying App
- Wake Display on Wrist Raise
- On Tap Wake for 70 Seconds
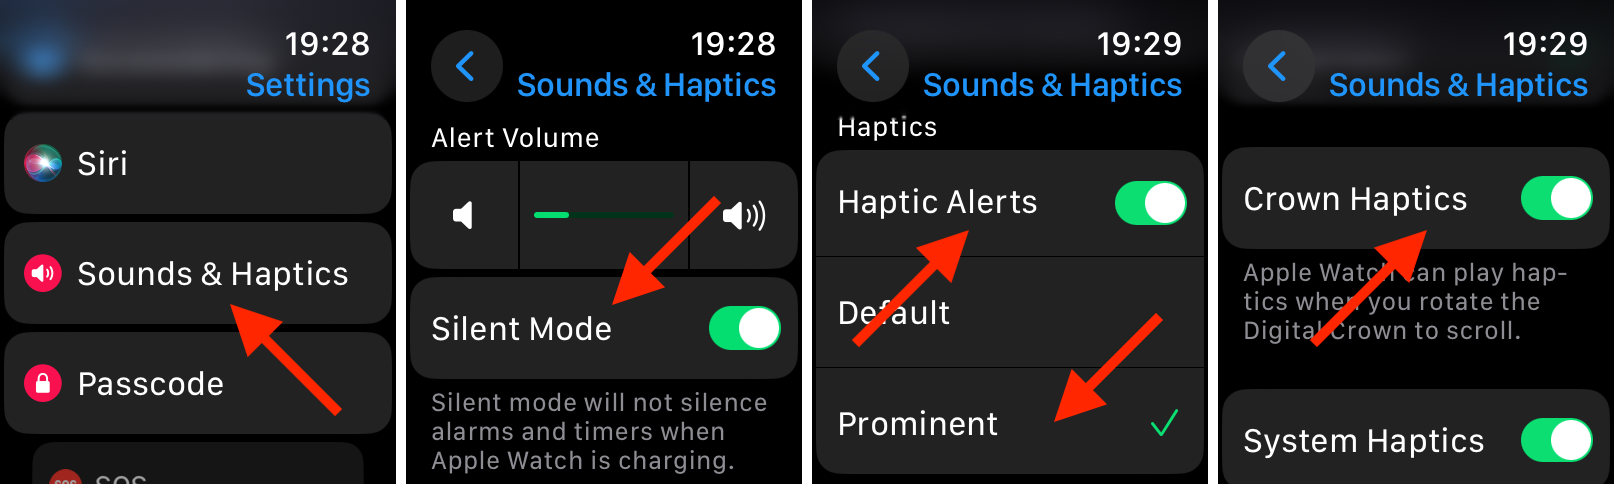
Haptics
Haptic feedback makes your Watch vibrate when you interact with MidiWrist Unleashed, this can be useful to make tweaks without looking or to get additional sensory confirmation of your intentions.
The following Sound & Haptics settings are a good idea to activate:
- Alert Volume > Silent Mode
to only feel the haptics and to not be disturbed by the alert sounds - Haptics > Haptic Alerts
To feel the haptic vibrations. - Haptics > Prominent
To feel the vibrations really well. - Crown Haptics
To make the digital crown feel more tangible.
NOTE: Haptic feedback in MidiWrist Unleashed needs to be enabled in the global settings of the app
Controller Panel List
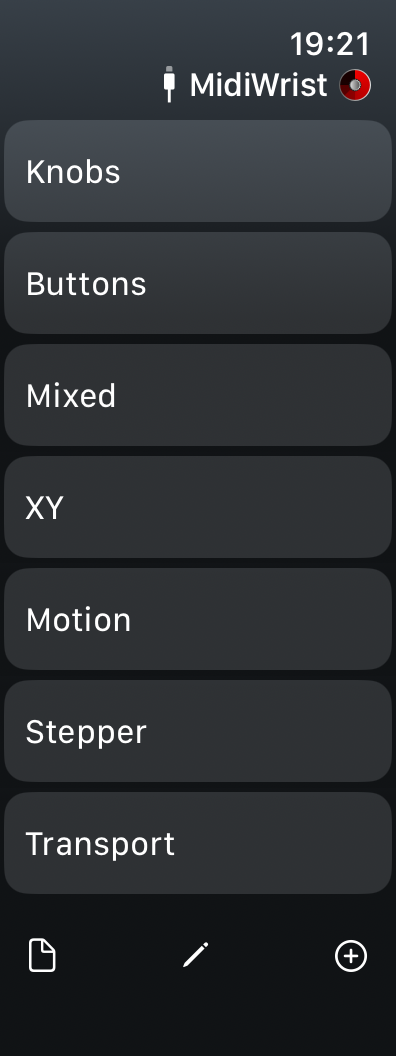
When MidiWrist Unleashed launches, you see the name of the current preset at the top with a connection icon and the app icon. The default preset is named MidiWrist.
Below the preset name, the controller panels that are part of the current preset are listed.
These panels can be freely deleted by swiping left and rearranged by long pressing on the label. New presets can also be added with the plus button at the bottom. You can have as many panels of any type as you want.
The controller panels come in five different fundamental types:
- Knobs & Buttons
- Motion
- Stepper
- Transport
- XY Pad
The next sections provide details for each of these panel types.
At the bottom of the controller panel list are three buttons:
- Show Preset List:
Show the list of presets that are stored withing MidiWrist Unleashed. - Edit Current Preset:
Edit the name and settings of the current preset. - Add Controller Panel:
Create a new controller panel of a selected type, give it a name and configure the panel layout.
Edit Current Preset
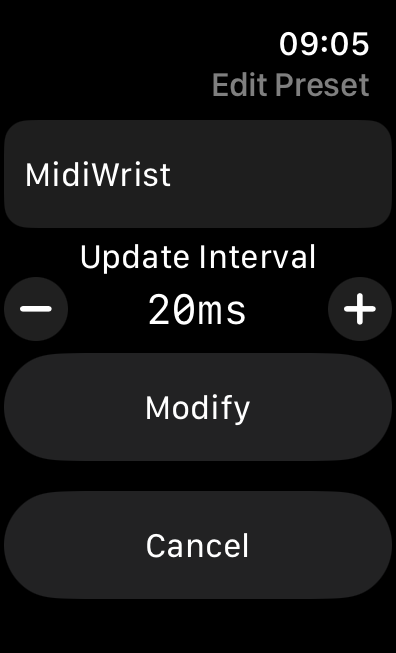
The edit preset panel allows you to change the name and settings of the current preset.
- Preset Name:
When changing the name, MidiWrist Unleashed will verify whether it already exists for another preset and disable the Modify button if that is the case. - Update Interval:
By default, MidiWrist Unleashed sends new MIDI values over the Bluetooth connection every 20ms. For most controls this is sufficient, however if you want to capture the most details from motion control, and your BLE receiver supports faster throughput, you can reduce the update interval down to 5ms. Also, if your BLE receiver struggles with a 20ms update interval, you can increase it up to 100ms.
Controller Panel Structure
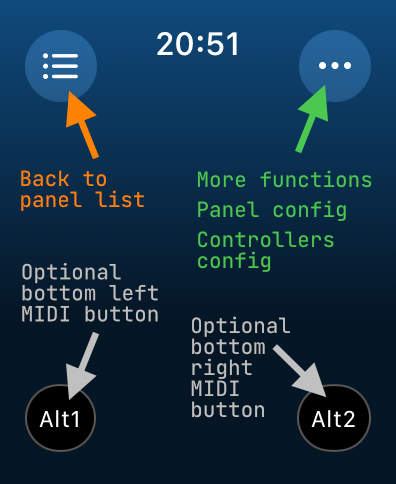
While each controller panel type is fundamentally different, the surrounding structure and interaction model is always the same.
- Top Left Button:
Closes the current panel and goes back to this preset's panel list. - Top Right Button:
Shows more functions that are specific for this panel type and provides access to additional corner buttons to configure the panel layout and the individual controllers on the panel. - Bottom Corner Buttons:
These are smaller MIDI buttons that can individually be hidden, allowing for up to 6 MIDI controls on a single panel, or for 2 button controls on panel types that otherwise can't have any.
Knobs & Buttons Panel

The default preset panels named Knobs, Buttons and Mixed are all of the same panel type, they're merely configured differently.
This panel type is the most flexible and configurable.
Knobs on the panel are used with your watch's Digital Crown. By tapping on each knob, you can enable or disable which knob is being changing when you turn the Digital Crown. Multiple knobs can be enabled simultaneously, providing you with macro control over multiple parameters.
Buttons on the panel are simply used by tapping them. Buttons can be configured to either toggle values on or off, or to be momentary, turning the button on as long as your finger is pressed and turning it off as soon as your finger is released.
More Functions
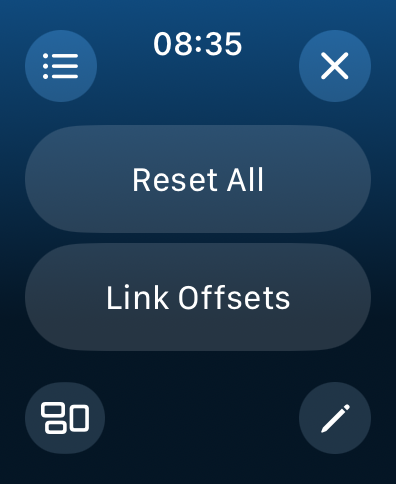
The following additional functions are available when pressing the triple-dot top right button:
- Reset All:
Resets all controls to their minimum values. - Link Offsets:
When more than one knob is available on the panel, linking them has the knobs respect their respective offsets even when they've moved to the extremes.
At the bottom are two additional buttons:
- Configure Panel Layout:
Configure the name, number of controls, visibility of corner buttons and background color of the panel. - Configure Individual Controls
Configure the label, function, behavior, MIDI message and color of each control on the panel.
Configure Panel Layout
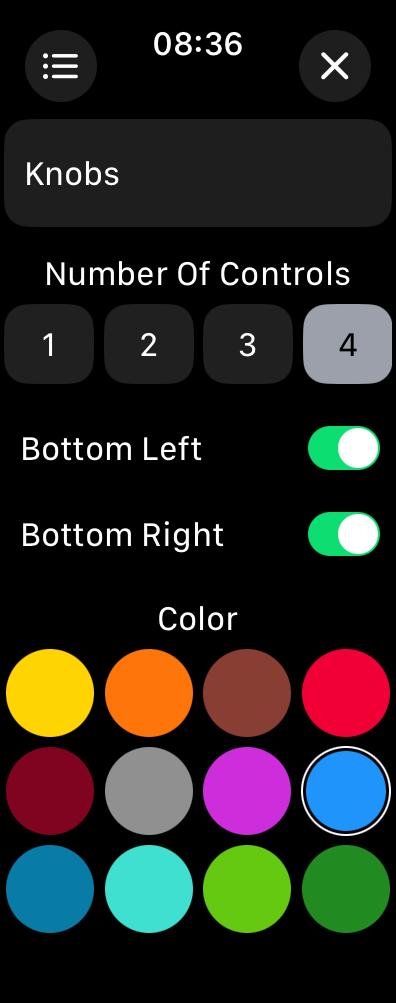
This page allows you to configure the layout and features of the entire controllers panel.
From top to bottom:
- Label:
The label associated with the panel, this is how it will appear in the preset's panel list. - Number Of Controls:
How many knobs and buttons that should be shown in the center area of this panel. - Bottom Left:
Whether the bottom left small MIDI button should be visible or not. - Bottom Right:
Whether the bottom right small MIDI button should be visible or not. - Color:
The background color of this panel.
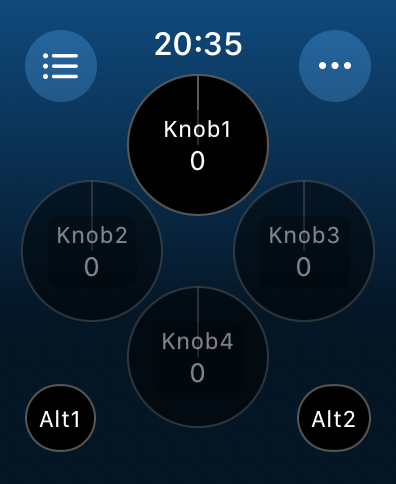
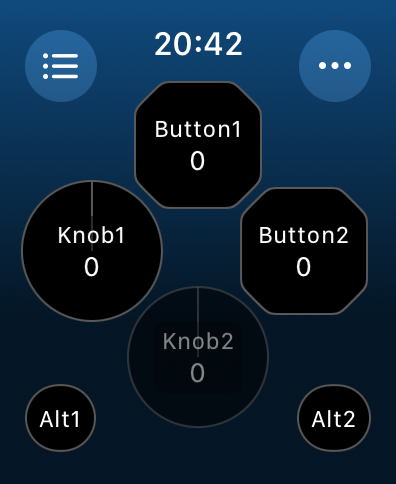
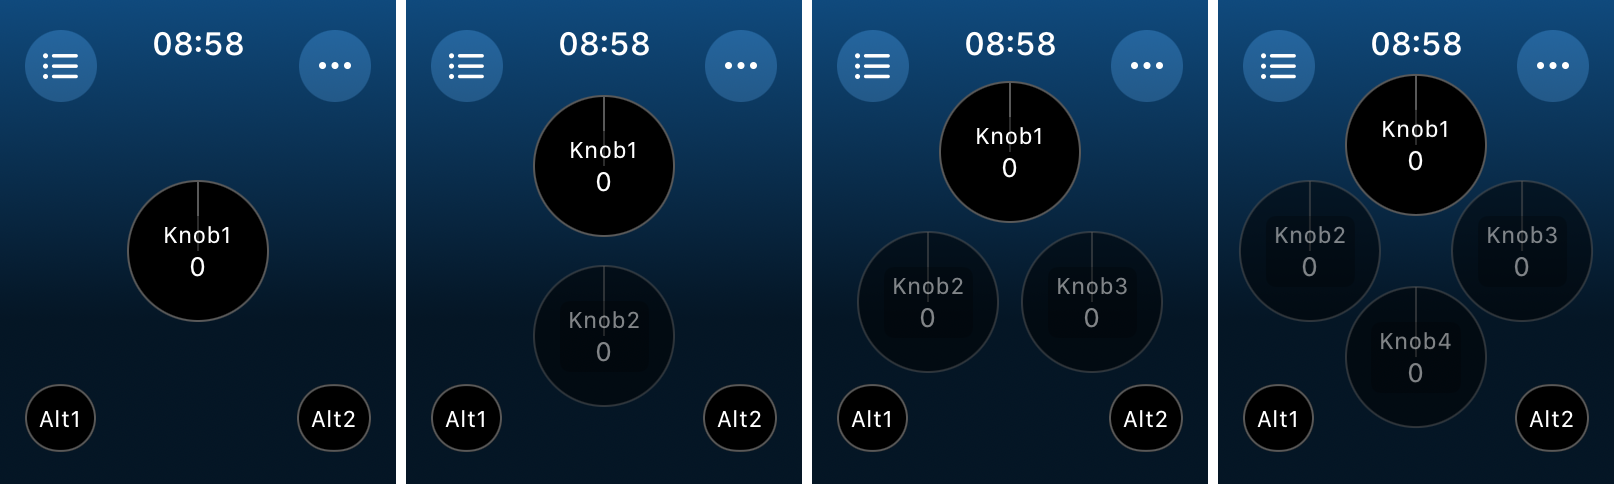
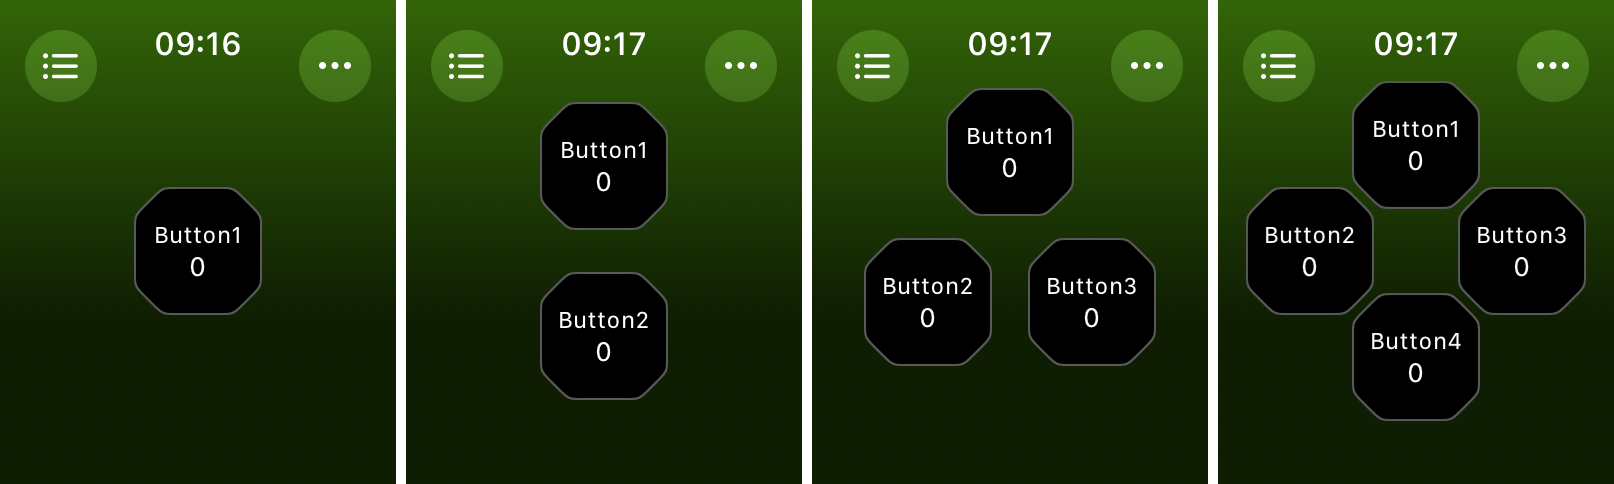
Below is an example of how the number of controls changes the layout of the panel, with and without the optional bottom corner buttons:
Configure Individual Controls

When you press the bottom right Configure Individual Controls button in the More Functions page, the same layout of the panel appears but with a dotted outline for each of the controls.
Tapping one of the controls will bring up a dedicated page that allows you to change every aspect of that control. Depending on the type of the control, and the MIDI message that is being sent out, these configuration options will vary.
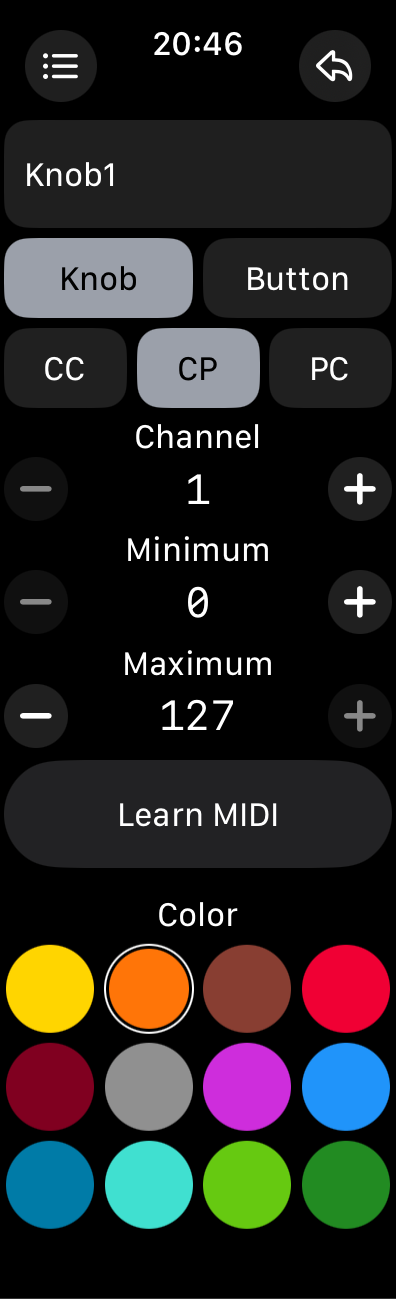
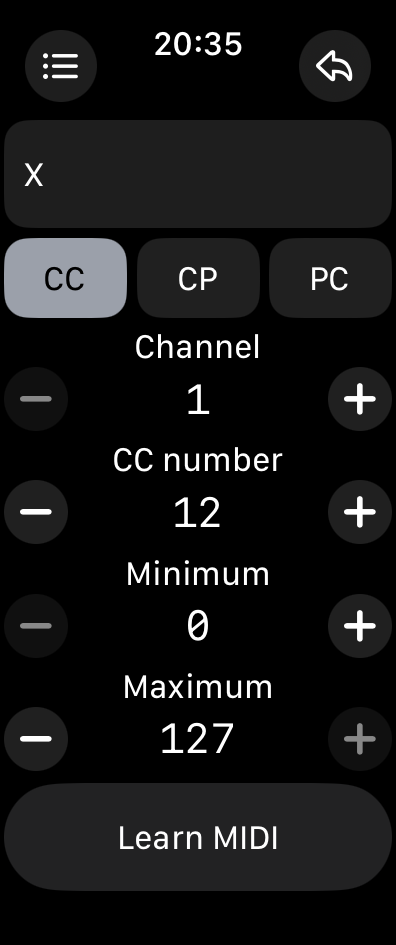
Knob CC (Control Change) Configuration
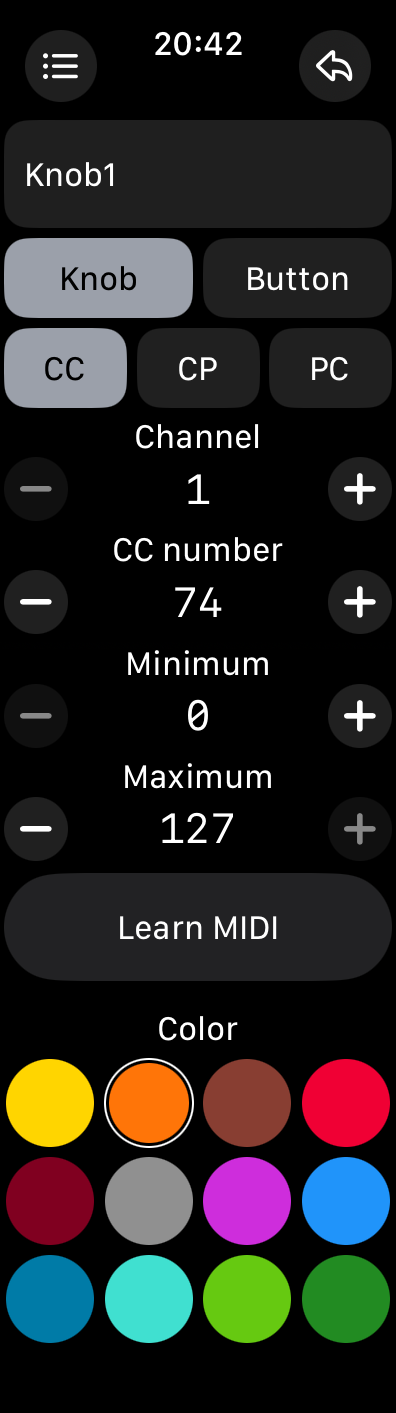
The following configuration options are available when the control is a knob, and when the MIDI message type is CC:
- Label:
The label that will be shown for the control. - Type:
Change the type to either be a knob or a button. Changing the type will change the available configuration options. - MIDI Message Type:
A choice of Control Change (CC), Channel Pressure (CP) and Program Change (PC) MIDI message types. Selecting a different MIDI message type will change the available configuration options. - Channel:
The MIDI channel that will be used by the control. - CC number:
The MIDI CC number that will be used by the control. - Minimum:
The minimum CC value that will be used by the control. - Maximum:
The maximum CC value that will be used by the control. - Learn MIDI:
Toggling this button with make MidiWrist Unleashed listen to incoming MIDI messages and automatically configure the MIDI message type based on the incoming message, if the controller type supports it. - Color:
The background color of the control.
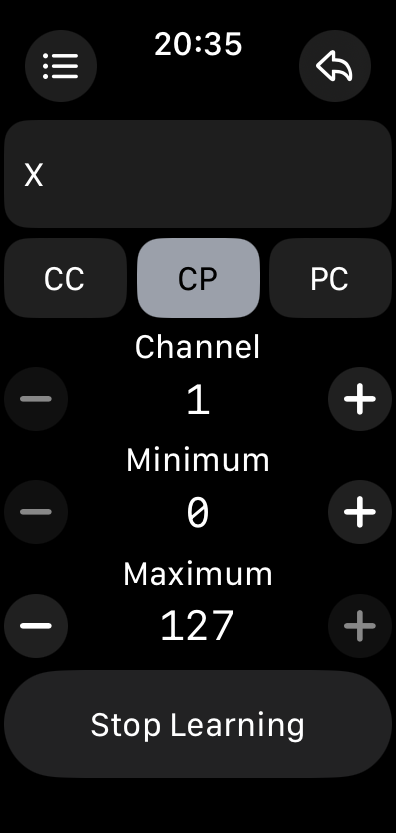
Knob CP (Channel Pressure) Configuration
The following configuration options are available when the control is a knob, and when the MIDI message type is CP:
- Label:
The label that will be shown for the control. - Type:
Change the type to either be a knob or a button. - MIDI Message Type:
A choice of MIDI message type. - Channel:
The MIDI channel that will be used by the control. - Minimum:
The minimum pressure value that will be used by the control. - Maximum:
The maximum pressure value that will be used by the control. - Learn MIDI:
Learn MIDI message type by listening to incoming MIDI. - Color:
The background color of the control.
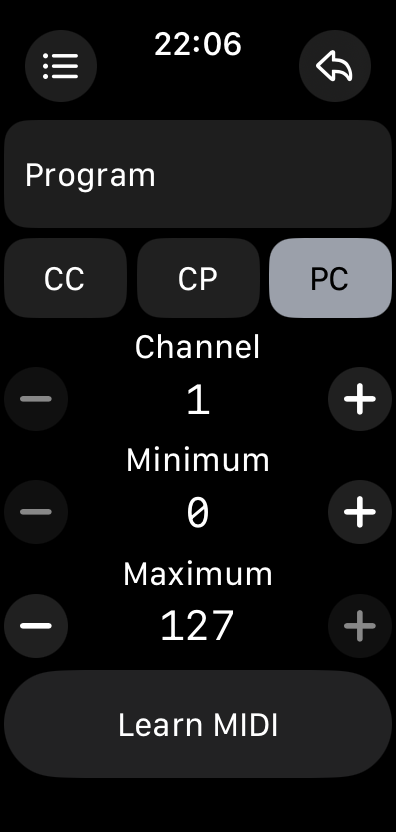
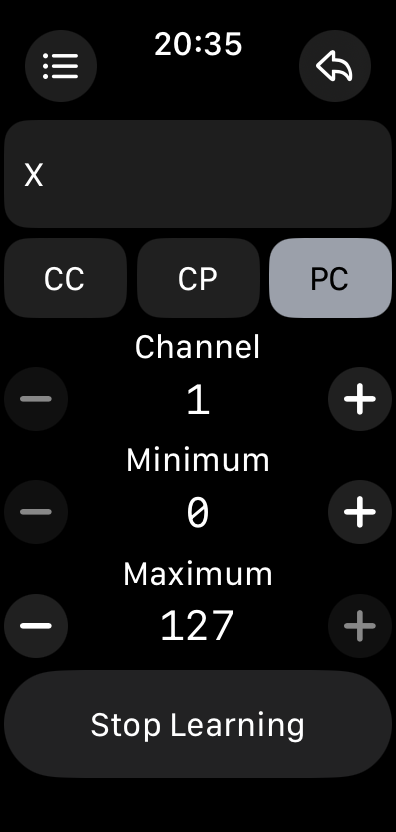
Knob PC (Program Change) Configuration
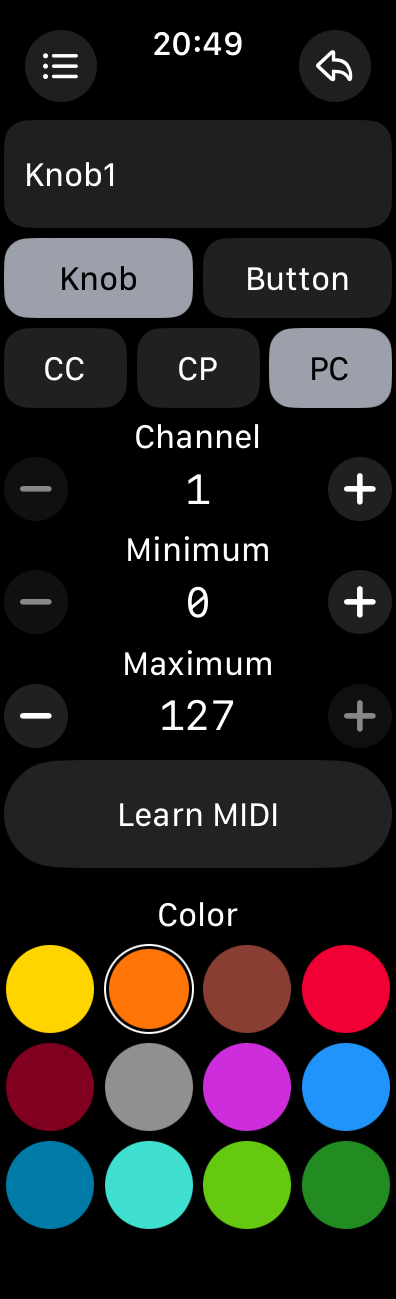
The following configuration options are available when the control is a knob, and when the MIDI message type is PC:
- Label:
The label that will be shown for the control. - Type:
Change the type to either be a knob or a button. - MIDI Message Type:
A choice of MIDI message type. - Channel:
The MIDI channel that will be used by the control. - Minimum:
The minimum program number that will be used by the control. - Maximum:
The maximum program number that will be used by the control. - Learn MIDI:
Learn MIDI message type by listening to incoming MIDI. - Color:
The background color of the control.
Button CC (Control Change) Configuration
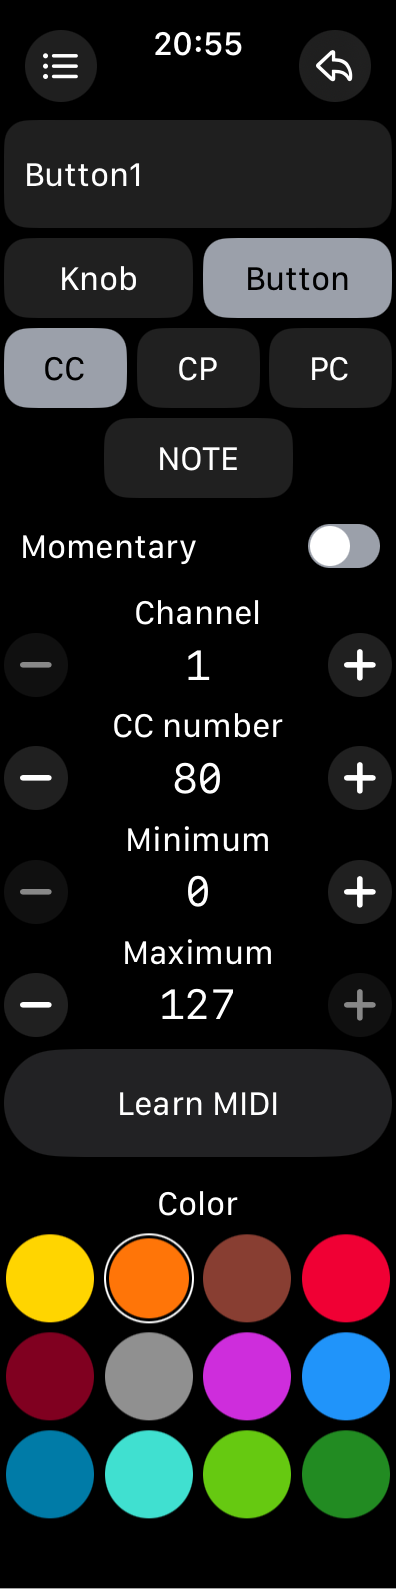
The following configuration options are available when the control is a button, and when the MIDI message type is CC:
- Label:
The label that will be shown for the control. - Type:
Change the type to either be a knob or a button. - MIDI Message Type:
A choice of Control Change (CC), Channel Pressure (CP), Program Change (PC) MIDI and Note On/Off (NOTE) message types. Selecting a different MIDI message type will change the available configuration options. - Momentary:
When enabled, the button will automatically turn off when you release your finger, otherwise the button toggles between on and off. - Channel:
The MIDI channel that will be used by the control. - CC number:
The MIDI CC number that will be used by the control. - Minimum:
The CC value that will be used when the button is off. - Maximum:
The CC value that will be used when the button is on. - Learn MIDI:
Toggling this button with make MidiWrist Unleashed listen to incoming MIDI messages and automatically configure the MIDI message type based on the incoming message, if the controller type supports it. - Color:
The background color of the control.
Button CP (Channel Pressure) Configuration
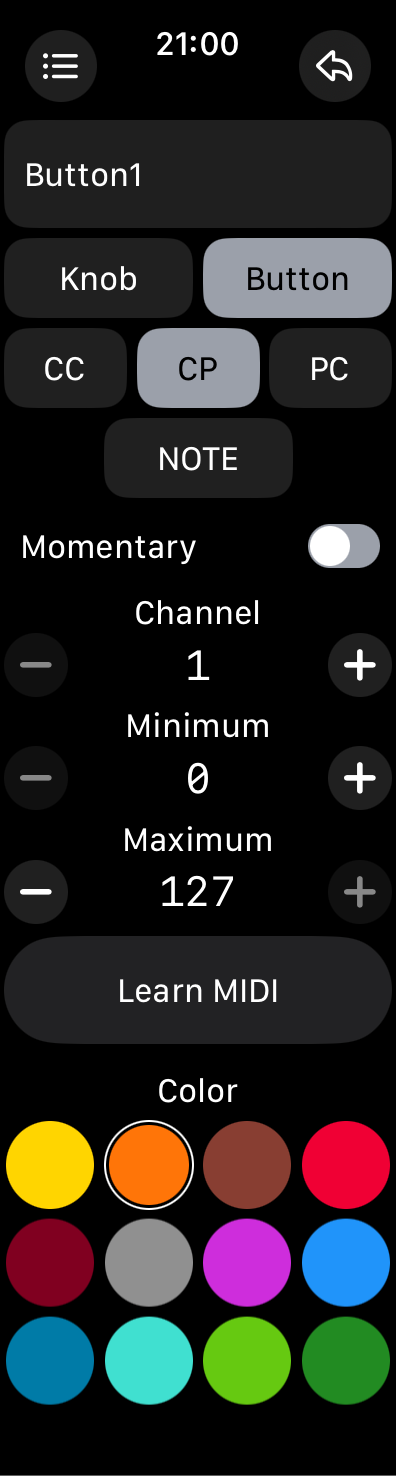
The following configuration options are available when the control is a button, and when the MIDI message type is CP:
- Label:
The label that will be shown for the control. - Type:
Change the type to either be a knob or a button. - MIDI Message Type:
A choice of MIDI message type. - Momentary:
The on/off behavior of the button. - Channel:
The MIDI channel that will be used by the control. - Minimum:
The pressure value that will be used when the button is off. - Maximum:
The pressure value that will be used when the button is on. - Learn MIDI:
Learn MIDI message type by listening to incoming MIDI. - Color:
The background color of the control.
Button PC (Program Change) Configuration
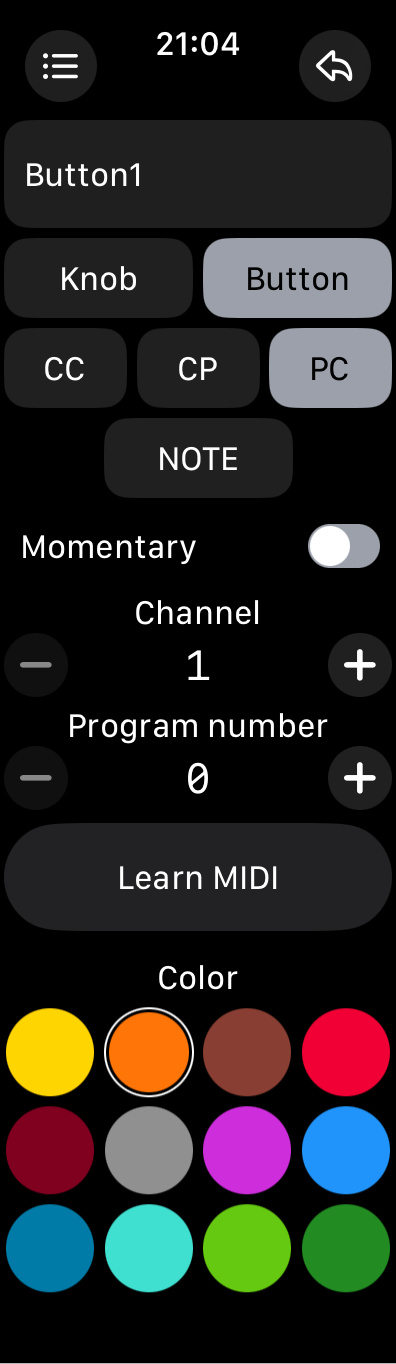
The following configuration options are available when the control is a button, and when the MIDI message type is PC:
- Label:
The label that will be shown for the control. - Type:
Change the type to either be a knob or a button. - MIDI Message Type:
A choice of MIDI message type. - Momentary:
The on/off behavior of the button. - Channel:
The MIDI channel that will be used by the control. - Program number:
The program number that will be sent by the button when it is turned on. - Learn MIDI:
Learn MIDI message type by listening to incoming MIDI. - Color:
The background color of the control.
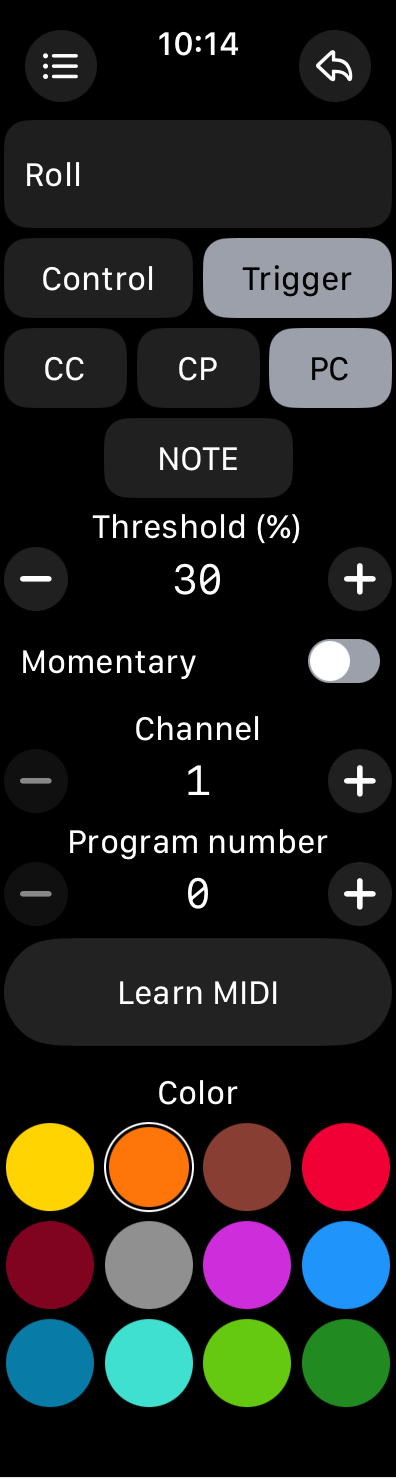
Button NOTE (Note On/Off) Configuration
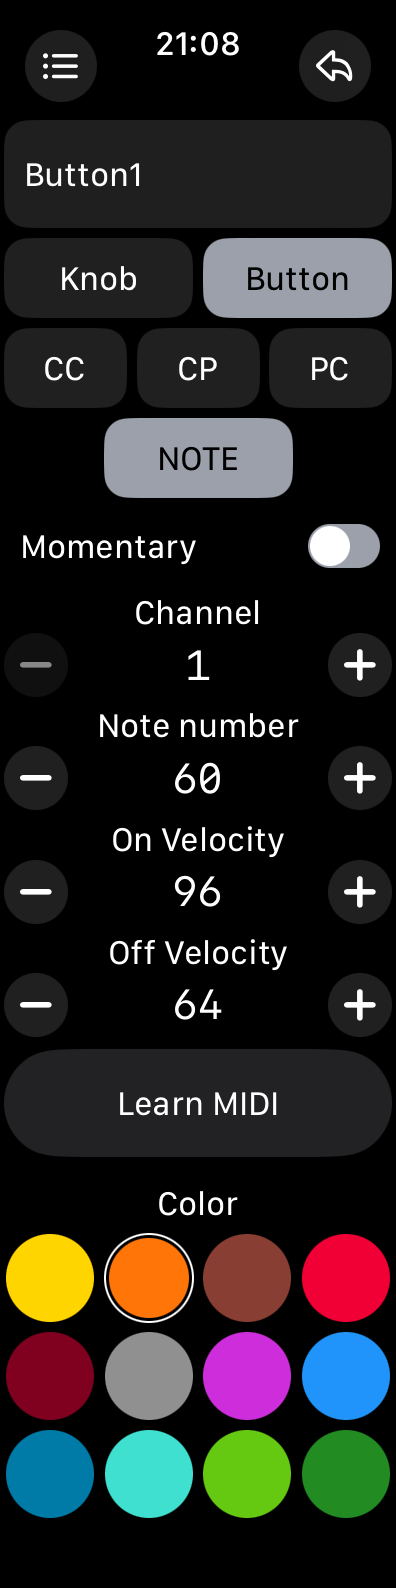
The following configuration options are available when the control is a button, and when the MIDI message type is NOTE:
- Label:
The label that will be shown for the control. - Type:
Change the type to either be a knob or a button. - MIDI Message Type:
A choice of MIDI message type. - Momentary:
The on/off behavior of the button. - Channel:
The MIDI channel that will be used by the control. - Note number:
The note number that will be sent by the button when it is turned on. - On velocity:
The note velocity that will be used by the button when it is turned on. - Off velocity:
The note velocity that will be used by the button when it is turned off. - Learn MIDI:
Learn MIDI message type by listening to incoming MIDI. - Color:
The background color of the control.
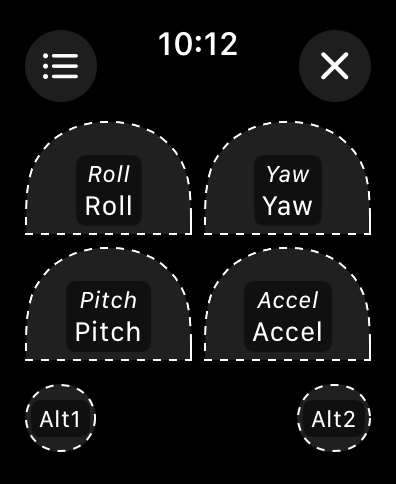
Motion Panel
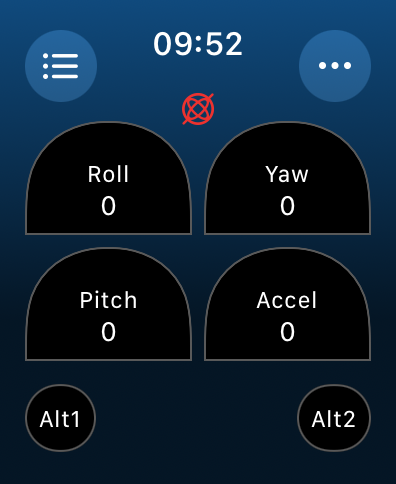
The motion panel type allows you to send MIDI messages based on the position of your watch in physical space. The three dimensional rotation angles (Roll, Yaw and Pitch) and the acceleration velocity of your motion (Accel), allow you to very naturally control MIDI devices by simply moving your hand around.
In order for the motion data to be sent continuously in real-time, even when the watch is turned away from you, Apple requires users to manually start a Workout. This can be done by accessing the More Functions panel with the top right button or by tapping the red gyroscope icon.
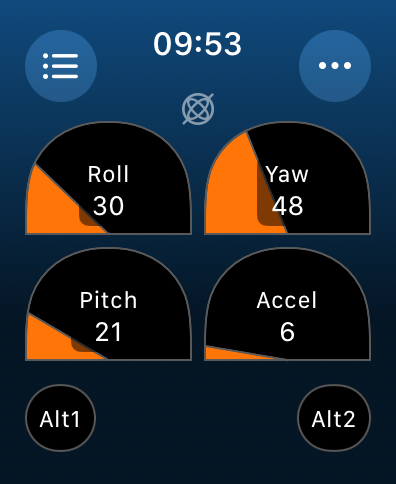
Each motion control can either send out a continuous control stream, similarly to a knob, or can behave as a trigger where once a threshold is exceeded, the control switches between its on and off value, similarly to a button.
When operating as a trigger, the visual feedback of that control will change, showing the threshold limit with a gray background and the current motion value as a rotating gray line. This makes is really clear when the threshold is exceeded and whether additional configuration tweaks are necessary for your purpose.
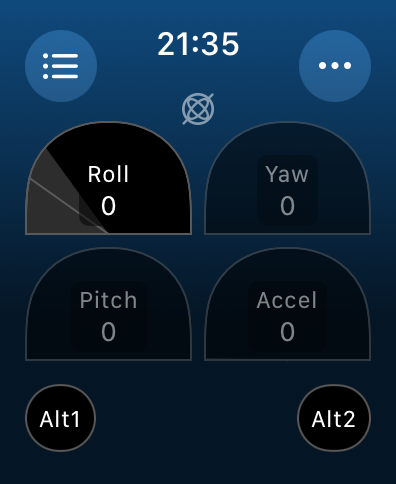
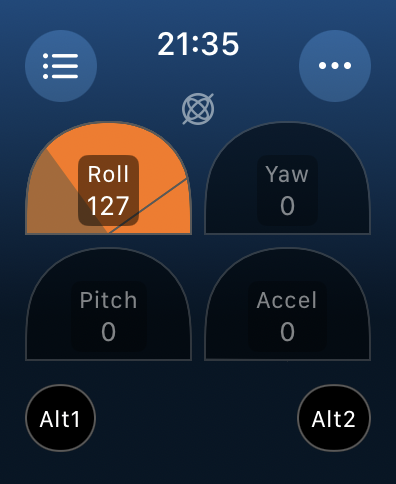
By tapping on each motion control, you can enable or disable that data from being sent out. Sometimes it can be a lot to have all 4 sending data as you move your hand, by disabling some motion controls, the MIDI data stream can become more streamlined if that's what you want.
Once a workout is started, motion data will be sent out over MIDI as long as the motion panel is the currently active panel. As soon as you switch back to the panel list, the workout will automatically be stopped, as well as the motion data.
NOTE: depending on how you use motion control, you might want to tweak the Update Interval setting in the Edit Preset panel. Faster updates will send more of your motion nuances, if your Bluetooth receiver is able to handle the throughput.
More Functions
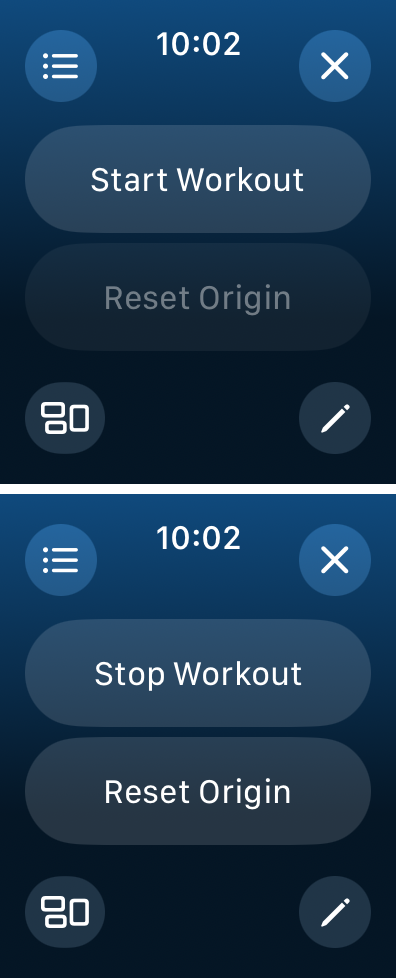
The following additional functions are available when pressing the triple-dot top right button:
- Start Workout:
Starts a workout on your watch so that real-time motion data will continue being sent out even when your watch is oriented away from you. The gyroscope on the motion panel will turn white. - Stop Workout:
Stop the motion workout on your watch, this will immediately stop sending out motion data. The gyroscope on the motion panel will turn red. - Reset Origin:
When a workout is active, this resets the origin of your motion to the current position of your hand.
At the bottom are two additional buttons:
- Configure Panel Layout:
Configure the label, visibility of corner buttons and background color of the panel. - Configure Individual Controls
Configure the label, function, behavior, MIDI message and color of each control on the panel.
Configure Panel Layout
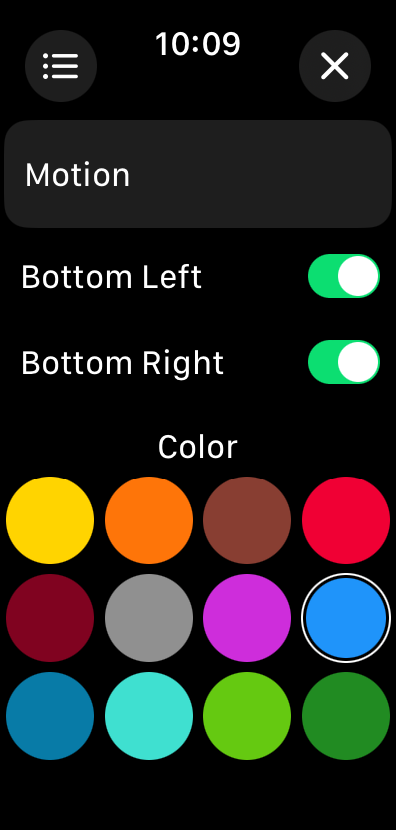
This page allows you to configure the layout and features of the entire motion panel.
From top to bottom:
- Label:
The label associated with the panel, this is how it will appear in the preset's panel list. - Bottom Left:
Whether the bottom left small MIDI button should be visible or not. - Bottom Right:
Whether the bottom right small MIDI button should be visible or not. - Color:
The background color of this panel.
Configure Individual Controls
When you press the bottom right Configure Individual Controls button in the More Functions page, the same layout of the panel appears but with a dotted outline for each of the controls.
Tapping one of the controls will bring up a dedicated page that allows you to change every aspect of that control. Depending on the type of the control, and the MIDI message that is being sent out, these configuration options will vary.
Control CC (Control Change) Configuration
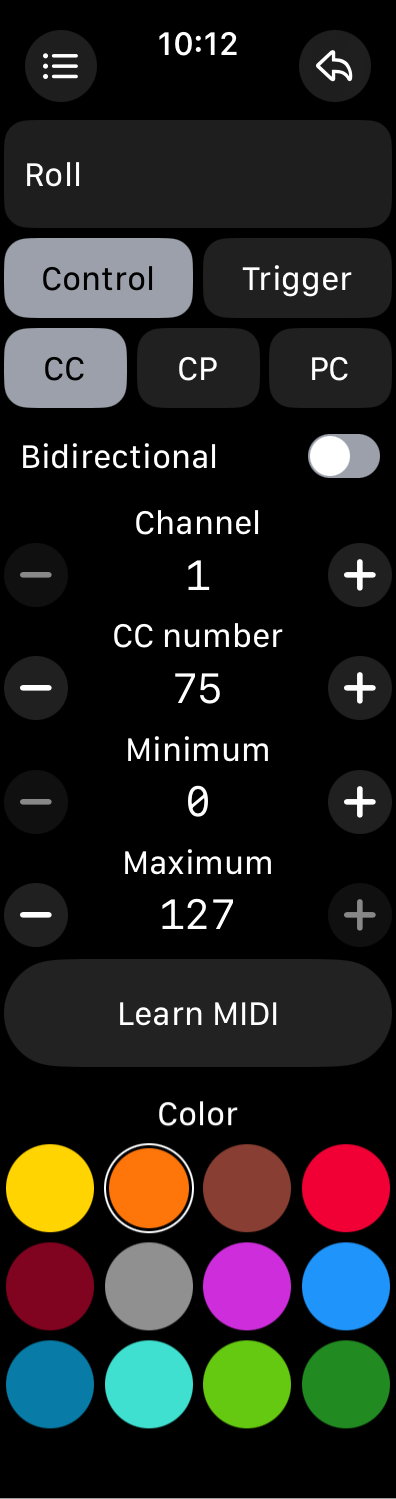
The following configuration options are available when the motion data behaves as a control, and when the MIDI message type is CC:
- Label:
The label that will be shown for the control. - Type:
Change the type to either be a control or a trigger. Changing the type will change the available configuration options. - MIDI Message Type:
A choice of Control Change (CC), Channel Pressure (CP) and Program Change (PC) MIDI message types. Selecting a different MIDI message type will change the available configuration options. - Bidirectional:
When bidirectional is enabled, the origin will be halfway between minimum and maximum, allowing movement in both directions. - Channel:
The MIDI channel that will be used by the control. - CC number:
The MIDI CC number that will be used by the control. - Minimum:
The minimum CC value that will be used by the control. - Maximum:
The maximum CC value that will be used by the control. - Learn MIDI:
Toggling this button with make MidiWrist Unleashed listen to incoming MIDI messages and automatically configure the MIDI message type based on the incoming message, if the controller type supports it. - Color:
The background color of the control.
Control CP (Channel Pressure) Configuration
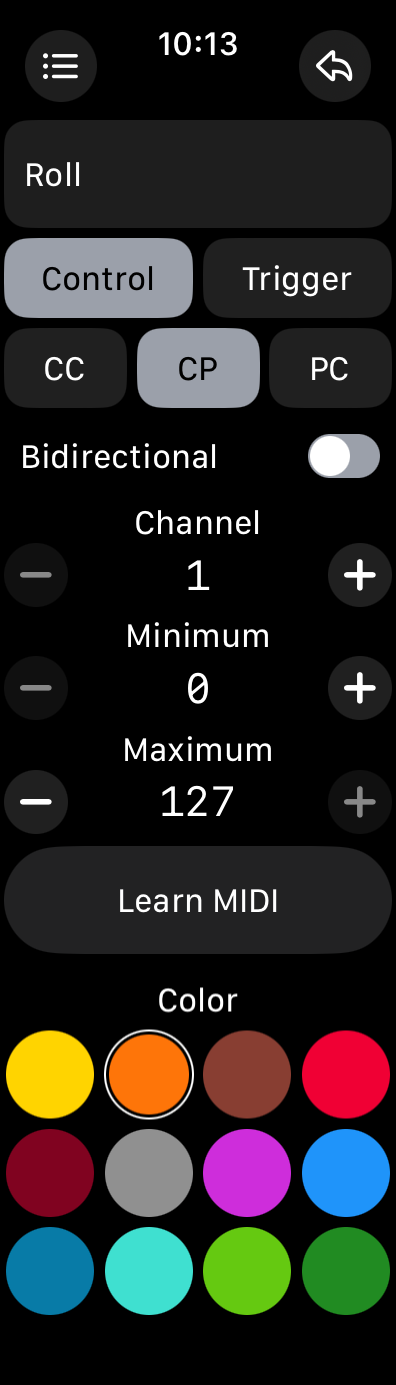
The following configuration options are available when the motion data behaves as a control, and when the MIDI message type is CP:
- Label:
The label that will be shown for the control. - Type:
Change the type to either be a control or a trigger. - MIDI Message Type:
A choice of MIDI message type. - Bidirectional:
The bidirectional behavior of the control - Channel:
The MIDI channel that will be used by the control. - Minimum:
The minimum pressure value that will be used by the control. - Maximum:
The maximum pressure value that will be used by the control. - Learn MIDI:
Learn MIDI message type by listening to incoming MIDI. - Color:
The background color of the control.
Control PC (Program Change) Configuration
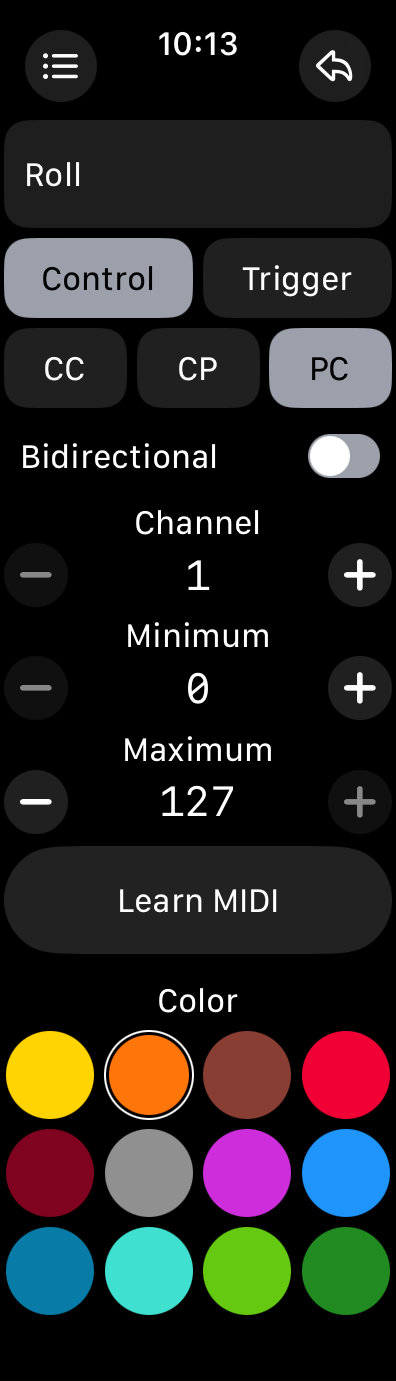
The following configuration options are available when the motion data behaves as a control, and when the MIDI message type is PC:
- Label:
The label that will be shown for the control. - Type:
Change the type to either be a control or a trigger. - MIDI Message Type:
A choice of MIDI message type. - Bidirectional:
The bidirectional behavior of the control - Channel:
The MIDI channel that will be used by the control. - Minimum:
The minimum program number that will be used by the control. - Maximum:
The maximum program number that will be used by the control. - Learn MIDI:
Learn MIDI message type by listening to incoming MIDI. - Color:
The background color of the control.
Trigger CC (Control Change) Configuration

The following configuration options are available when the motion data behaves as a trigger, and when the MIDI message type is CC:
- Label:
The label that will be shown for the control. - Type:
Change the type to either be a control or a trigger. - MIDI Message Type:
A choice of Control Change (CC), Channel Pressure (CP), Program Change (PC) MIDI and Note On/Off (NOTE) message types. Selecting a different MIDI message type will change the available configuration options. - Threshold:
The threshold that causes the trigger to activate. - Momentary:
When enabled, the trigger will automatically turn off when the value reaches below the threshold, otherwise the trigger toggles between on and off each time the threshold is exceeded. - Channel:
The MIDI channel that will be used by the trigger. - CC number:
The MIDI CC number that will be used by the trigger. - Minimum:
The CC value that will be used when the trigger is off. - Maximum:
The CC value that will be used when the trigger is on. - Learn MIDI:
Toggling this button with make MidiWrist Unleashed listen to incoming MIDI messages and automatically configure the MIDI message type based on the incoming message, if the controller type supports it. - Color:
The background color of the control.
Trigger CP (Channel Pressure) Configuration

The following configuration options are available when the motion data behaves as a trigger, and when the MIDI message type is CP:
- Label:
The label that will be shown for the control. - Type:
Change the type to either be a control or a trigger. - MIDI Message Type:
A choice of MIDI message type. - Threshold:
The threshold that causes the trigger to activate. - Momentary:
The on/off behavior of the trigger. - Channel:
The MIDI channel that will be used by the control. - Minimum:
The pressure value that will be used when the trigger is off. - Maximum:
The pressure value that will be used when the trigger is on. - Learn MIDI:
Learn MIDI message type by listening to incoming MIDI. - Color:
The background color of the control.
Trigger PC (Program Change) Configuration
The following configuration options are available when the motion data behaves as a trigger, and when the MIDI message type is PC:
- Label:
The label that will be shown for the control. - Type:
Change the type to either be a control or a trigger. - MIDI Message Type:
A choice of MIDI message type. - Threshold:
The threshold that causes the trigger to activate. - Momentary:
The on/off behavior of the trigger. - Channel:
The MIDI channel that will be used by the control. - Program number:
The program number that will be sent by the trigger when it is turned on. - Learn MIDI:
Learn MIDI message type by listening to incoming MIDI. - Color:
The background color of the control.
Trigger NOTE (Note On/Off) Configuration
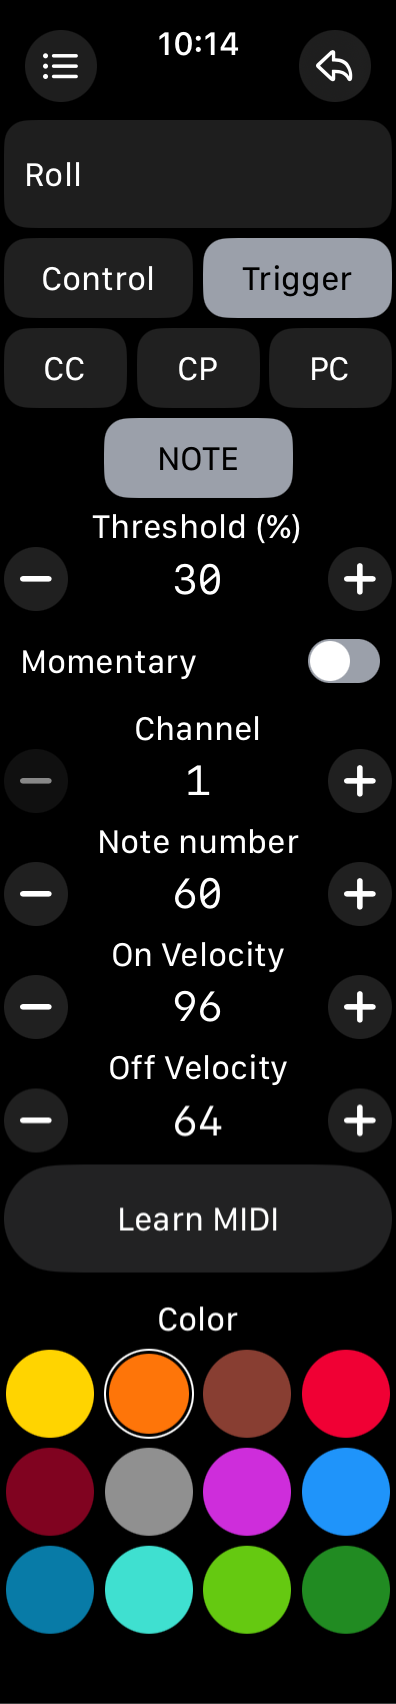
The following configuration options are available when the motion data behaves as a trigger, and when the MIDI message type is NOTE:
- Label:
The label that will be shown for the control. - Type:
Change the type to either be a control or a trigger. - MIDI Message Type:
A choice of MIDI message type. - Threshold:
The threshold that causes the trigger to activate. - Momentary:
The on/off behavior of the trigger. - Channel:
The MIDI channel that will be used by the control. - Note number:
The note number that will be sent by the trigger when it is turned on. - On velocity:
The note velocity that will be used by the trigger when it is turned on. - Off velocity:
The note velocity that will be used by the trigger when it is turned off. - Learn MIDI:
Learn MIDI message type by listening to incoming MIDI. - Color:
The background color of the control.
Stepper Panel
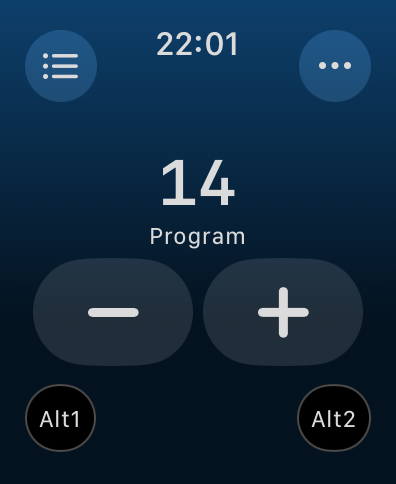
The stepper panel allows you to discretely step through individual MIDI values with plus and minus buttons. When pressing and holding either of these buttons, the values will automatically continue to change and the longer you press, the faster it changes. The Digital Crown can also be used to more quickly and precisely step through a wider range of values.
More Functions
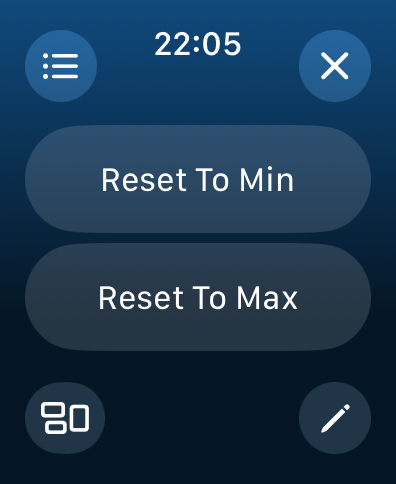
The following additional functions are available when pressing the triple-dot top right button:
- Reset To Min:
Resets the stepped control to its minimum value. - Reset To Max:
Resets the stepped control to its maximum value.
At the bottom are two additional buttons:
- Configure Panel Layout:
Configure the label, visibility of corner buttons and background color of the panel. - Configure Individual Controls
Configure the label, function, behavior and MIDI message of each control on the panel.
Configure Panel Layout
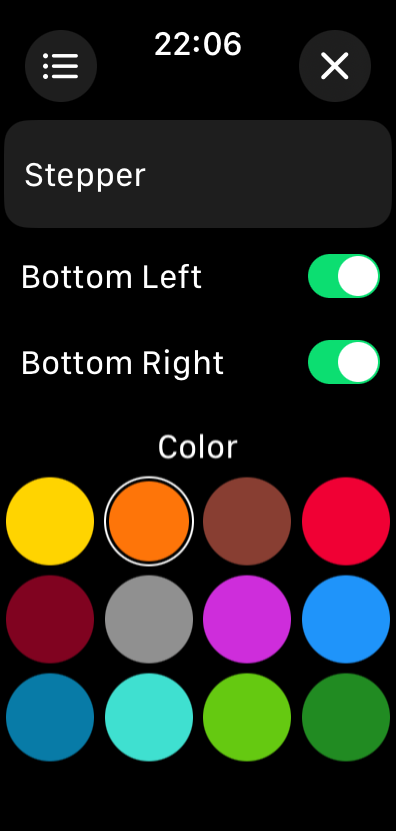
This page allows you to configure the layout and features of the entire stepper panel.
From top to bottom:
- Label:
The label associated with the panel, this is how it will appear in the preset's panel list. - Bottom Left:
Whether the bottom left small MIDI button should be visible or not. - Bottom Right:
Whether the bottom right small MIDI button should be visible or not. - Color:
The background color of this panel.
Configure Individual Controls
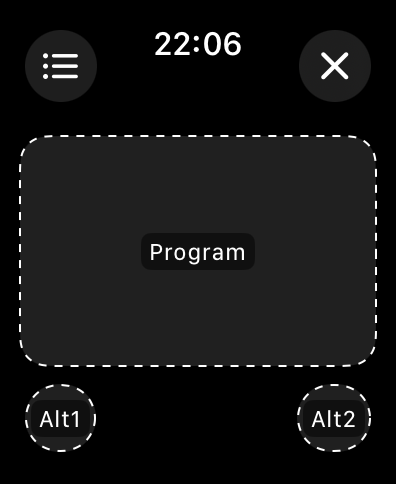
When you press the bottom right Configure Individual Controls button in the More Functions page, the same layout of the panel appears but with a dotted outline for each of the controls.
Tapping one of the controls will bring up a dedicated page that allows you to change every aspect of that control. Depending on the type of the control, and the MIDI message that is being sent out, these configuration options will vary.
Stepper CC (Control Change) Configuration
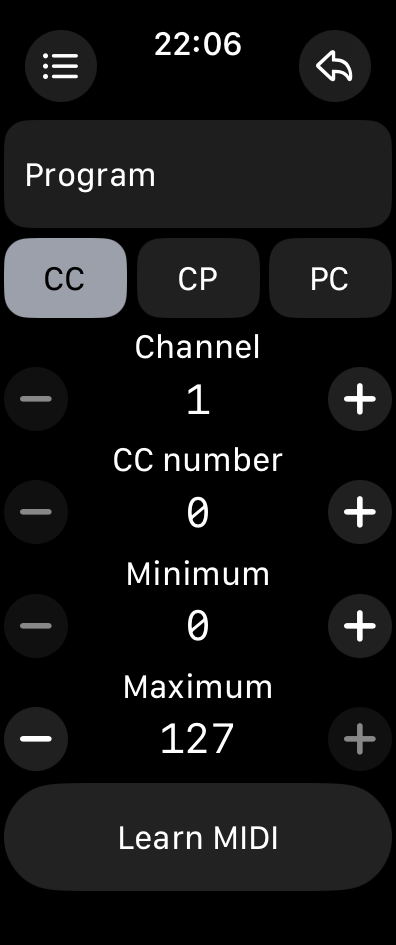
The following configuration options are available when the MIDI message type is CC:
- Label:
The label that will be shown for the control. - MIDI Message Type:
A choice of Control Change (CC), Channel Pressure (CP) and Program Change (PC) MIDI message types. Selecting a different MIDI message type will change the available configuration options. - Channel:
The MIDI channel that will be used by the control. - CC number:
The MIDI CC number that will be used by the control. - Minimum:
The minimum CC value that will be used by the control. - Maximum:
The maximum CC value that will be used by the control. - Learn MIDI:
Toggling this button with make MidiWrist Unleashed listen to incoming MIDI messages and automatically configure the MIDI message type based on the incoming message, if the controller type supports it.
Stepper CP (Channel Pressure) Configuration
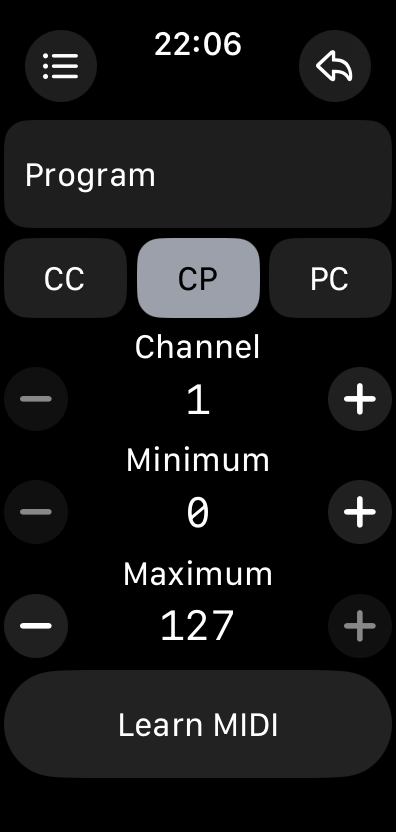
The following configuration options are available when the MIDI message type is CP:
- Label:
The label that will be shown for the control. - MIDI Message Type:
A choice of MIDI message type. - Channel:
The MIDI channel that will be used by the control. - Minimum:
The minimum pressure value that will be used by the control. - Maximum:
The maximum pressure value that will be used by the control. - Learn MIDI:
Learn MIDI message type by listening to incoming MIDI.
Stepper PC (Program Change) Configuration
The following configuration options are available when the MIDI message type is PC:
- Label:
The label that will be shown for the control. - MIDI Message Type:
A choice of MIDI message type. - Channel:
The MIDI channel that will be used by the control. - Minimum:
The minimum program number that will be used by the control. - Maximum:
The maximum program number that will be used by the control. - Learn MIDI:
Learn MIDI message type by listening to incoming MIDI.
Transport Panel
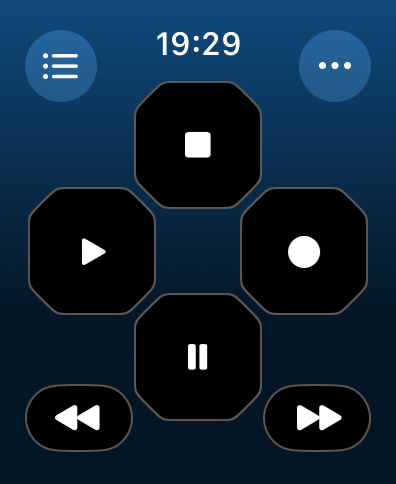
The transport panel provides direct access to Midi Machine Control (MMC) or Mackie Control Universal (MCU) commands.
This makes it possible to remotely control the transport of most DAWs and hosts. The Digital Crown can also be used to scrub the playhead to another location on the timeline. MMC only has a handful commands available, MCU is more extensive.
More Functions
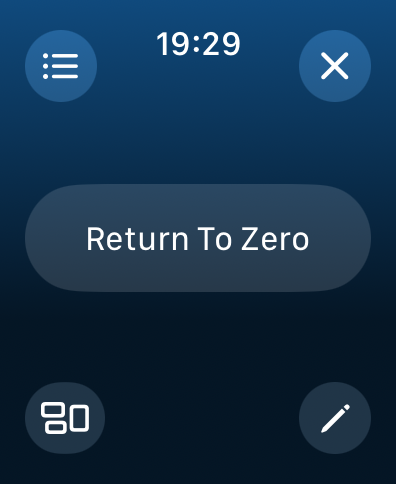
The following additional functions are available when pressing the triple-dot top right button:
- Reset To Zero:
Resets playhead to the beginning.
At the bottom are two additional buttons:
- Configure Panel Layout:
Configure the label, visibility of corner buttons and background color of the panel. - Configure Individual Controls
Configure the label, function, behavior, MIDI message and color of each control on the panel.
Configure Panel Layout
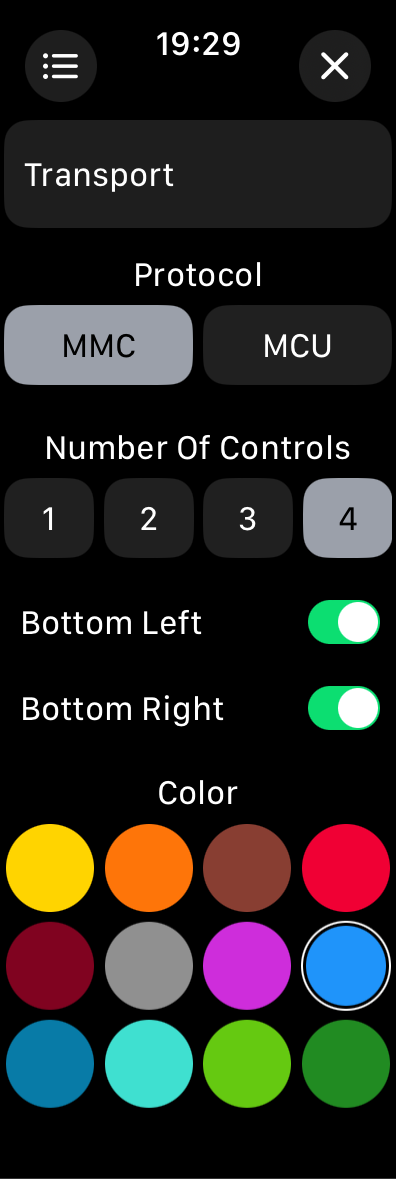
This page allows you to configure the layout and features of the entire transport panel.
From top to bottom:
- Label:
The label associated with the panel, this is how it will appear in the preset's panel list. - Protocol:
A change of Midi Machine Control (MMC) or Mackie Control Universal (MCU) protocols. MMC only has a handful commands available, MCU is more extensive. - Number Of Controls:
How many knobs and buttons that should be shown in the center area of this panel. - Bottom Left:
Whether the bottom left small MIDI button should be visible or not. - Bottom Right:
Whether the bottom right small MIDI button should be visible or not. - Color:
The background color of this panel.
Configure Individual Controls
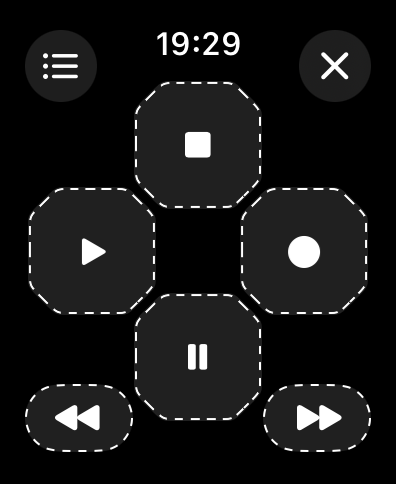
When you press the bottom right Configure Individual Controls button in the More Functions page, the same layout of the panel appears but with a dotted outline for each of the controls.
Tapping one of the controls will bring up a dedicated page that allows you to change every aspect of that control. Depending on the transport protocol, these configuration options will vary.
MMC Command Configuration
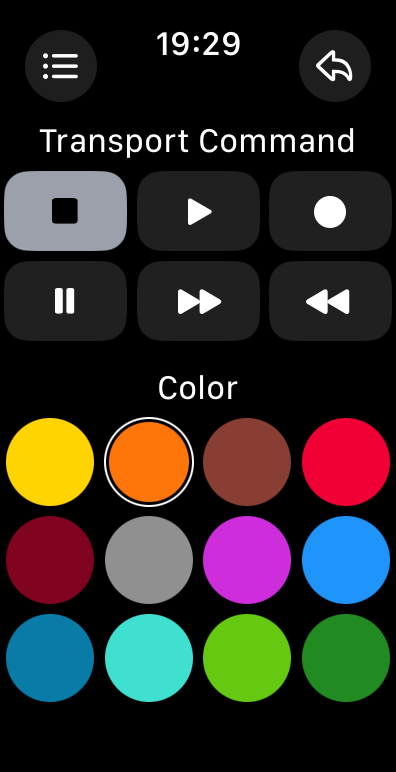
The following configuration options are available when the uses the MMC protocol:
- Transport Command:
A choice of Stop, Play, Record, Pause, Fast Forward and Rewind. - Color:
The background color of the control.
MCU Command Configuration
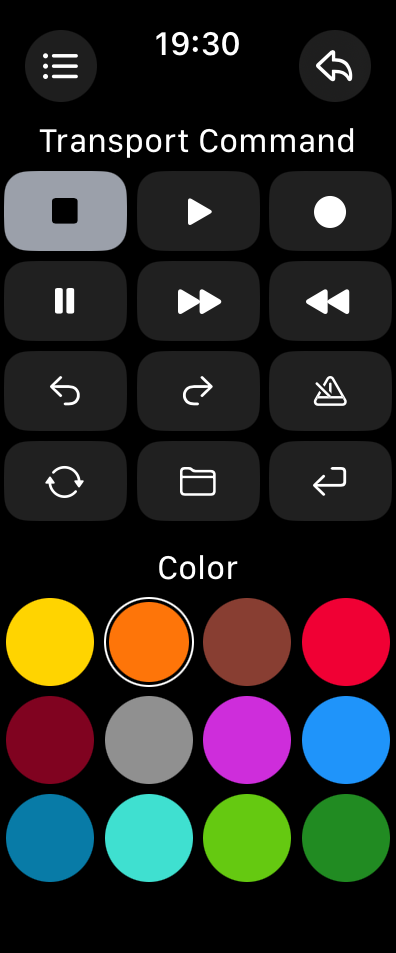
The following configuration options are available when the uses the MCU protocol:
- Transport Command:
A choice of Stop, Play, Record, Pause, Fast Forward, Rewind, Undo, Redo, Click, Cycle, Save, and Enter. - Color:
The background color of the control.
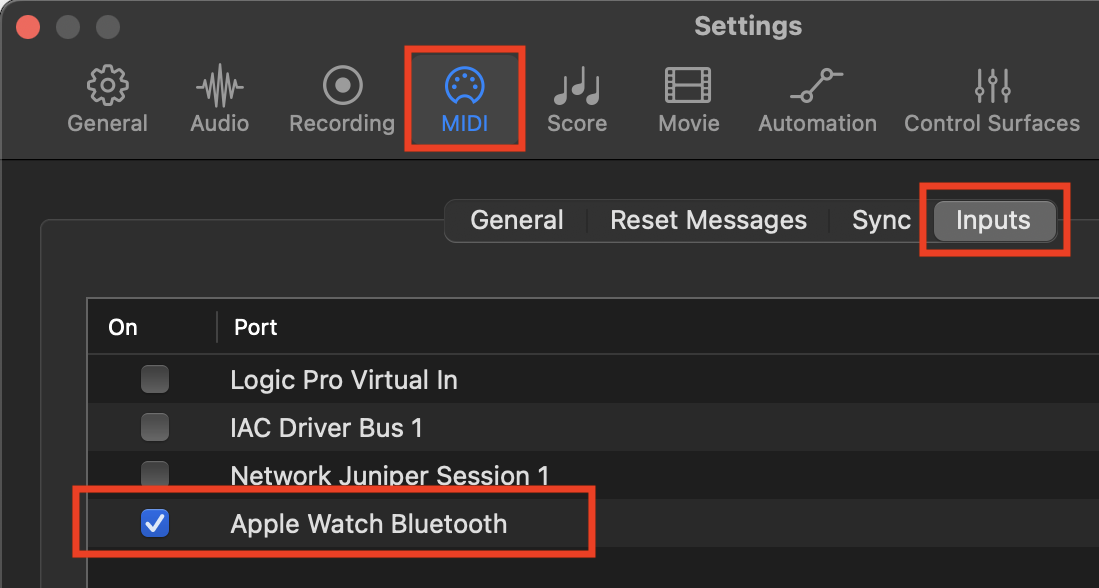
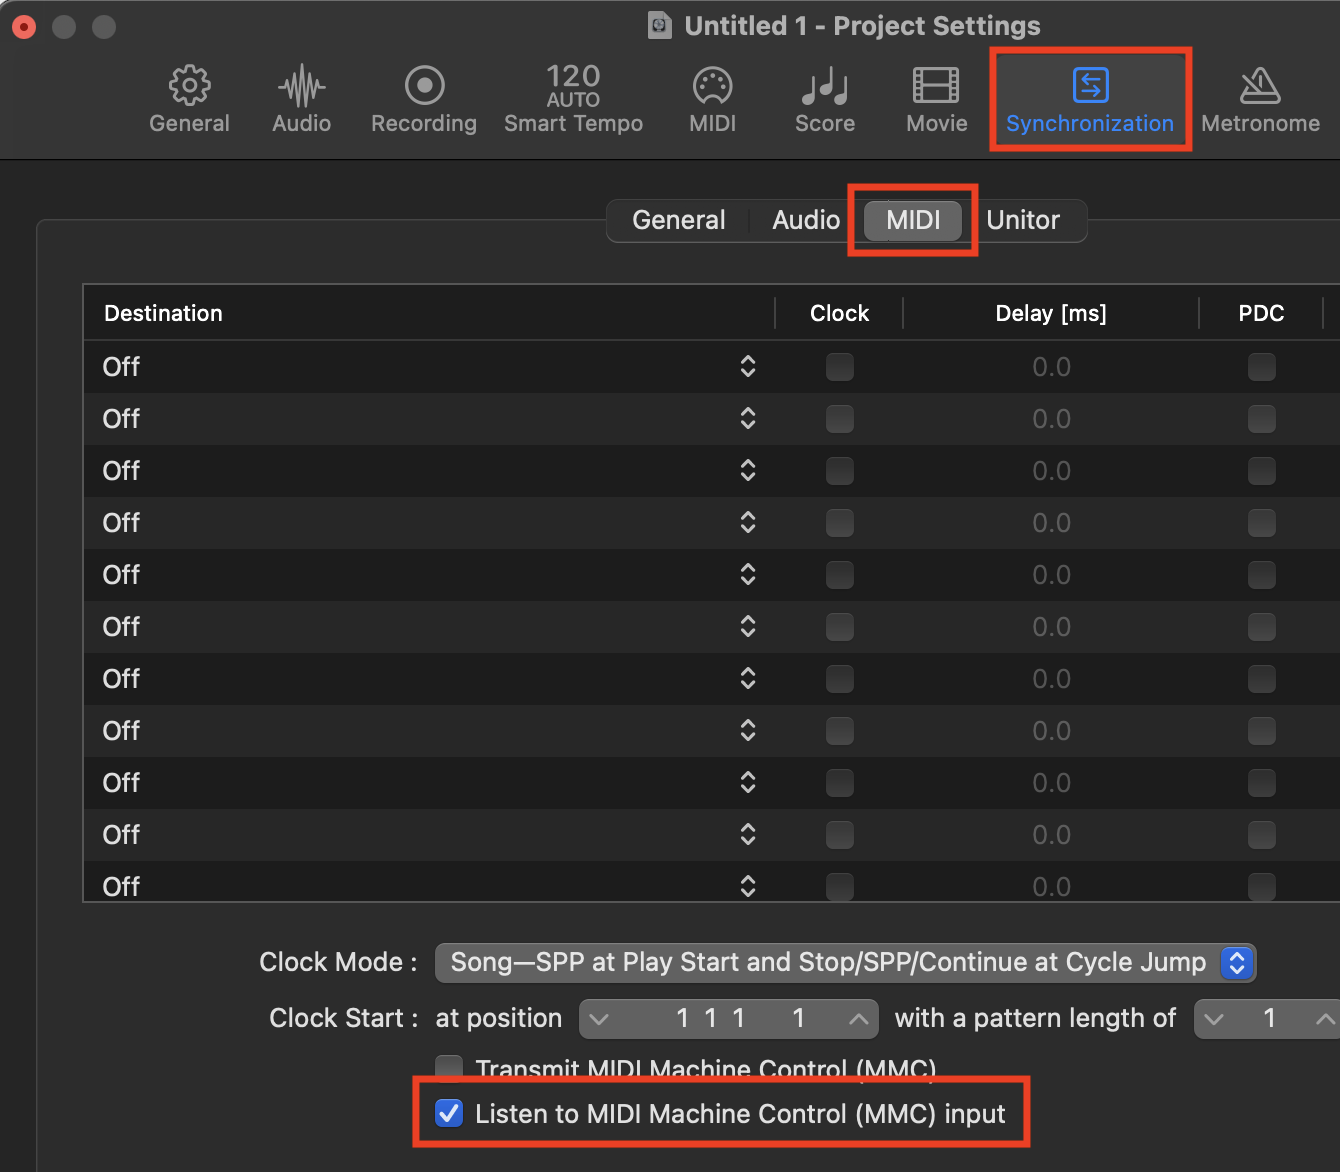
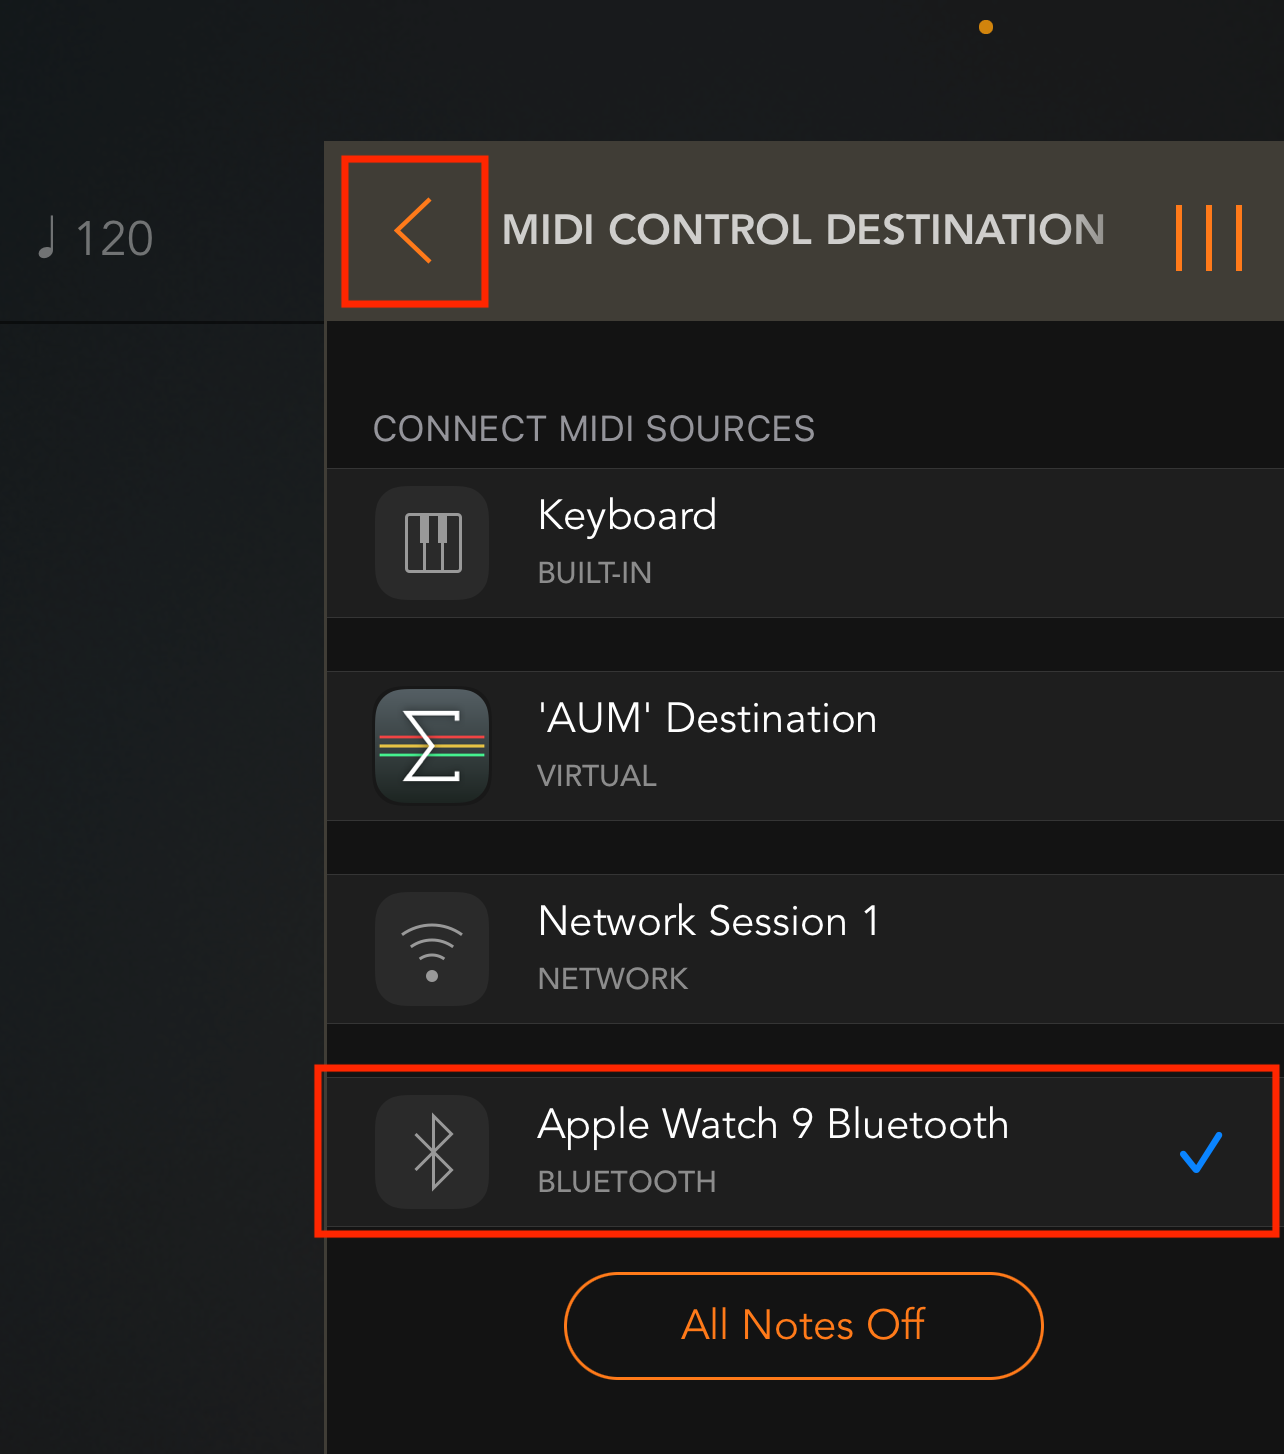
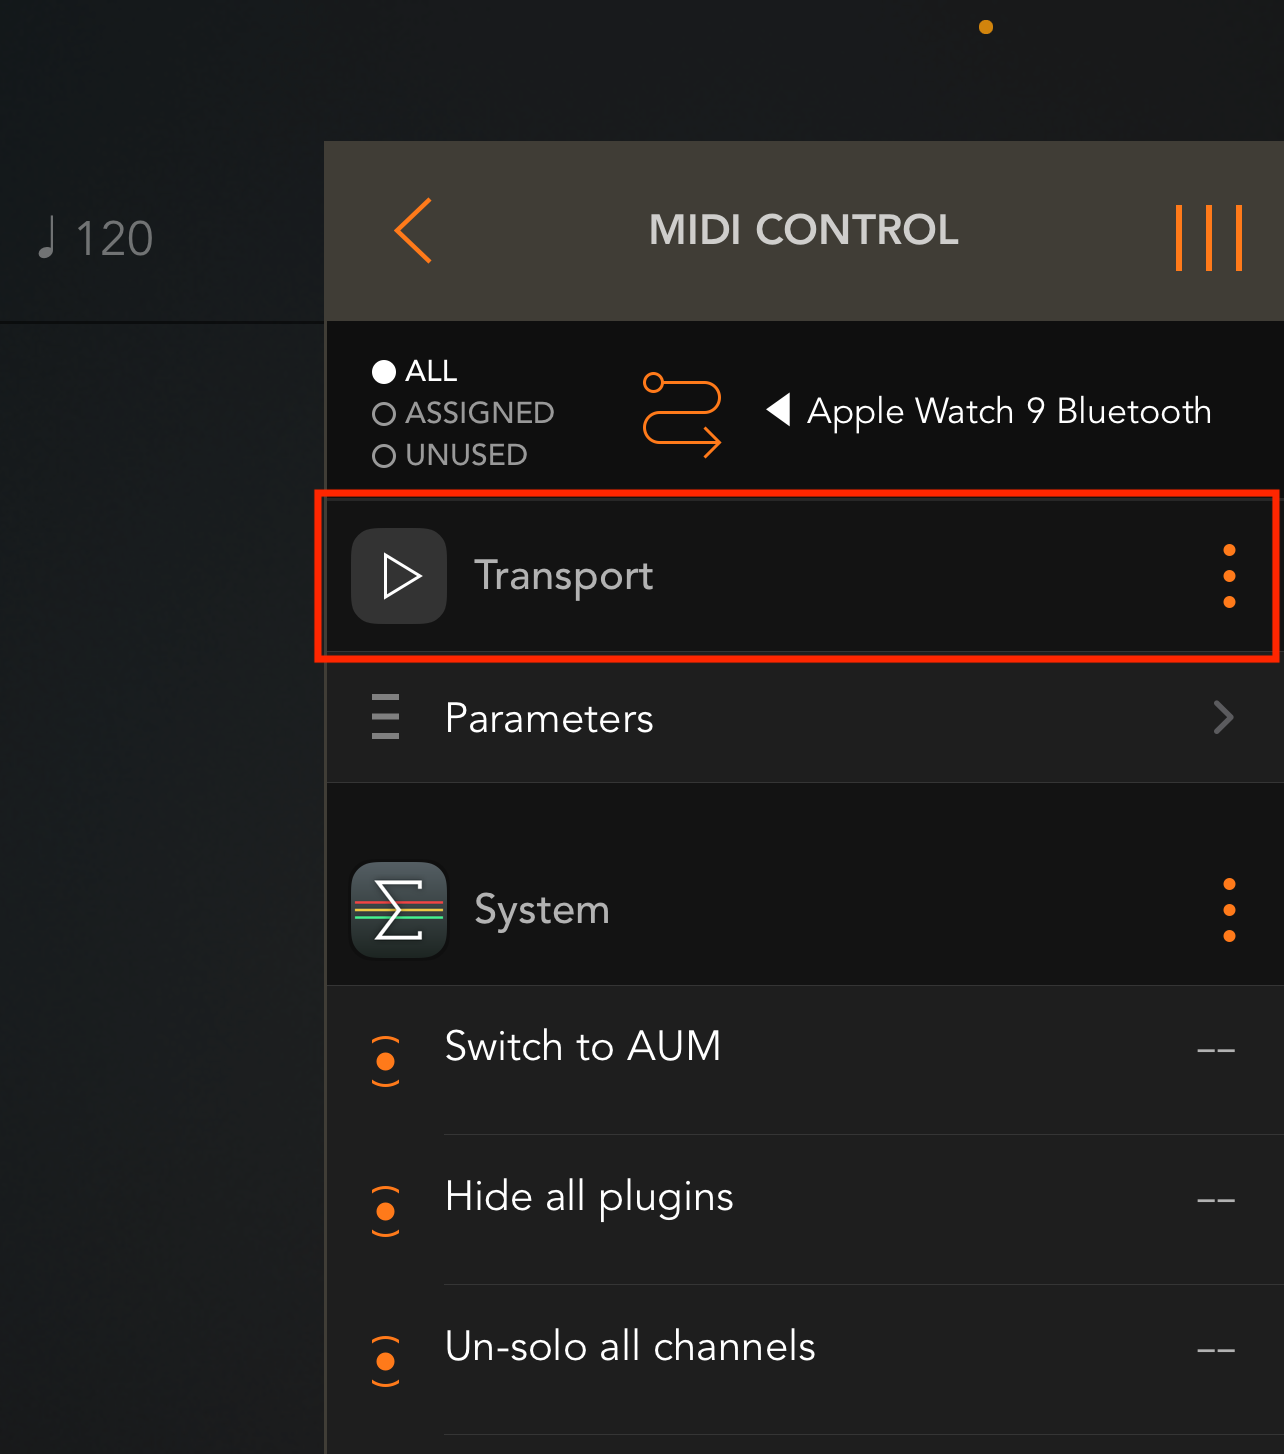
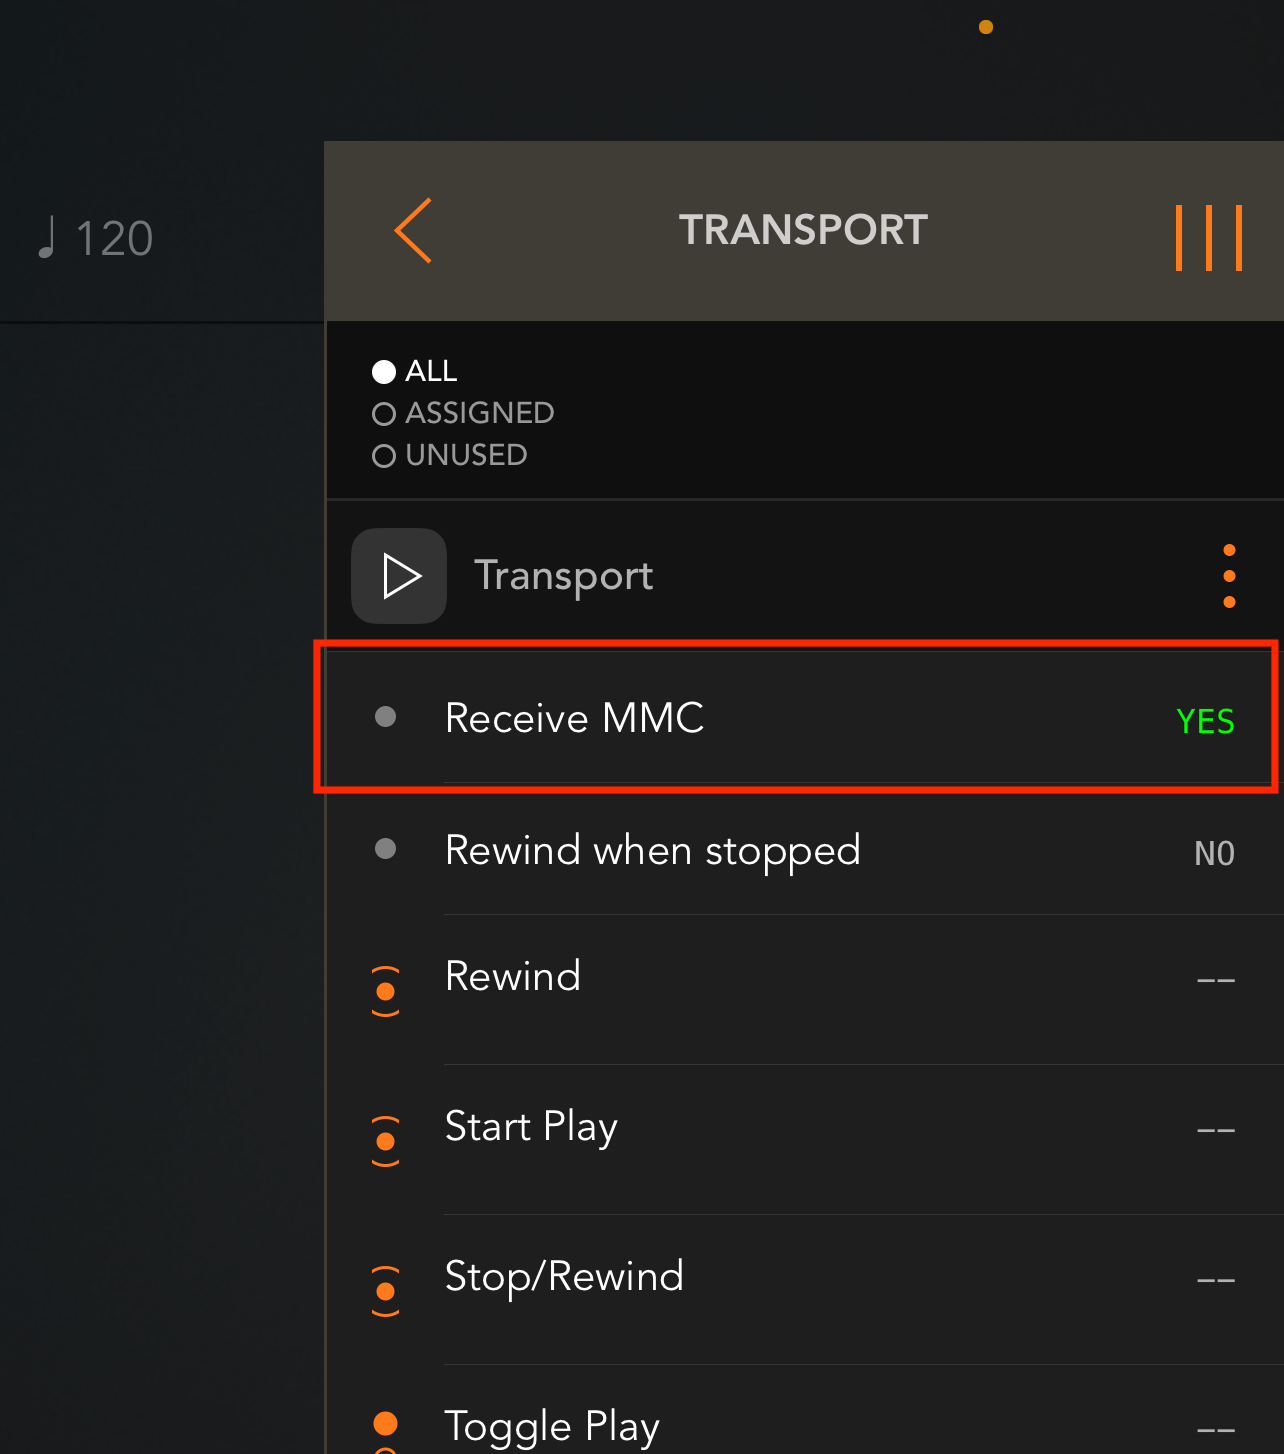
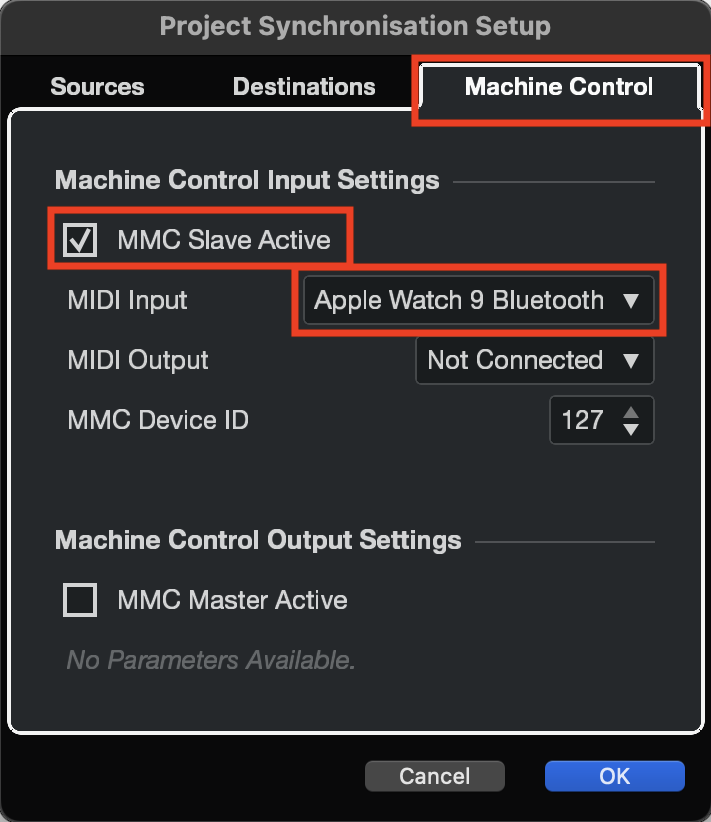
Setting up MIDI Machine Control (MMC)
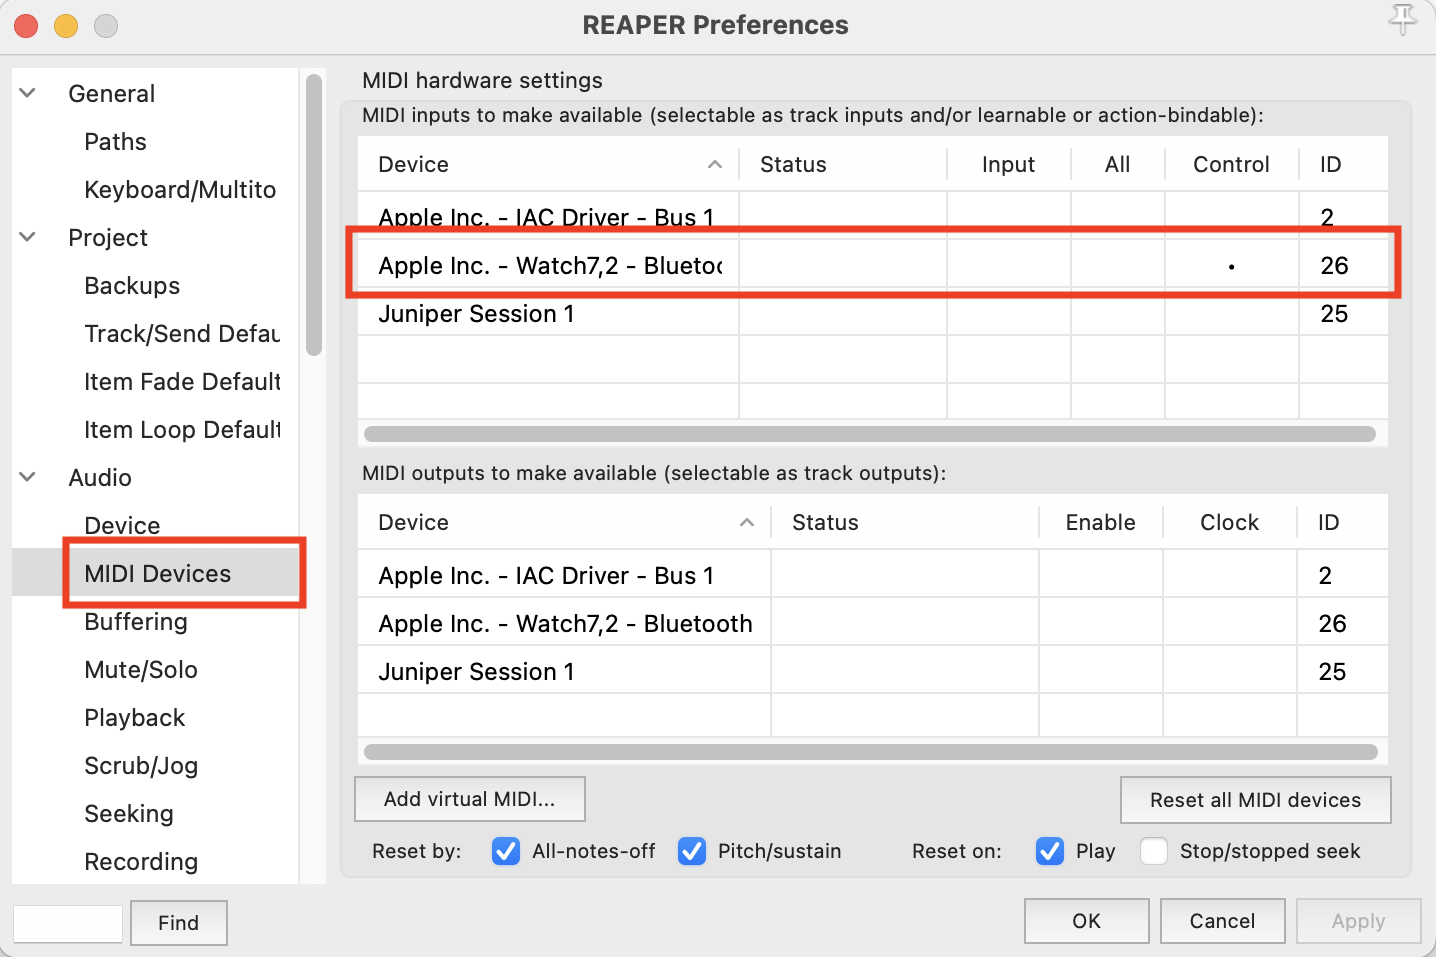
Setting MMC up is different for each DAW, in Logic Pro for instance, it needs to be configured both in the global preferences and the project settings, while in Reaper it's just a single preference in the MIDI settings.
Apple Logic Pro
Cockos Reaper
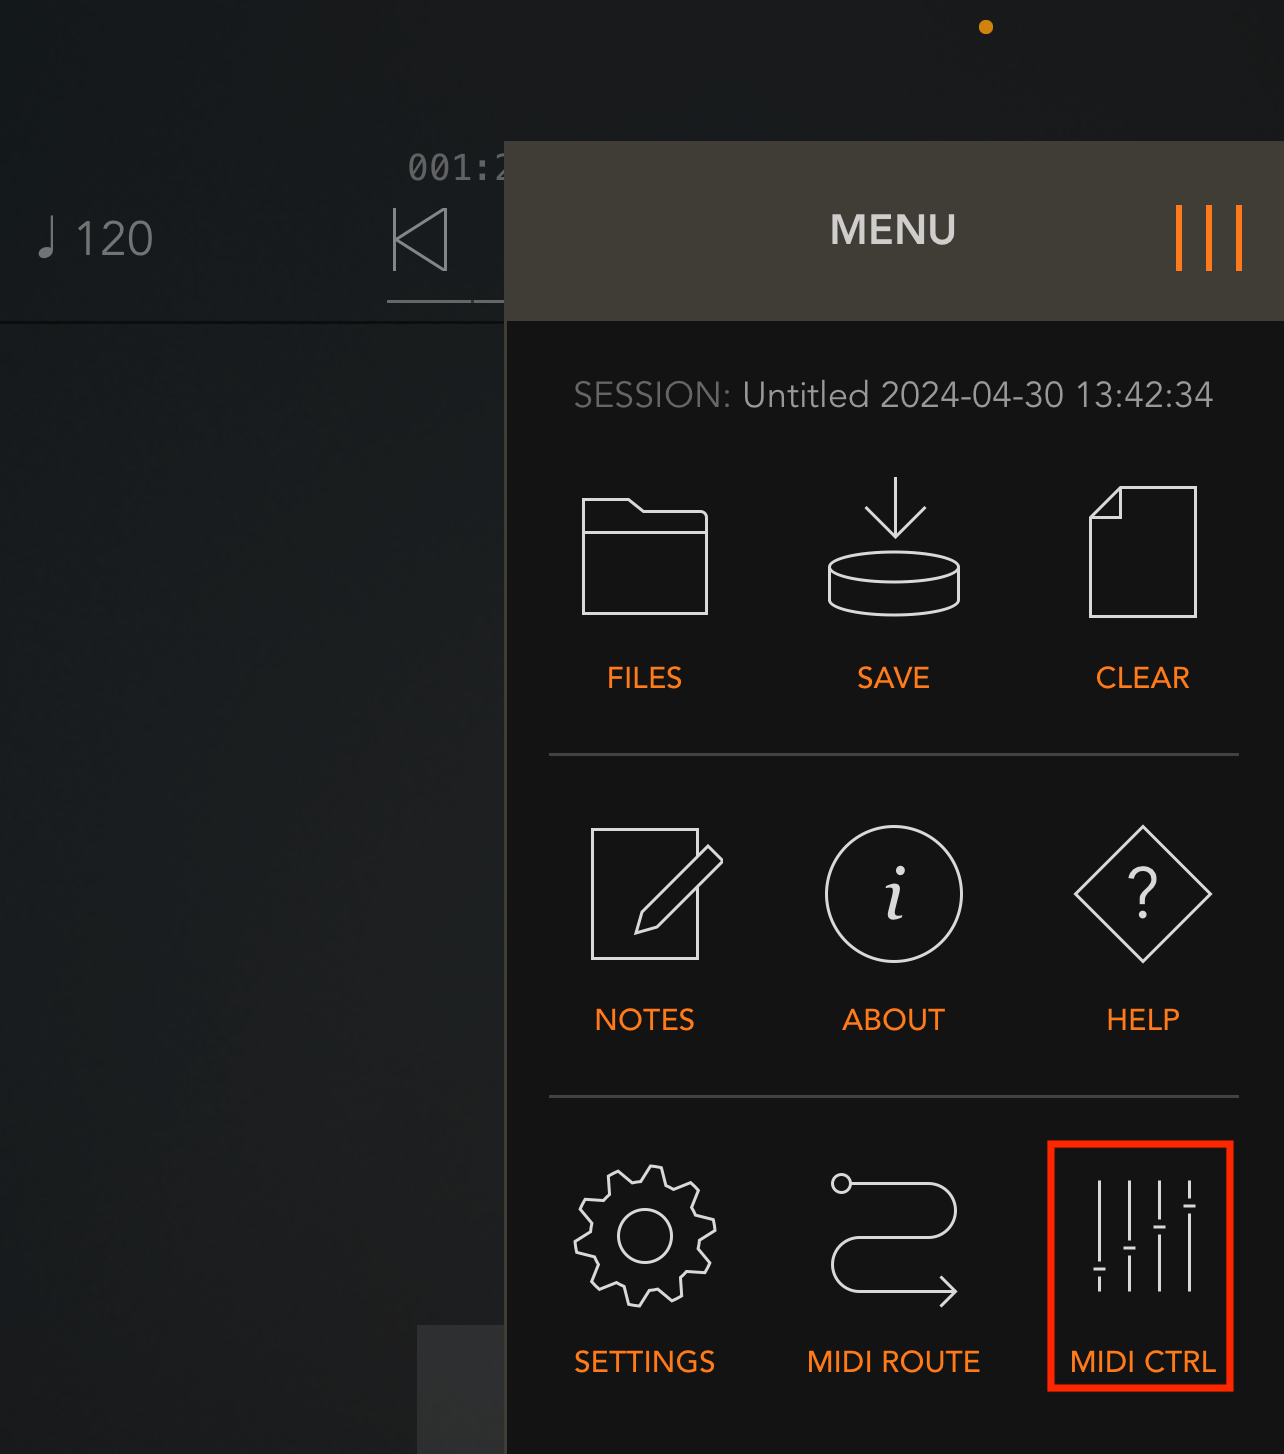
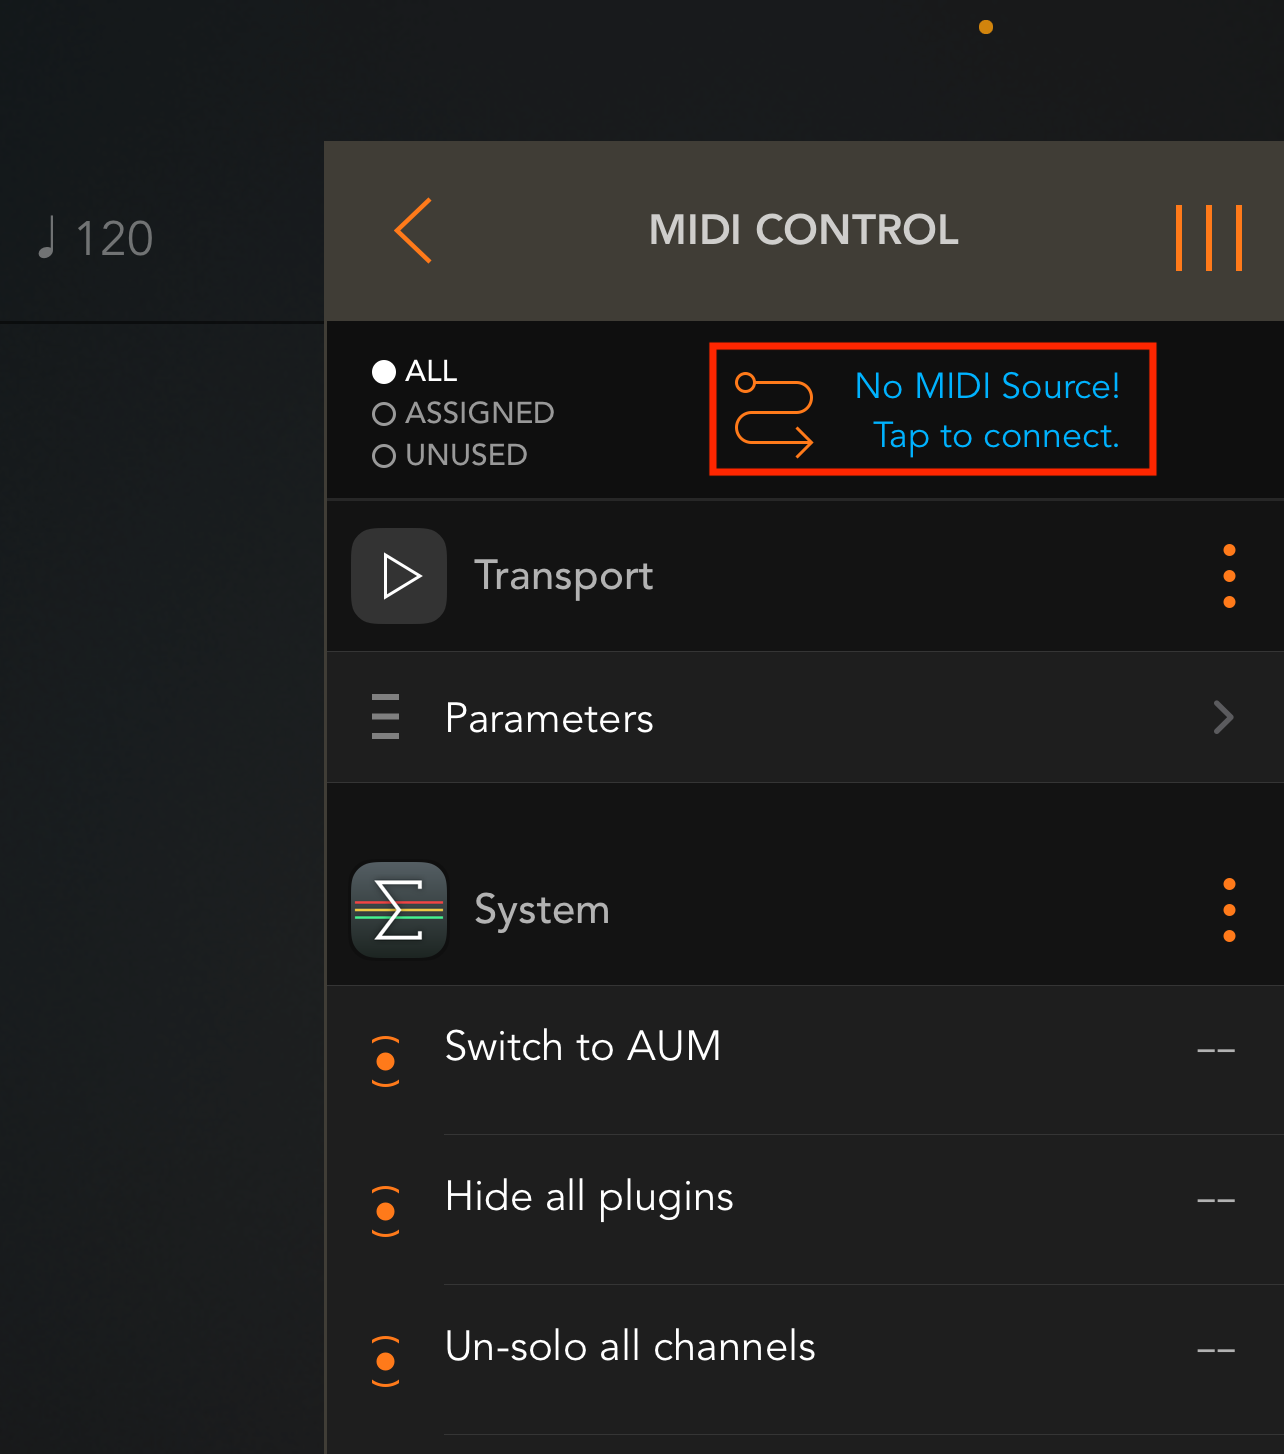
Kymatica AUM
Steinberg Cubase

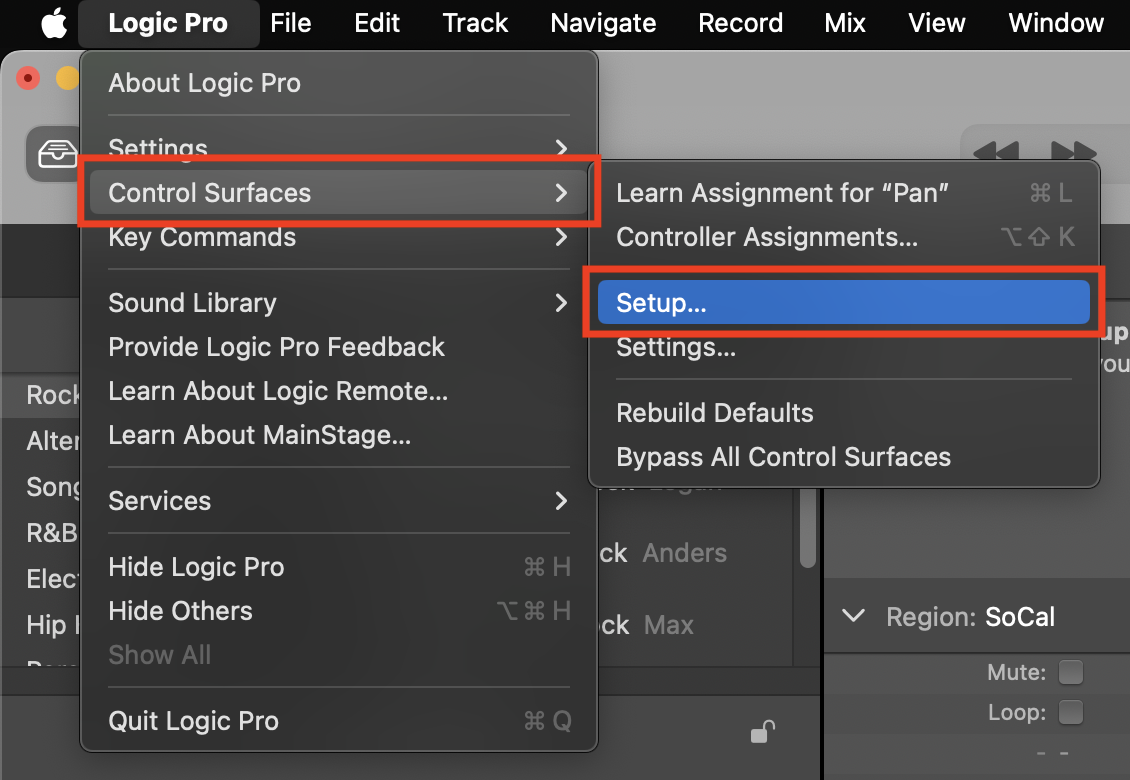
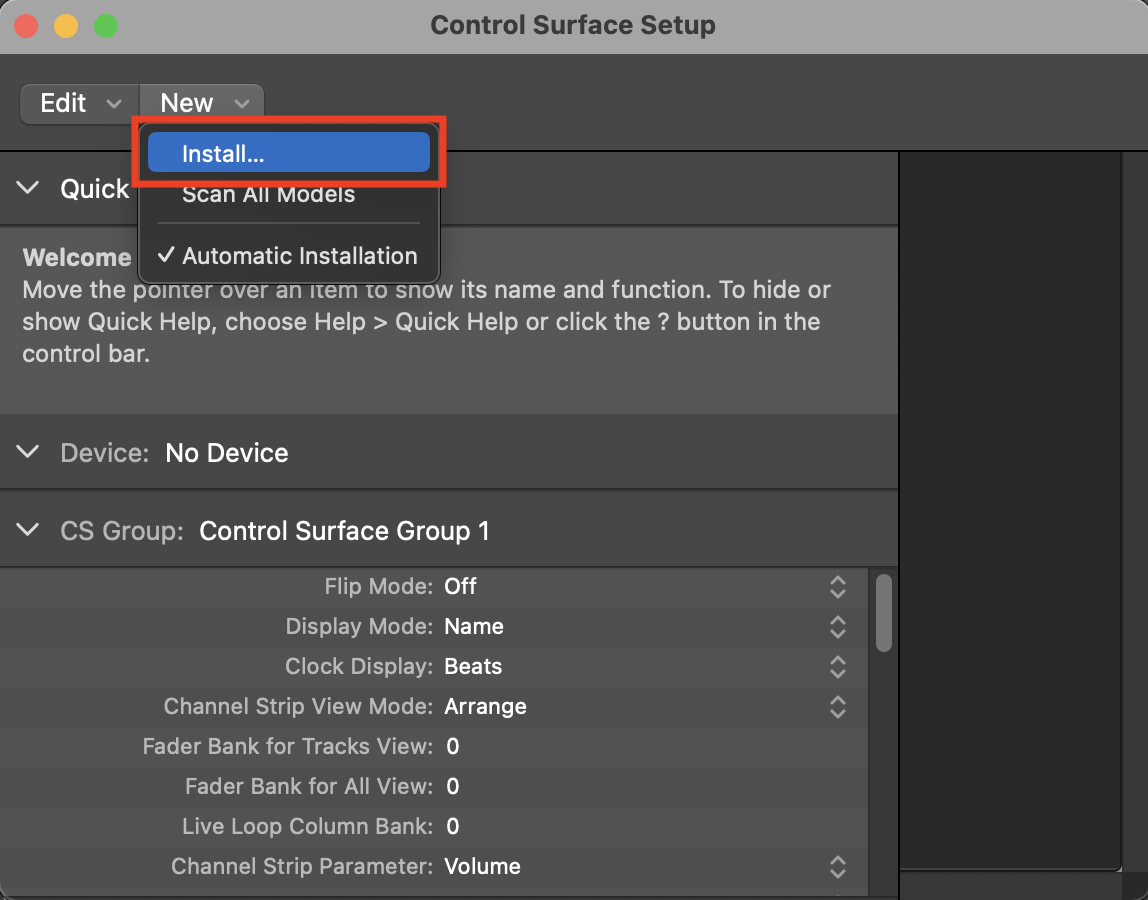
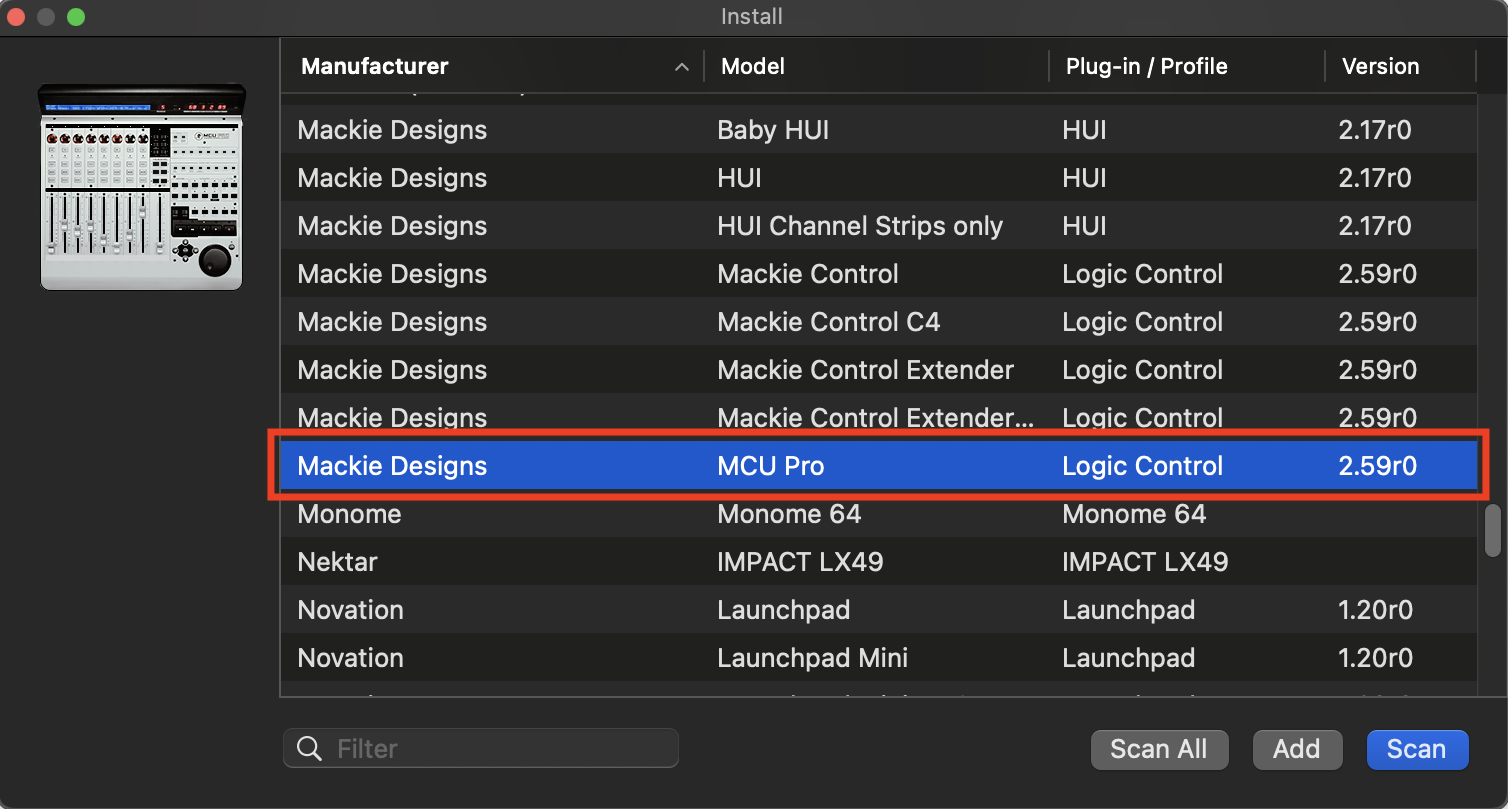
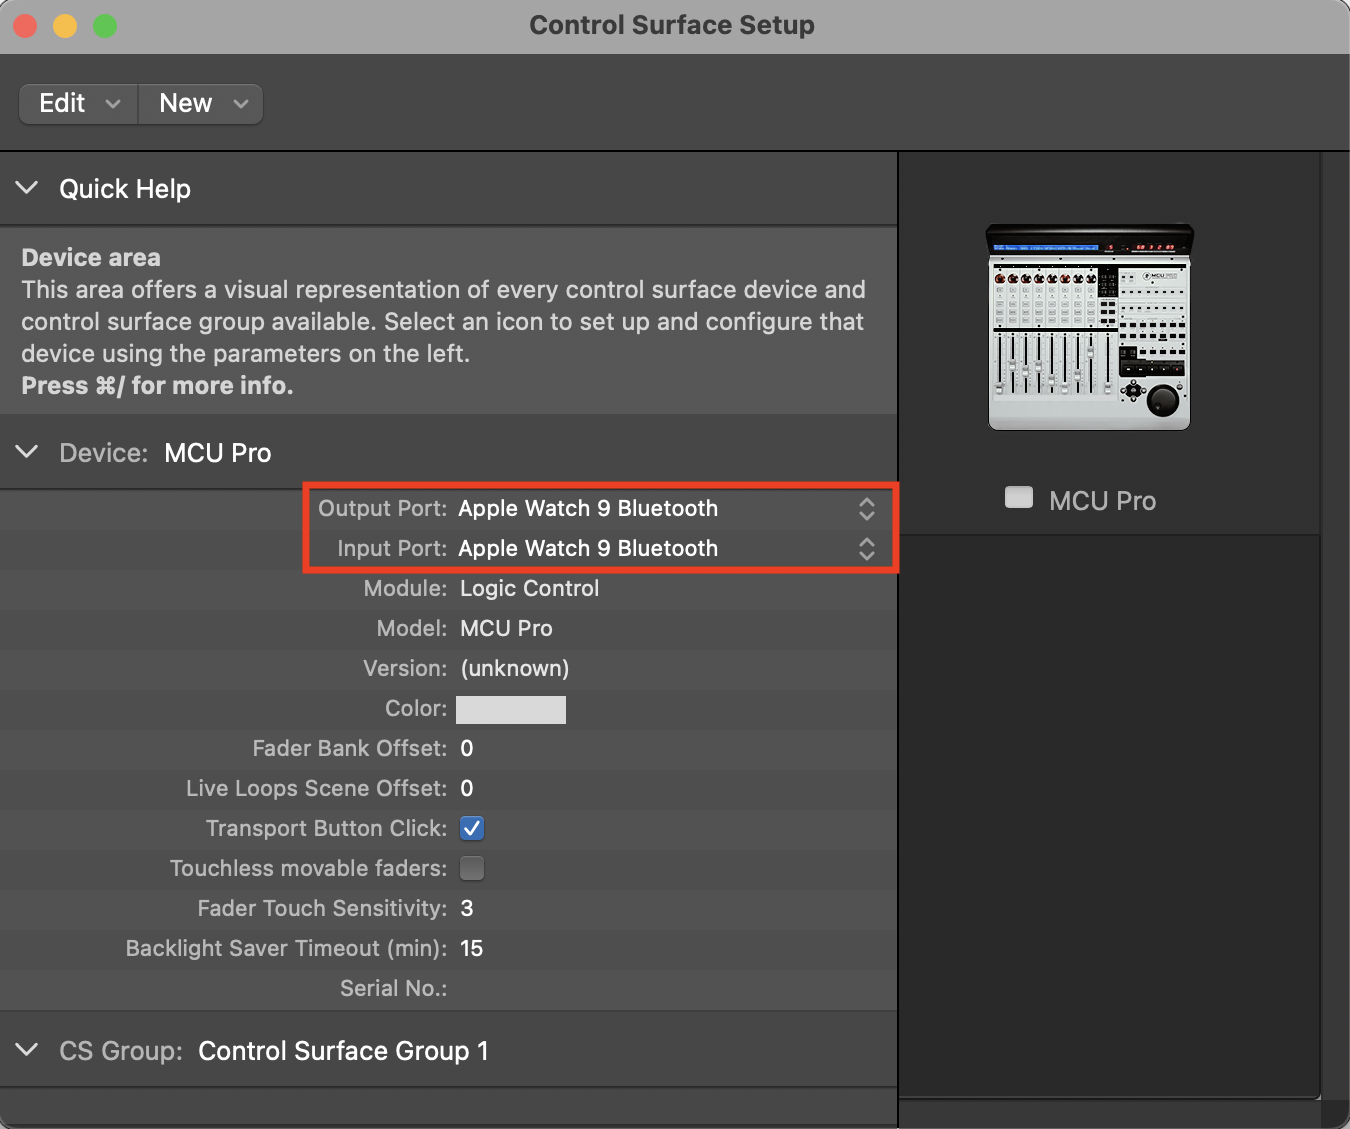
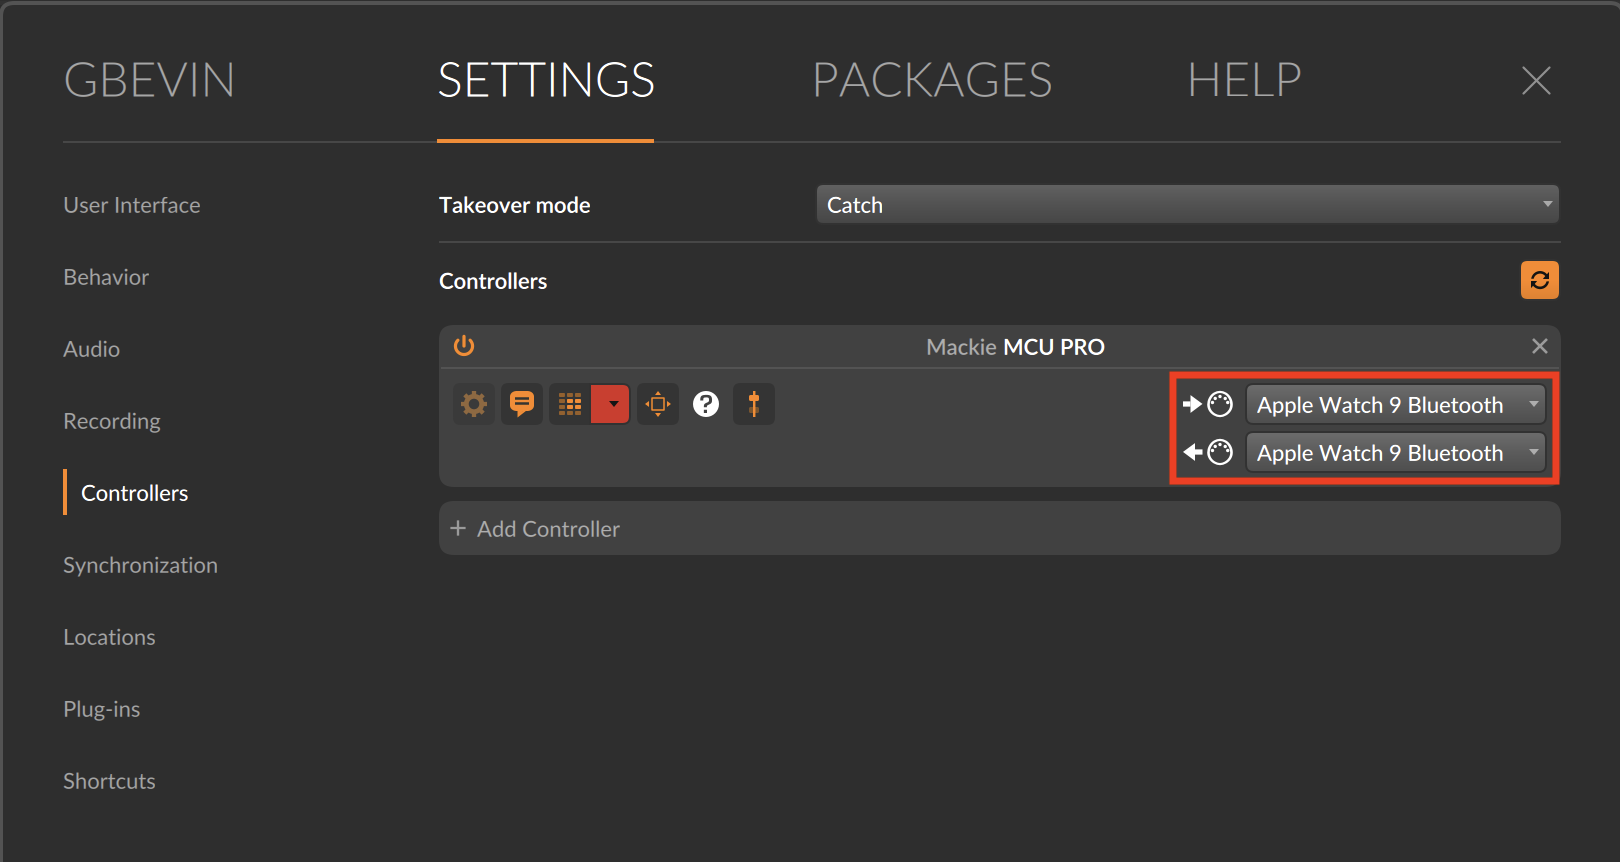
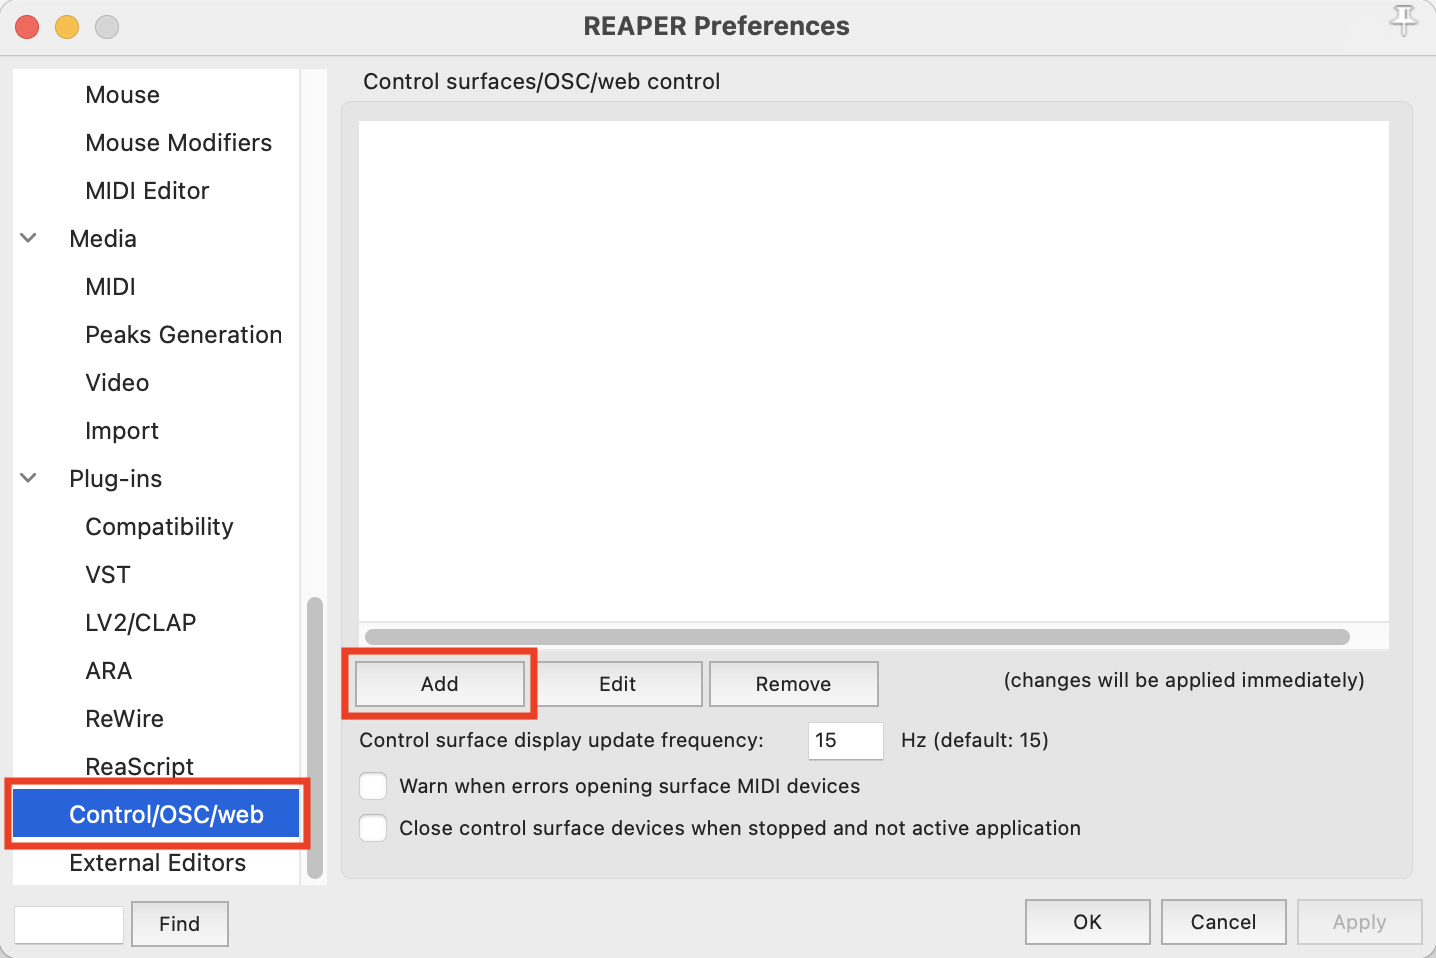
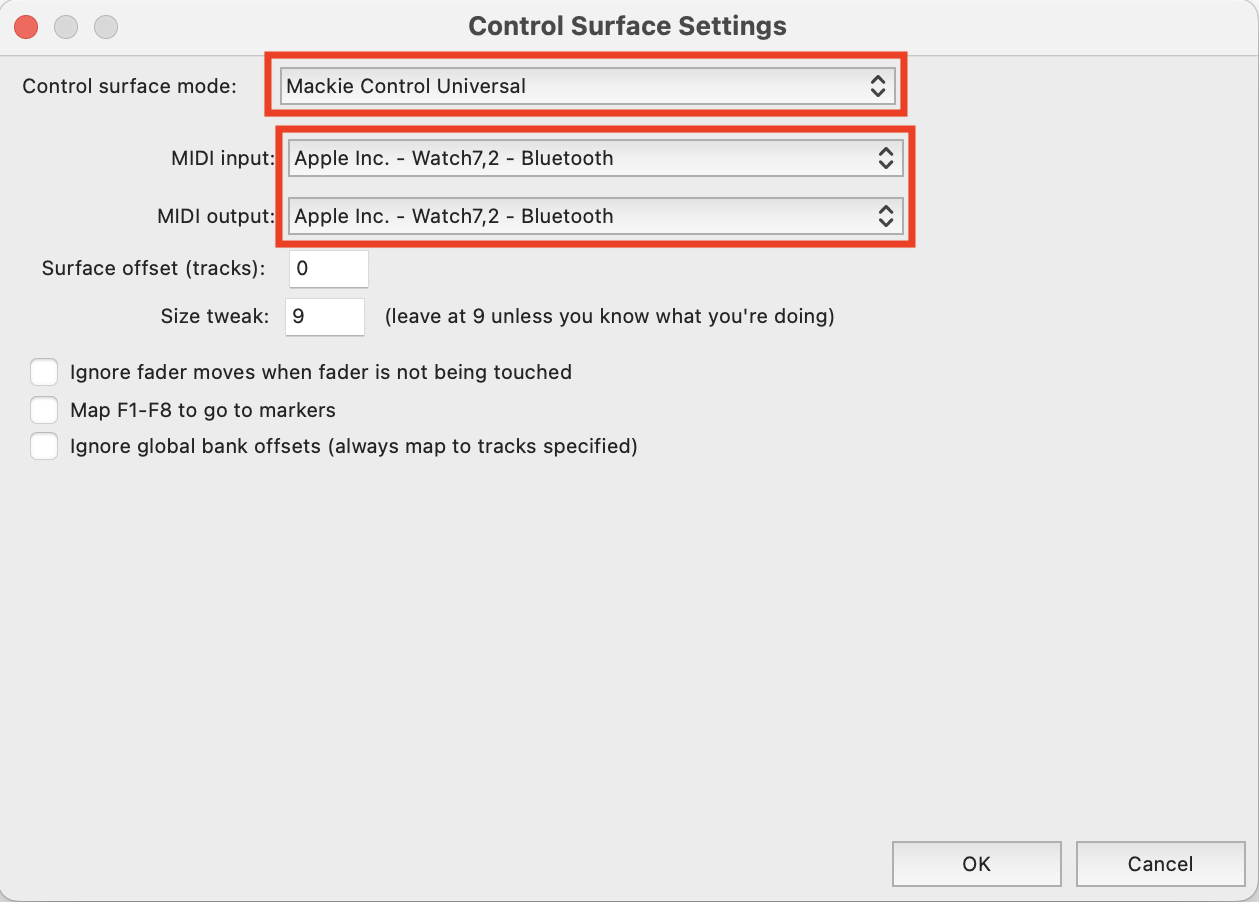
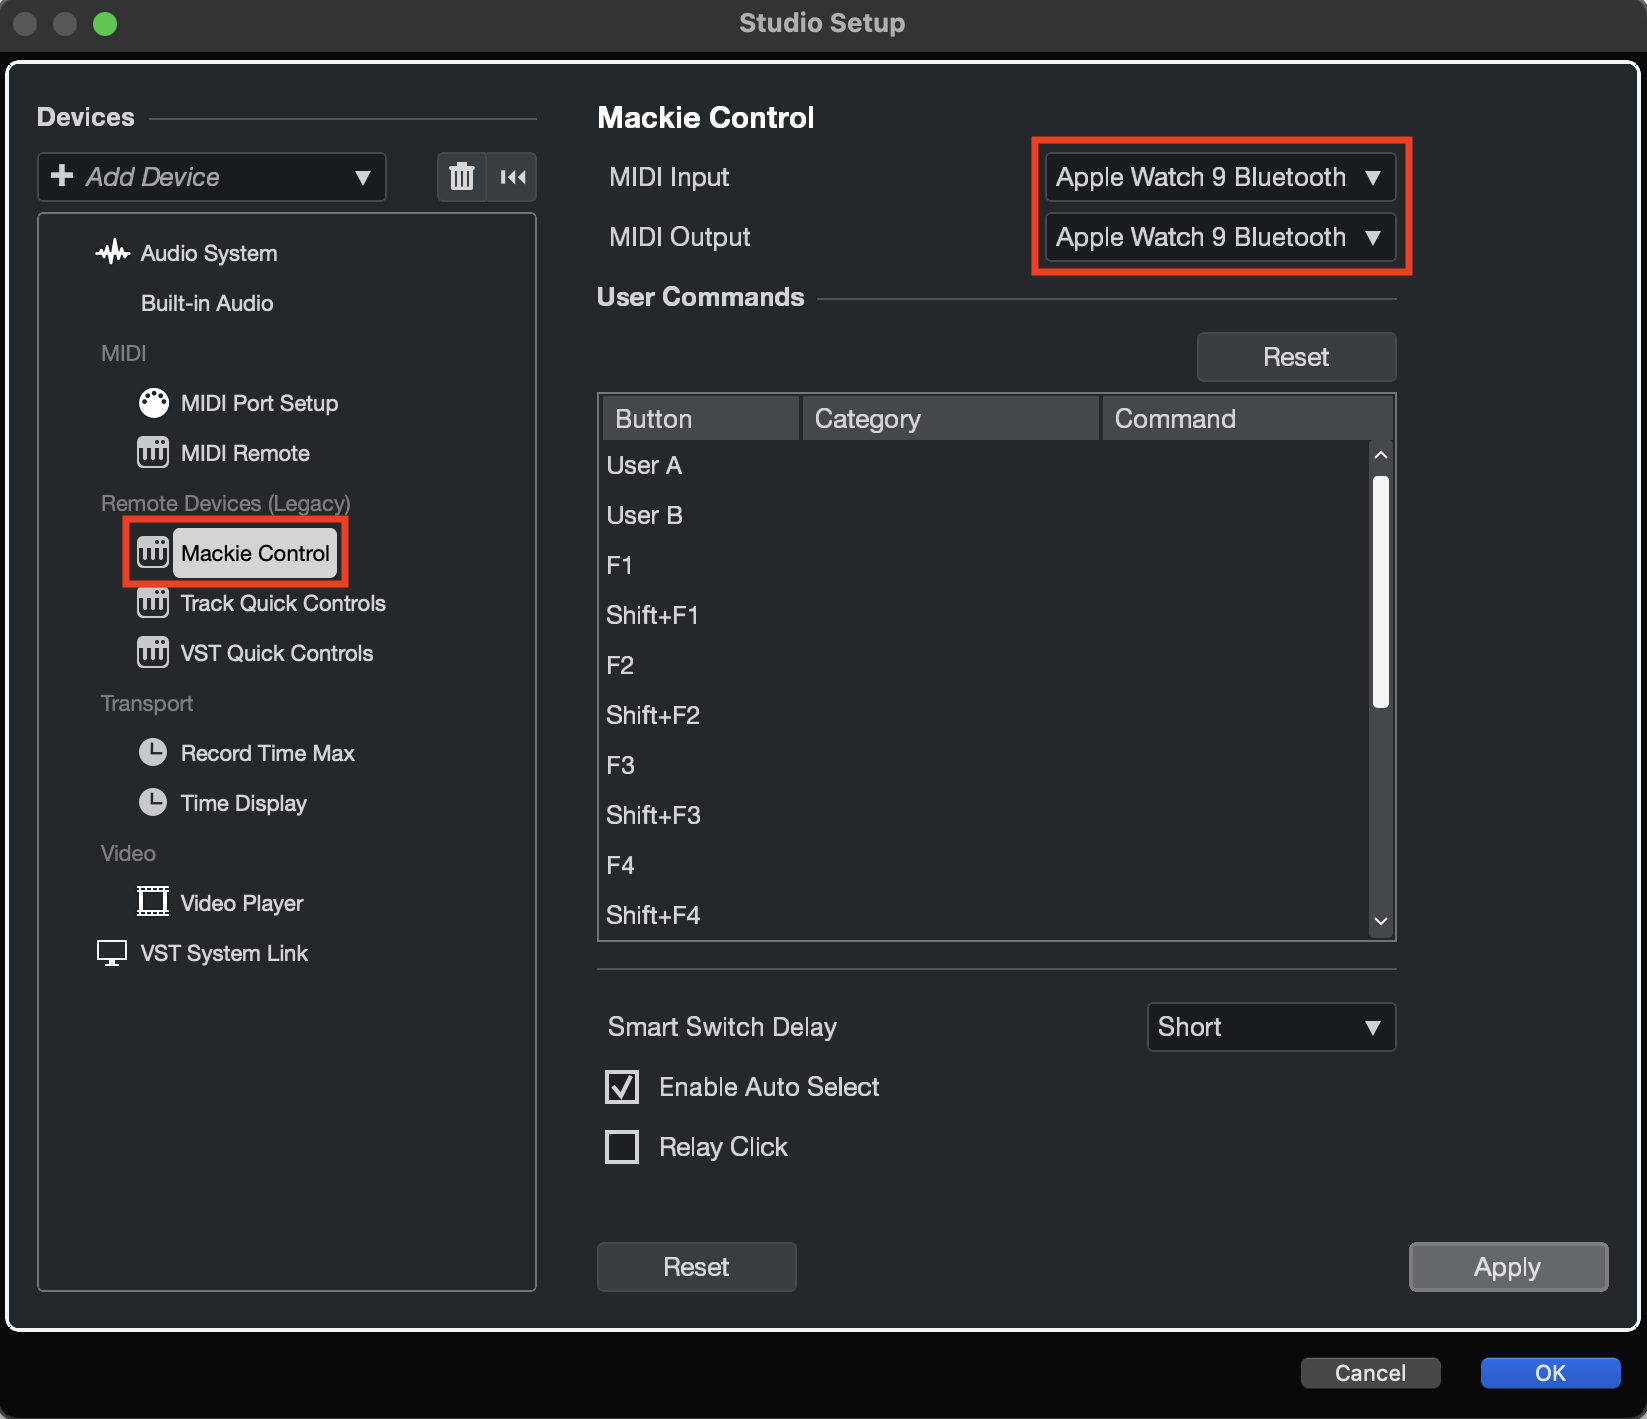
Setting up Mackie Control Universal (MCU)
Setting MCU up is also different for each DAW, the screen shots below show some popular examples.
The screen shots below show you how to do this for some popular DAWs.
Ableton Live
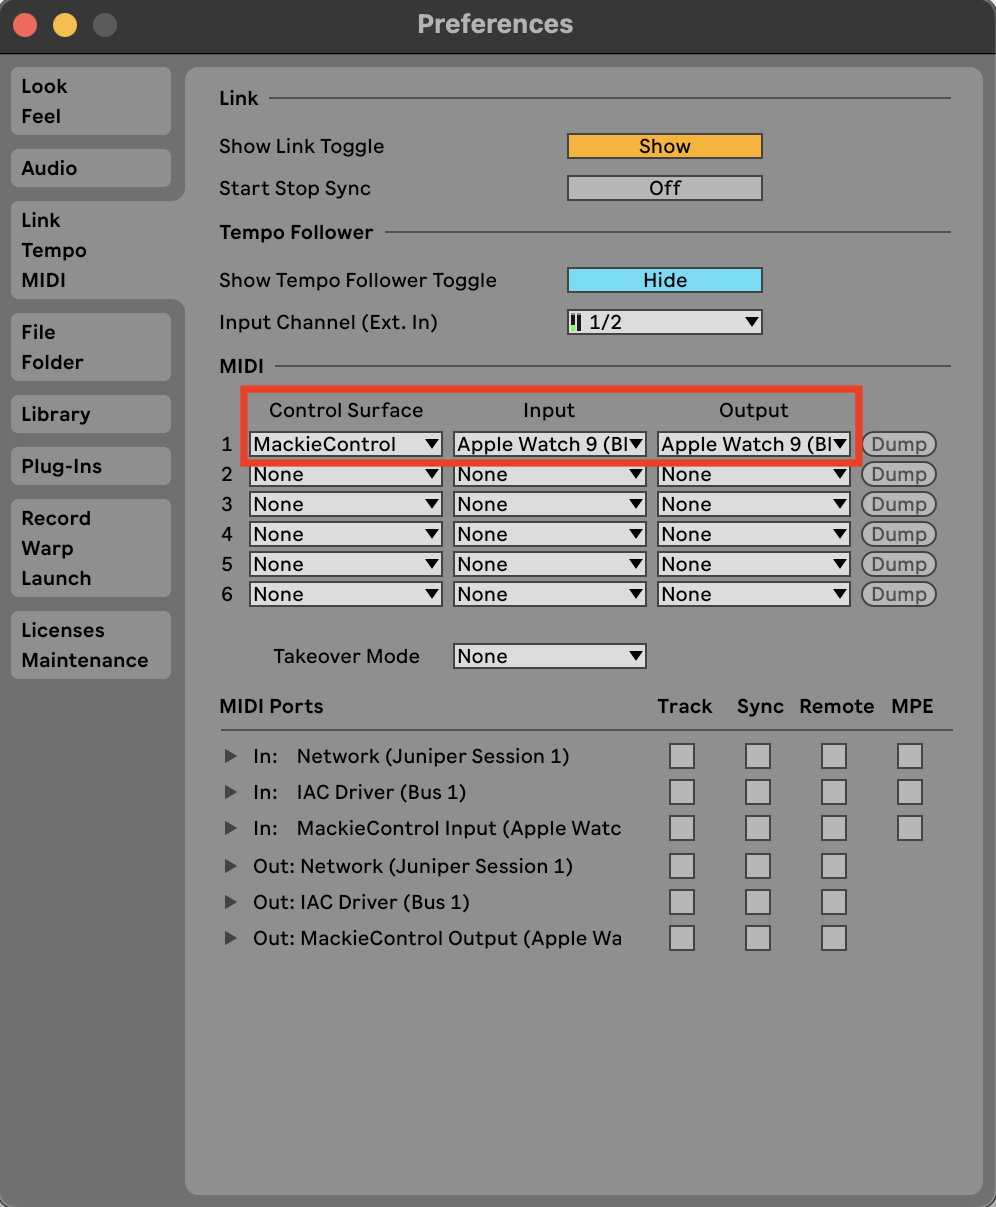
Apple Logic Pro
Bitwig

Cockos Reaper
Steinberg Cubase


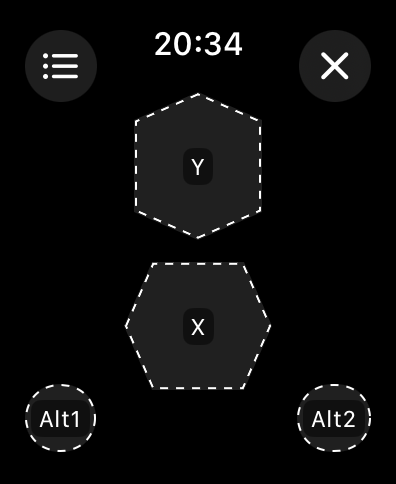
XY Panel
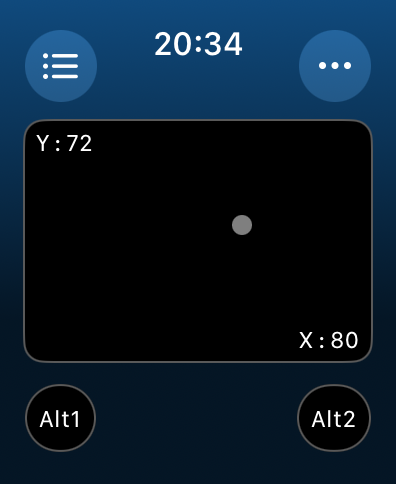
The XY panel provides simultaneous control over two axis with one gesture.
The X axis and the Y axis can be configured to send out different messages and make it very intuitive to explore the relationship between these two controls by moving the dot on the XY panel around.
More Functions
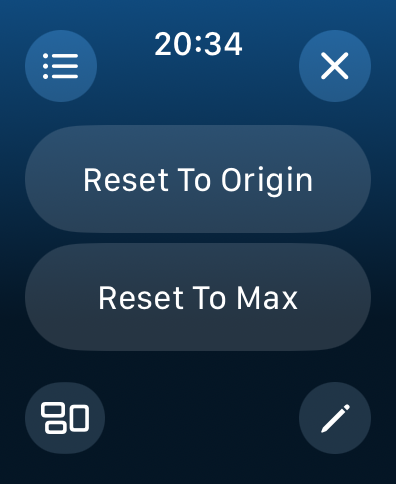
The following additional functions are available when pressing the triple-dot top right button:
- Reset To Origin:
Resets both axis to their minimum value. - Reset To Max:
Resets both axis to their maximum value.
At the bottom are two additional buttons:
- Configure Panel Layout:
Configure the label, visibility of corner buttons and background color of the panel. - Configure Individual Controls
Configure the label, function, behavior and MIDI message of each control on the panel.
Configure Panel Layout
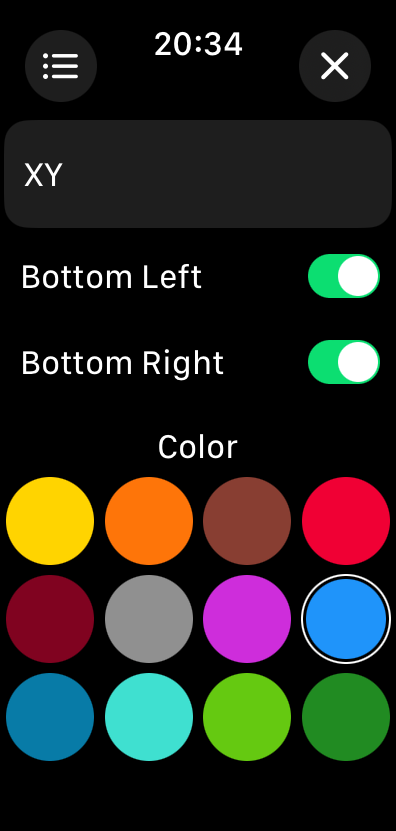
This page allows you to configure the layout and features of the entire XY panel.
From top to bottom:
- Label:
The label associated with the panel, this is how it will appear in the preset's panel list. - Bottom Left:
Whether the bottom left small MIDI button should be visible or not. - Bottom Right:
Whether the bottom right small MIDI button should be visible or not. - Color:
The background color of this panel.
Configure Individual Controls
When you press the bottom right Configure Individual Controls button in the More Functions page, the same layout of the panel appears but with a dotted outline for each of the controls.
Tapping one of the controls will bring up a dedicated page that allows you to change every aspect of that control. Depending on the type of the control, and the MIDI message that is being sent out, these configuration options will vary.
XY CC (Control Change) Configuration
The following configuration options are available when the MIDI message type is CC:
- Label:
The label that will be shown for the axis. - MIDI Message Type:
A choice of Control Change (CC), Channel Pressure (CP) and Program Change (PC) MIDI message types. Selecting a different MIDI message type will change the available configuration options. - Channel:
The MIDI channel that will be used by the axis. - CC number:
The MIDI CC number that will be used by the axis. - Minimum:
The minimum CC value that will be used by the axis. - Maximum:
The maximum CC value that will be used by the axis. - Learn MIDI:
Toggling this button with make MidiWrist Unleashed listen to incoming MIDI messages and automatically configure the MIDI message type based on the incoming message, if the axisler type supports it.
XY CP (Channel Pressure) Configuration
The following configuration options are available when the MIDI message type is CP:
- Label:
The label that will be shown for the axis. - MIDI Message Type:
A choice of MIDI message type. - Channel:
The MIDI channel that will be used by the axis. - Minimum:
The minimum pressure value that will be used by the axis. - Maximum:
The maximum pressure value that will be used by the axis. - Learn MIDI:
Learn MIDI message type by listening to incoming MIDI.
XY PC (Program Change) Configuration
The following configuration options are available when the MIDI message type is PC:
- Label:
The label that will be shown for the axis. - MIDI Message Type:
A choice of MIDI message type. - Channel:
The MIDI channel that will be used by the axis. - Minimum:
The minimum program number that will be used by the axis. - Maximum:
The maximum program number that will be used by the axis. - Learn MIDI:
Learn MIDI message type by listening to incoming MIDI.
Preset List
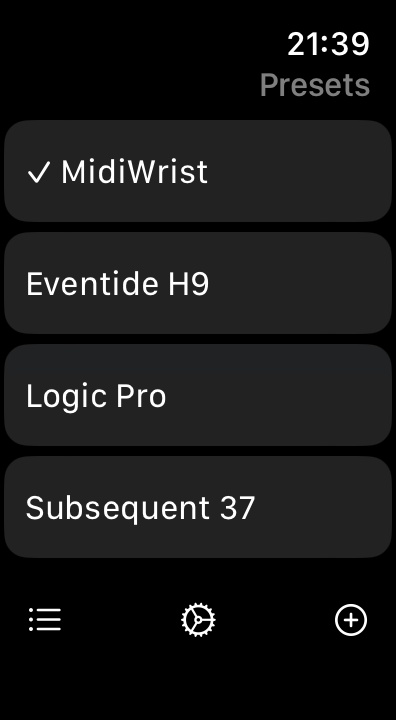
At the bottom of the Controller Panel List, the left button takes you to the Preset List.
By tapping any preset in the list, you'll load its controller panels and the Controller Panel List will be shown. The currently active preset is indicated by a checkmark.
The presets can be freely deleted by swiping left and rearranged by long pressing on the label. New presets can also be created with the plus button at the bottom. You can have as many presets as you want.
At the bottom of the preset list are three buttons:
- Show Panel List:
Shows the controller panel list of the currently active preset. - Show Settings:
Show the settings panel. - Add Preset:
Create a new blank or factory preset.
Settings
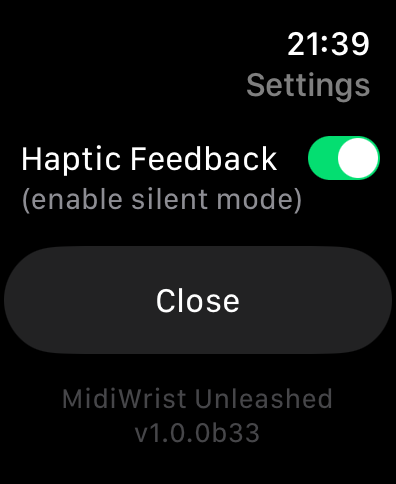
The settings panel contains global settings and information.
From top to bottom:
- Haptic Feedback:
When enabled, your Watch will generate haptics to confirm certain interactions. It's currently technically impossible to dissociate this from an alert sound, so it's recommended to set your Watch to silent when haptics are enabled. - Close:
Go back to the preset list. - Version:
The version number and build of the app.
Bluetooth LE MIDI
Bluetooth LE MIDI (BLE MIDI) is how MidiWrist Unleashed connects to a hardware device. Your Mac, iPhone, iPad and Vision Pro all support BLE MIDI, and any hardware MIDI device can easily become BLE MIDI capable by connecting a CME dongle to it.
A BLE MIDI device can either scan for other devices to connect to or advertise itself as being available for connections. MidiWrist Unleashed isn't able to advertise itself.
Making a connection to a new device typically involves the following steps:
- Make the device advertise itself as a BLE MIDI peripheral
- Tap on the MidiWrist Unleashed preset name to open the connection page
- Press the 'Start scanning' button to look for the new device
- When the device appear in the list below, tap its name to create a connection to it
NOTE: on iOS, iPadOS and visionOS, BLE MIDI advertisement is handled from inside apps, not from the system settings. For instance, in Animoog Z, go to the MIDI panel in the settings, and then tap 'BT TRANSMIT'. This is different for every app.
The details of how to make BLE MIDI connections with the actual devices varies significantly.
Here are some resources to get you started:
Thanks for reading this manual!
MidiWrist Unleashed is at the forefront of technology: the only standalone MIDI controller on Apple Watch in the world.
Some things might not work as you expect. This can be due to MidiWrist Unleashed, but also due to the Apple Watch or watchOS, or any other device or application that you're interacting with.
MidiWrist Unleashed is made by me, a single passionate developer, in my spare time. MidiWrist Unleashed will likely never sell enough to recoup the amount of time and resources I've spent on it. Please take that into account before you contact me for support requests. There are many other resources and communities available online.
That being said, if you think there's a problem with MidiWrist Unleashed, please contact me before leaving a bad review on the App Store. I'll try my best to help you within the time that I have available.
![]()