 GECO Documentation
Getting Started
GECO tracks both of your hands independently and simultaneously. It's however technically impossible to differentiate between your left and right hands by just looking at their shape.
Therefore, we implemented a smart algorithm that combines all the information that GECO receives when it first sees a hand. This allows us to determine what a hand's most likely dexterity is.

To make this algorithm work best, we suggest that you place your Leap Motion Controller in front of you, in between both of your hands while holding them out straight. With this placement, GECO should be able to very reliably detect which hand is your left and which one is your right.
In case the smart behavior doesn't suit you, feel free to experiment with the other dexterity detection algorithms that can be selected in the application preferences (see below).
The Main Window
When GECO is first launched, you'll see two sections in the main window: the live view and the configuration panel.
They both have been carefully designed to be quick and easy to use, without being overloaded. The panels have been stripped down to their essentials and are laid out in such a way that once you've used them a few times, you'll be able to intuitively navigate any of their functionalities.
The Live View
The live view provides a real-time visual representation of all the data that comes into and goes out of GECO.
Each rectangle represents an information stream, symbolized by the icon that is shown in the center. The ten icons on the left are controlled by your left hand and the ten icons on the right are controlled by your right hand. You'll notice that they're identical, but are mirrored along the center of the window.
The icons illustrate the information of your hand position that is detected. You can double-click any rectangle to automatically scroll the configuration panel to the relevant MIDI settings.
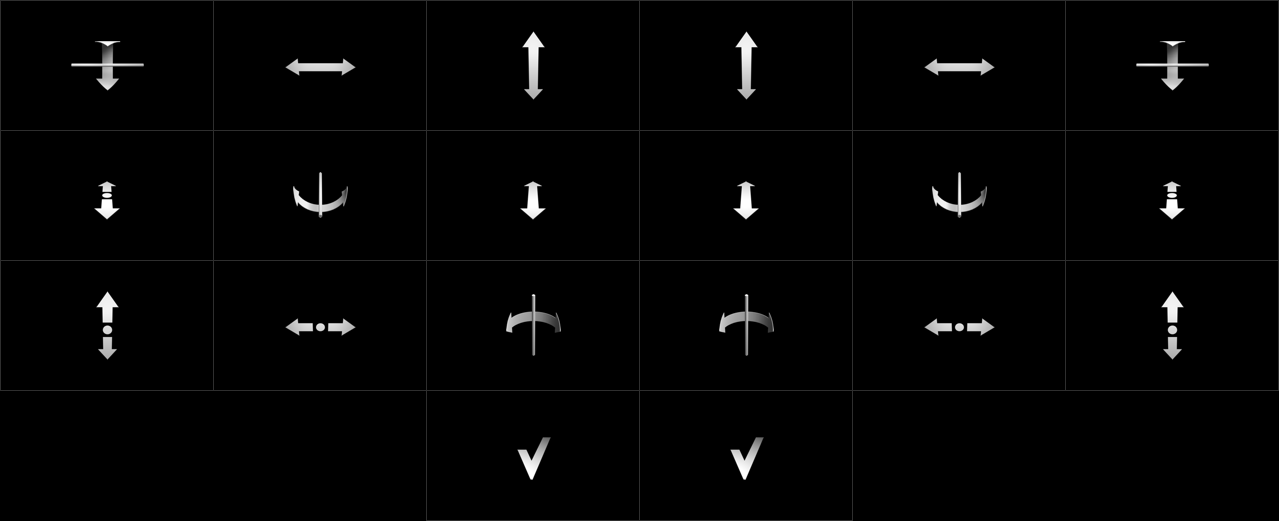
Below is an overview of all the icons:
| Up & Down Position: distance from the Leap Motion Controller (Y-axis) | |
| Up & Down Movement: distance from when your hand was first seen (Y-axis) | |
| Left & Right Position: distance from the Leap Motion Controller (X-axis) | |
| Left & Right Movement: distance from when your hand was first seen (X-axis) | |
| Back & Forth Position: distance from the Leap Motion Controller (Z-axis) | |
| Back & Forth Movement: distance from when your hand was first seen (Z-axis) | |
| Pitch Inclination of your hand's palm | |
| Roll Inclination of your hand's palm | |
| Yaw Direction of your hand's palm | |
| Presence of your hand |
Real-time data display
 When you move your hands in above your Leap Motion Controller, the live view rectangles will be illuminated based on the data that's detected.
In the background you can see your hand as open or closed. The configuration panel provides different settings for the same information stream based on the openness of your hand, allowing you to very quickly switch between different control methods by simply opening or closing your hands.
To make it possible for you to freely and fluently rotate your hands in 3D-space, changing the openness of your hand only works when your palm is roughly horizontal. As soon as a certain inclination is detected, the opennes will stick to the previously active one.
The mouse cursor will automatically hide after a period of inactivity when it's positioned over the real-time data display. As soon as the mouse moves, the cursor will appear again.
Colours and intensity
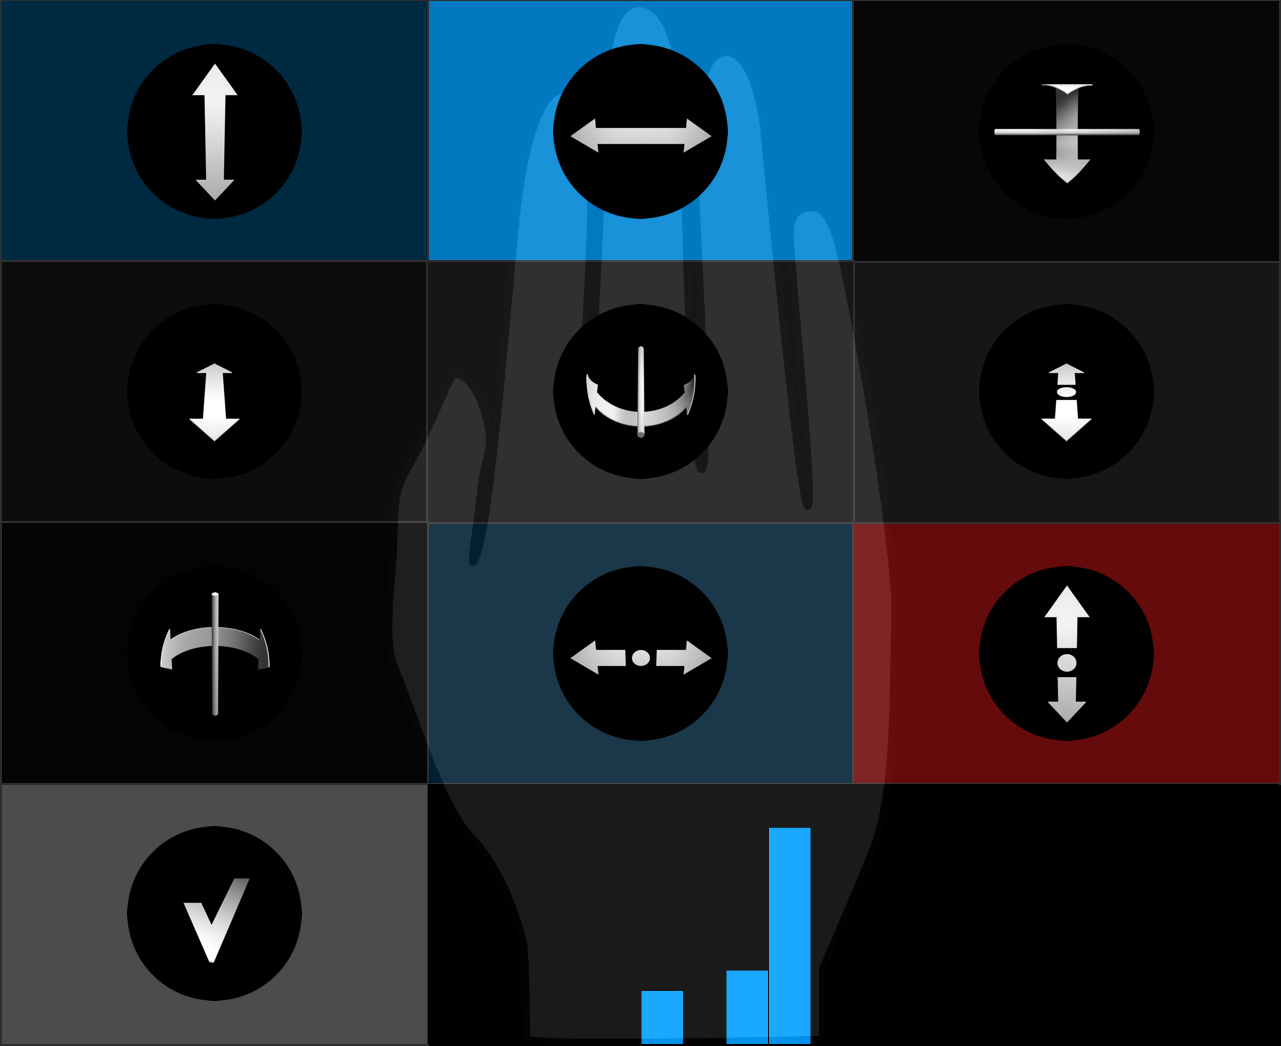 The colours and the intensity of the information rectangles change based on the data that's detected and the current configuration.
By default, gray means that the output is disabled (not generating data), blue means that the detected data is positive (larger than zero) and red means that the detected data is negative (below zero).
The colours can be configured in the settings of each document.
Data output indicators
 To the bottom left and right of the live view, you can see two areas without any icons. These are used to provide you with visual indicators of the data that is being sent out by GECO.
Each vertical bar corresponds to one of the rectangles in the live view and increases as the values of the data messages become larger. The first 10 bars in the bottom left corner are tied to the data that's generated by your opened left hand, and the next 10 bars for the data of your closed left hand. In the bottom right corner this is again mirrored, meaning that the first 10 bars correspond to the data of your closed right hand and the next 10 bars for the data of your opened right hand.
Note that the data output indicators will be different based on the type of output, OSC output will be negative as well as positive and finer-grained that MIDI output.
View customization
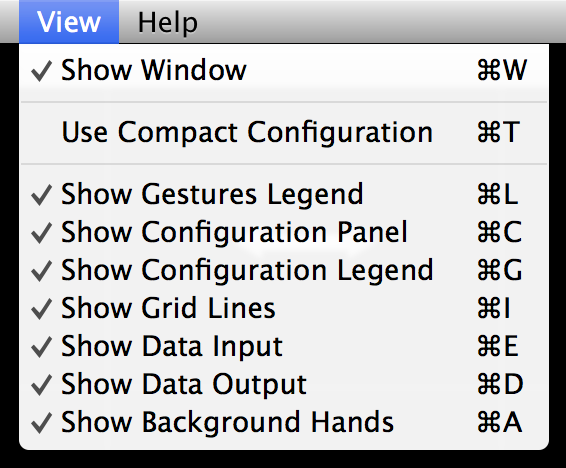 All this visual feedback might be too much for your taste. By going to the View menu, you can turn each part on or off, eventually reducing everything to only the rectangles and the colours.
This view is actually the original intention of the Live View as we think that after customizing the color pallet, projecting these real-time changing rectangles can be very interesting to augment live performances.
Resource consumption
The Live View is heavily optimized and benefits from graphics acceleration on your computer, still it is the part of GECO that consumes the most resources. By closing the main window or by resizing it so that the Live View is hidden, the CPU usage of GECO will become completely insignificant, allowing it to run alongside any resource-intensive music application.
The Configuration Panel
The Configuration Panel allows you to configure how gestures will be translated into MIDI or OSC messages.

For each information stream you can configure four different messages based on the dexterity and openness of the hand the stream originates from. The settings are organized vertically underneath each hand icon.
Don't hesitate to resize GECO's main window to, for instance, only keep the Configuration Panel visible. The horizontal strip was purposely created so that it can be easily tucked away underneath other applications. You can even make it as small as a single gesture configuration rectangle, if you really want to get it out of the way but still keep the window open.
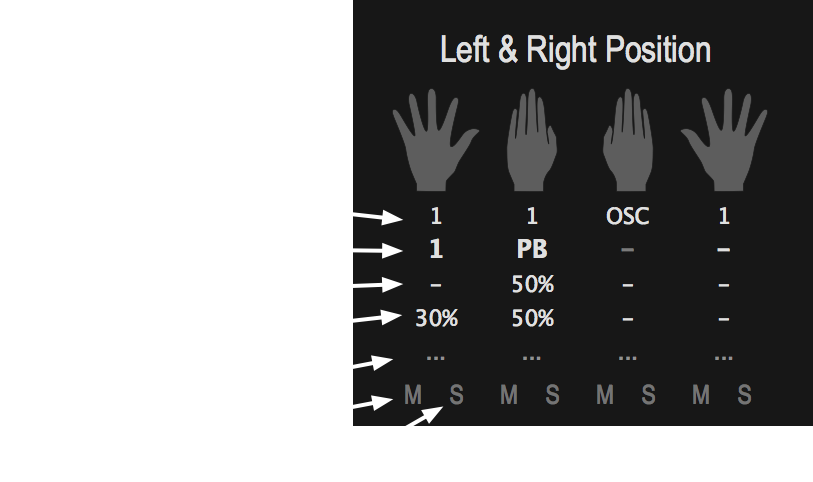
To change the output channel, message or data offset, simply click and drag vertically to increase or decrease the values. To increase the speed at which the values change, move further away horizontally while dragging. Alternatively, you can double-click the entries and type in the values that you want.
Output Channels
The first channels are numbered from 1 to 16 and correspond to the MIDI channels with the same number. These are MIDI's way of keeping messages apart, even if they have the same name. For instance, if you want to send out different PitchBend messages simultaneously, put them on different channels and they will be kept separate.
One other channel value is also supported: OSC. This is a more powerful control protocol. You don't need to configure the MIDI message for these channels and that control will thus be disabled. For OSC to function, make sure that you configure the appropriate OSC information in the 'Document settings'
MIDI Messages
The most common MIDI Messages are called Continuous Controller or MIDI CC messages. Their names range from 0 to 127. GECO supports two other message types: the Pitch Bend and Channel Pressure. Drag beyond MIDI CC 127 or type in PB or CP to activate these.
The advantage of the PitchBend message is that its resolution is much more detailed than MIDI CC messages (16384 value steps as opposed to 128). Using Pitch Bend messages, you'll be able to fully take advantage of the precision of your Leap Motion Controller with MIDI. The other alternative is to use 14-bit MIDI CC messages through the advanced configuration panel, but only very few devices and applications are able to receive these messages correctly.
Note that Pitch Bend messages are designed to 'bend' away from notes, so their neutral position is actually right in the middle of the value range. If you want to control pitch modulation through GECO, it's therefore recommended to set the Data Offset and Rest Value to 50% as explained below.
We're fully aware that this only covers a part of the MIDI specification. For now, we decided against implementing support for NRPN, Sysex, Note On/Off, ... since they would further complicate the interface, don't really feel natural through current hand gestures or are too scarcely supported in other software. In the future we'll be revisiting these limitations and add more extensive support as the Leap Motion controller matures.
Data Offset
The Data Offset allows you to change the base value to which the gesture data will be added or subtracted. This allows you for instance to go from the maximum range to 0 or to set a neutral center point.
A special 'LAST' data offset will use the latest value that was sent as the offset when your hand comes back into range. This setting can be activated by dragging beyond the 100% rest value or by typing in LAST.
For convenience, GECO will be very permissive and allow lowercase and uppercase characters to be entered, while matching on the very first one already. So just typing in the character 'l' will set the rest value to 'LAST'.
Rest Value
The Rest Value allows you to change to value that is sent when your hand is out of range and the message goes back to a neutral position. The rest value is 0 by default. When using Pitch Bend messages for pitch control, it's recommended to set this to 50% since that is the standard neutral position.
A special 'LAST' rest value allows data to stick even after a hand has been removed. Clearing the mapping will however always reset it to the neutral point. This value can be activated by dragging beyond the 100% rest value or by typing in LAST.
For convenience, GECO will be very permissive and allow lowercase and uppercase characters to be entered, while matching on the very first one already. So just typing in the character 'l' will set the rest value to 'LAST'.
Advanced Configuration
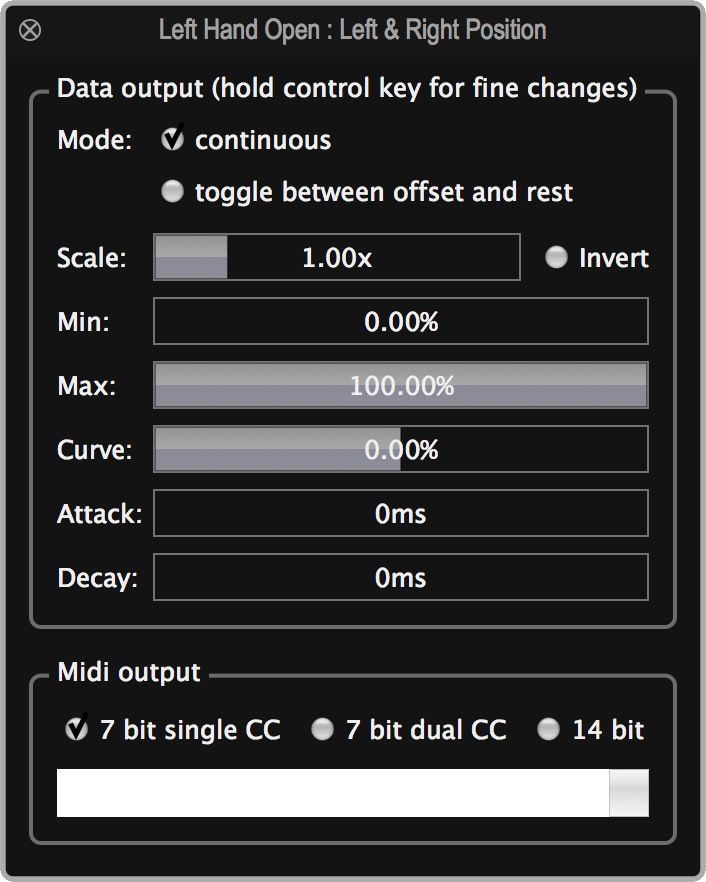 The triple dot underneath the rest value gives you access to the advanced configuration panel.
These are the available data output settings:
- Mode: select either 'continuous' or 'toggle between offset and rest', when toggle is selected the data stream has a latching behavior where it switches between the 'data offset' and the 'rest value' settings each time a stream is activated
- Scale: the sensitivity of output value changes
- Invert: the direction of the output values is reversed
- Min: the minimum output value boundary
- Max: the maximum output value boundary
- Curve: the output data distribution curve
- Attack: the time it takes to reach your gesture value
- Decay: the time it takes to go back to the rest value
When MIDI CC messages are being sent, you have the option of activating 14-bit MIDI output. This sends a second MIDI CC message for the fine-grained values in between the coarse-grained 128 steps of the single MIDI CC message.
Theoretically, any MIDI CC message can be selected to carry this additional data. However, the MIDI specification standardized that for MIDI CC messages 0-31, the messages 32-63 will provide the 14 bit support. For these 32 message names, GECO will automatically select the appropriate sibling for you, but still allow you to change the fine-grained MIDI CC message to anything you want.
Note that you'll have to configure the target MIDI device or application to properly receive 14-bit MIDI messages. Sadly many don't support this yet.
Finally, the MIDI output can also be sent as 7-bit dual output, meaning that negative values will be sent using the CC number that is configured in the advanced settings. This allows you to fully take advantage of the whole range of gesture interaction, even though MIDI CC only supports positive values.
Mute and Solo
The M and S toggle buttons, mute or solo the relevant output data. This is very handy to temporarily turn off a data stream or to focus on a particular one.
Using Solo, it becomes very easy to use the MIDI Learn features of other software since you're only sending out one message. Without this, it can be frustrating to get MIDI Learn to pick up the message you want it to bind to.
Linking Hand Open and Close
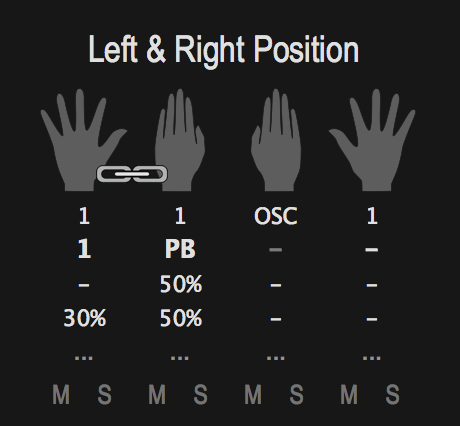 By default, the open and closed state of your hands behave totally independently. When you switch between them, the data that is sent out for the previous openness will remain steady until your hand disappears.
This behavior might not be what you want though. If you click in between the hands, you can optionally link the open and closed state together so that they mutually exclude each-other. Instead of remaining steady at the previously known value when switching between each-other, they will now reset to their base value.
Disabling Hand Open or Close
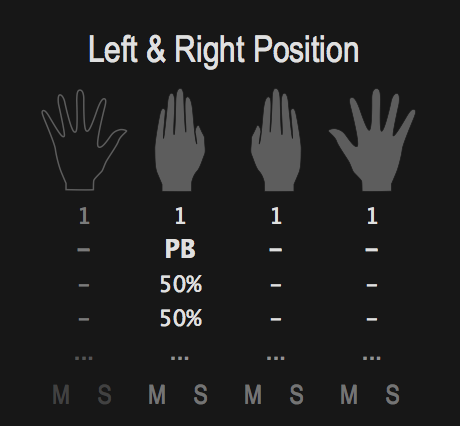 Using the open or closed hand for different messages can be very expressive, but also requires greater care when moving your hands.
By clicking on one of the hand icons, you can disable or enable any open or closed gesture. By doing so, GECO will use the configuration of the active gesture (closed when open is disabled, or open when closed is disabled), and disregard the openness state of your hand for that particular gesture data stream.
Document Settings
The configuration that is performed through the document settings dialog is stored alongside with the gesture settings from the configuration panel.
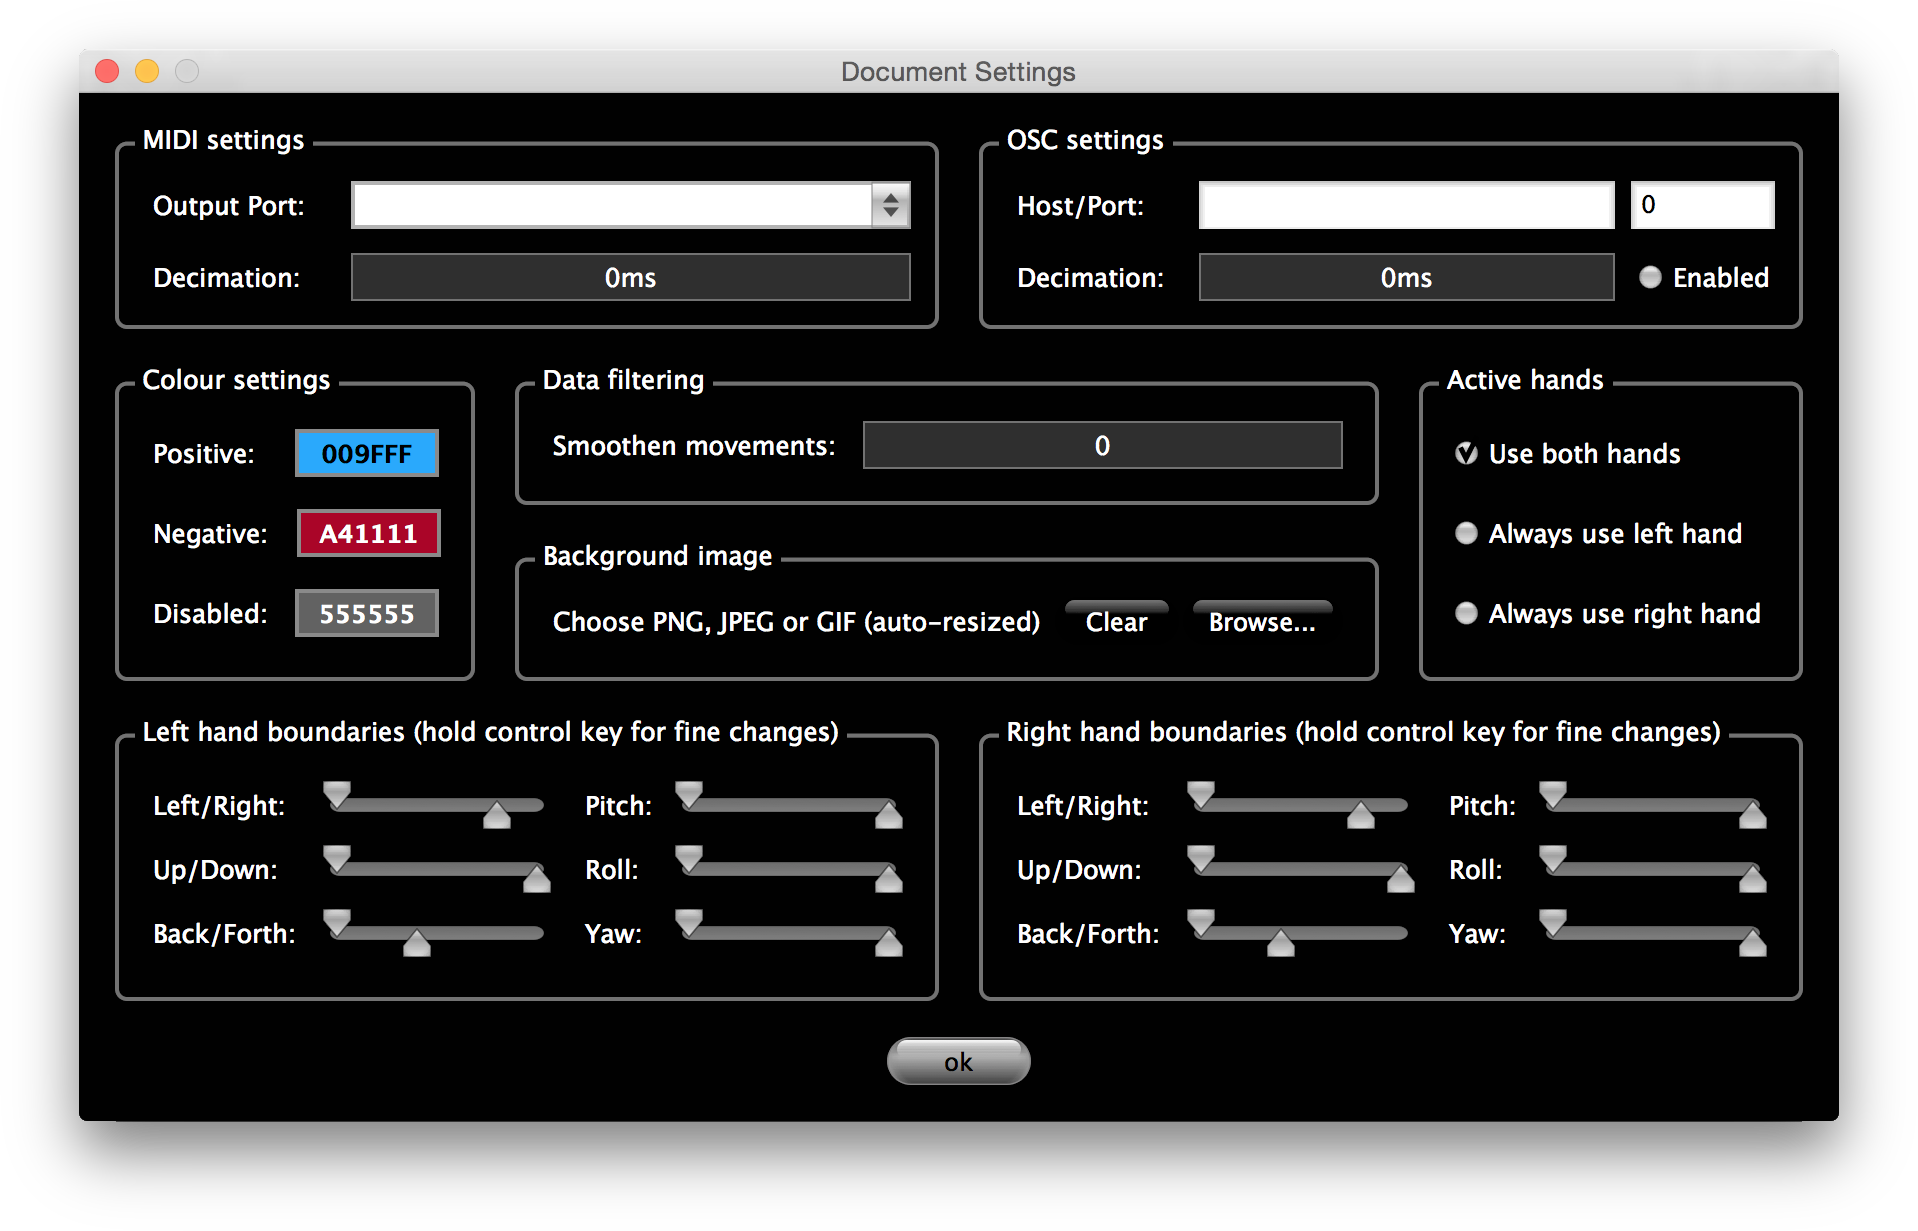
MIDI Settings
MIDI Output Port
This drop down menu allows you to send out MIDI data to any MIDI port known by your system.
MIDI Decimation
This is a value in milliseconds, which by default is disabled. Click and drag to change the value.
Some MIDI devices can only receive MIDI messages at a certain speed. If you let GECO send out MIDI data to these devices without any trimming, you can get weird behavior liking data backing up, messages being lost, notes hanging indefinitely, ...
By increasing the MIDI decimation value, you reduce the amount of messages that will be sent. For instance, a value of 10 will maximum send one value every ten milliseconds for each MIDI message type. Since you can have many message types active at the same time, this can still result into many more overall messages per second. It's up to you to experiment with the setting that works best for your MIDI devices.
OSC Settings
Host Name and Port Number
OSC is a control protocol that is sent through an UDP network connection. GECO will function as an OSC client and you'll need to specific which OSC server the information has to be sent to. This can be done by providing the network Host Name or IP Address and the Port Number of the server. Make sure that these are correct, without this information the data will not arrive at the right destination.
OSC Decimation
This is a value in milliseconds, which by default is disabled. Click and drag to change the value.
By increasing the OSC decimation value, you reduce the amount of messages that will be sent. For instance, a value of 10 will maximum send one value every ten milliseconds for each data stream.
Enabled
You can easily turn OSC globally on and off by checking or unchecking this option.
Important
Don't forget to set each Output Channel to 'OSC' in the Configuration Panel. Simply setting the host name and port will not send out any OSC.
Colour Settings
You can freely select which colours will be used by the Live View. They will be stored with your document and are loaded as soon as a new document becomes active.
Using different colour schemes can be very effective to create different moods or to visually identify different configuration settings.
Data Filtering
The data output can be smoothened over time to remove sudden spikes or noise at the expensive of additional latency.
Background Image
You can select any PNG, JPEG or GIF image and GECO will use it as the backdrop of the live view. The image will automatically be resized to fit the window size and the coloured squares will be drawn over the image with different levels of transparency, based on the position of your hands.
Combined with the colour settings, this can provide a very personal performance view.
Active Hands
GECO is designed for two-handed use, but many use it with one hand while playing another instrument with the other hand.
By selecting which hand is active, you'll only enable that section of the configuration and the live view, causing any hand that's seen by GECO to be treated as the hand that you've selected to be active.
Boundary Settings
GECO has been carefully tuned to offer a detailed and stable detection range which can be used comfortably for live performance. However in the studio, you might want to have shorter movement ranges so that you don't have to move your entire arm. Through the upper boundary settings (rightmost arrow), you can change what the maximum distances are.
You can also change the minimum boundaries (leftmost arrow) to offset the starting point for each movement axis and each hand independently. This can be very handy to create 'dead zones' in the middle where GECO will not send out any performance data.
Connecting the Data Output
 MIDI connections
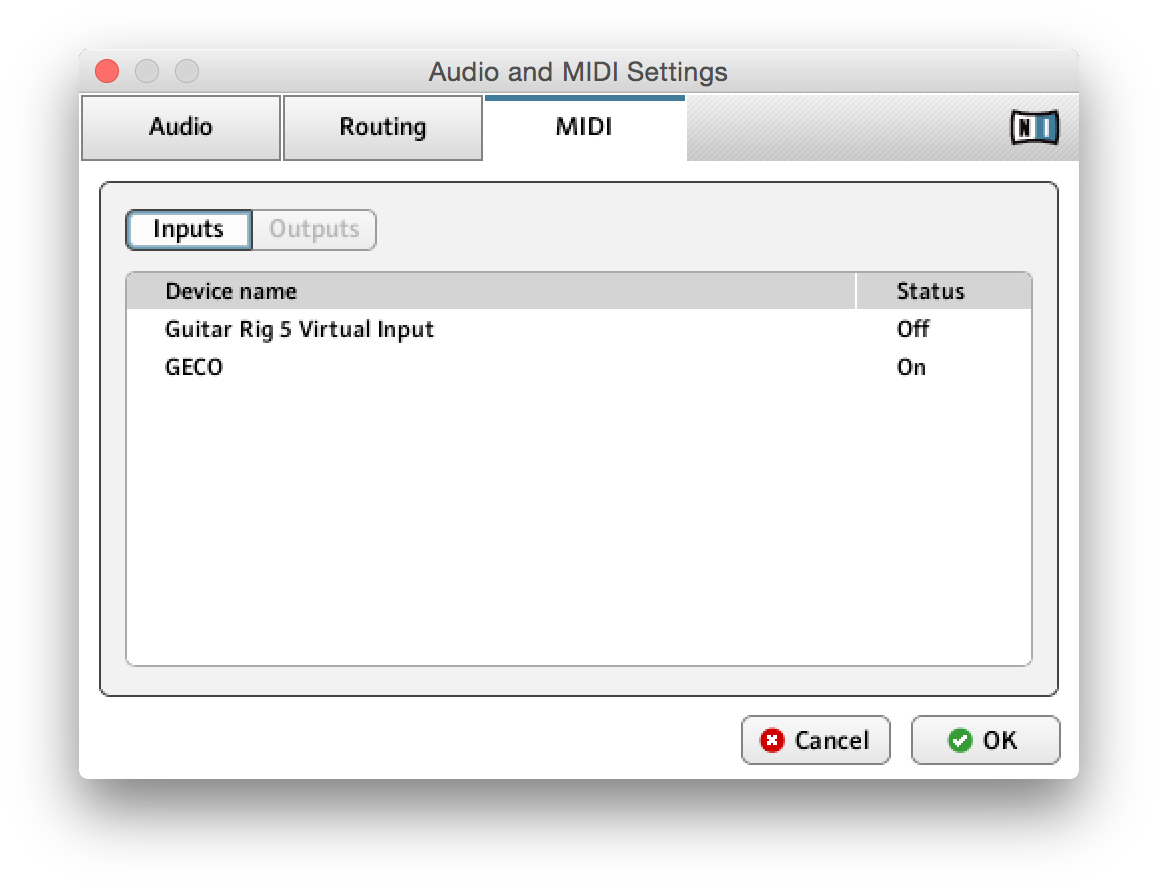
GECO always creates a virtual MIDI port on macOS that is named 'GECO'. All MIDI data will always be sent through this virtual port. This makes it very easy to connect to other software. You can simply enable this MIDI port in the application that you want to control and the MIDI messages will be received without any further configuration. For instance, to the right you can see the typical configuration dialog of Native Instruments software, in this case Guitar Rig 5.
On Windows we recommend installing a 'virtual MIDI cable' driver such as loopMIDI (https://www.tobias-erichsen.de/software/loopmidi.html) when you want to send MIDI between different software applications.
The Settings of your open document allow you to select a MIDI Output Port from the drop-down menu. This will make GECO send out data through that MIDI port.
Note that GECO is able to activate a previously stored MIDI output port even when you connect your MIDI device after loading a document. This removes any set-up hassle since you don't have to pay attention to the order in which you connect your MIDI devices.
 OSC connections
OSC messages are identified by path names and are sent over an UDP network connection. GECO will act as an OSC client and you can configure the information for the OSC server that you want to control through the Document Settings.
GECO has a standard scheme for these paths that is short but still very intuitive. If you're consuming messages yourself in a generic application, you'll be able to use the paths detailed below without any additional configuration.
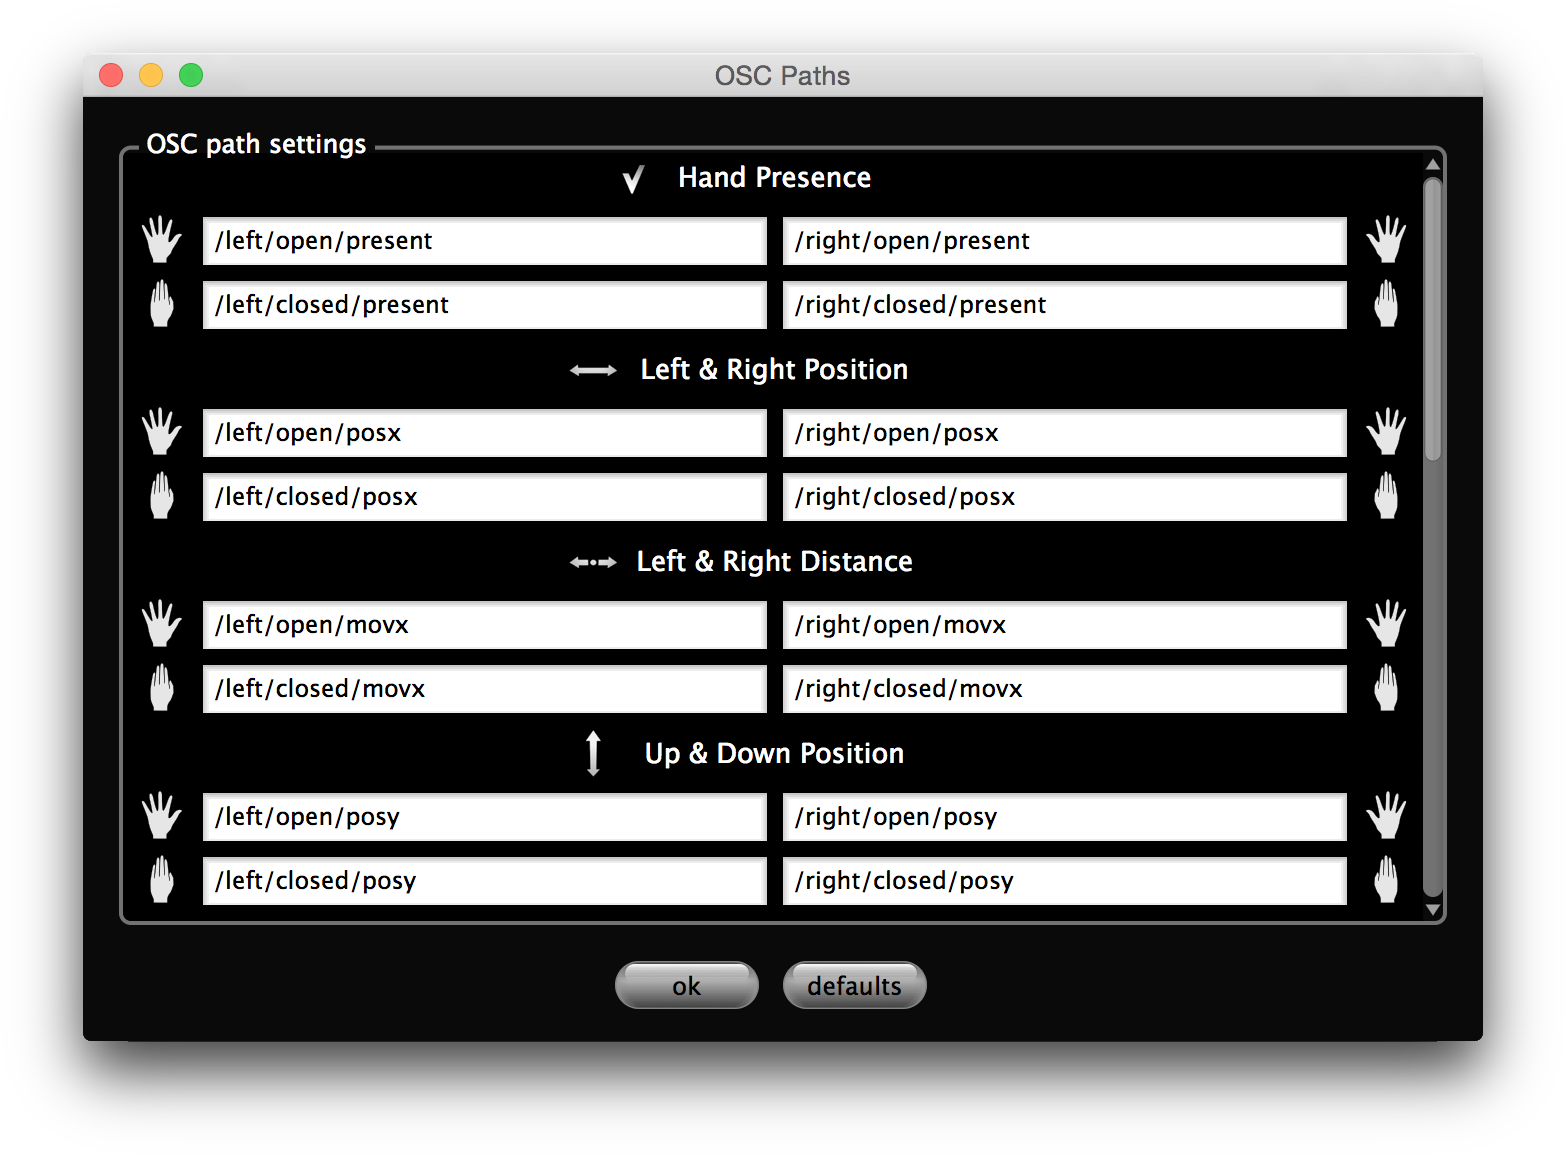
However, if you want to control specific OSC controls through GECO, these often have their own specific paths on which they're listening for messages. You'll have to refer to the documentation of the application that you want to control to determine what these paths are exactly. Once you know, you can open the OSC Paths dialog through the File menu and change the path for each message type independently.
These are the standard GECO OSC output paths:
| /left/open/present | /right/open/present |
| /left/open/posx | /right/open/posx |
| /left/open/posy | /right/open/posy |
| /left/open/posz | /right/open/posz |
| /left/open/movx | /right/open/movx |
| /left/open/movy | /right/open/movy |
| /left/open/movz | /right/open/movz |
| /left/open/pitch | /right/open/pitch |
| /left/open/roll | /right/open/roll |
| /left/open/yaw | /right/open/yaw |
| /left/closed/present | /right/closed/present |
| /left/closed/posx | /right/closed/posx |
| /left/closed/posy | /right/closed/posy |
| /left/closed/posz | /right/closed/posz |
| /left/closed/movx | /right/closed/movx |
| /left/closed/movy | /right/closed/movy |
| /left/closed/movz | /closed/movz |
| /left/closed/pitch | /right/closed/pitch |
| /left/closed/roll | /right/closed/roll |
| /left/closed/yaw | /right/closed/yaw |
Working With Documents
GECO has been designed to be always operational and to allow any changes to be performed at any time. You can freely load, save or create documents while you're performing through gestures.
Each document stores the document configuration, colours, output port, and decimation. They will immediately apply as soon as you load a document, making this a perfect way to switch between different setups on the fly. We're investigating ways to make this possible without having to use your mouse. This is one of the features that will be further developed in future versions of GECO.
 Preferences
The global preferences are active for the whole application and aren't stored with a particular document.
Startup preferences
The startup preferences change the automatic behaviour of the application when it starts up.
Open last active document
When checked, GECO will automatically load your last document at startup. This is particularly handy for a live performance scenario where you want to restore the environment you prepared during rehearsal.
Restore window visibility
When checked, the last visibility status of the main window will be restored. So if it was closed when GECO last quit, it will be closed when the application starts up again, otherwise it will be visible. When this preference is unchecked, the main window will always be visible.
Performance
The performance preferences allow you to fine-tune the application behaviour for the impact on the CPU.
Limit background FPS
When checked, GECO will detect when it's running in the background and will limit the frame rate of the rendering. This will reduce its CPU requirements without having to close the window or hide the live view, at the expense of choppy rendering.
Dexterity detection
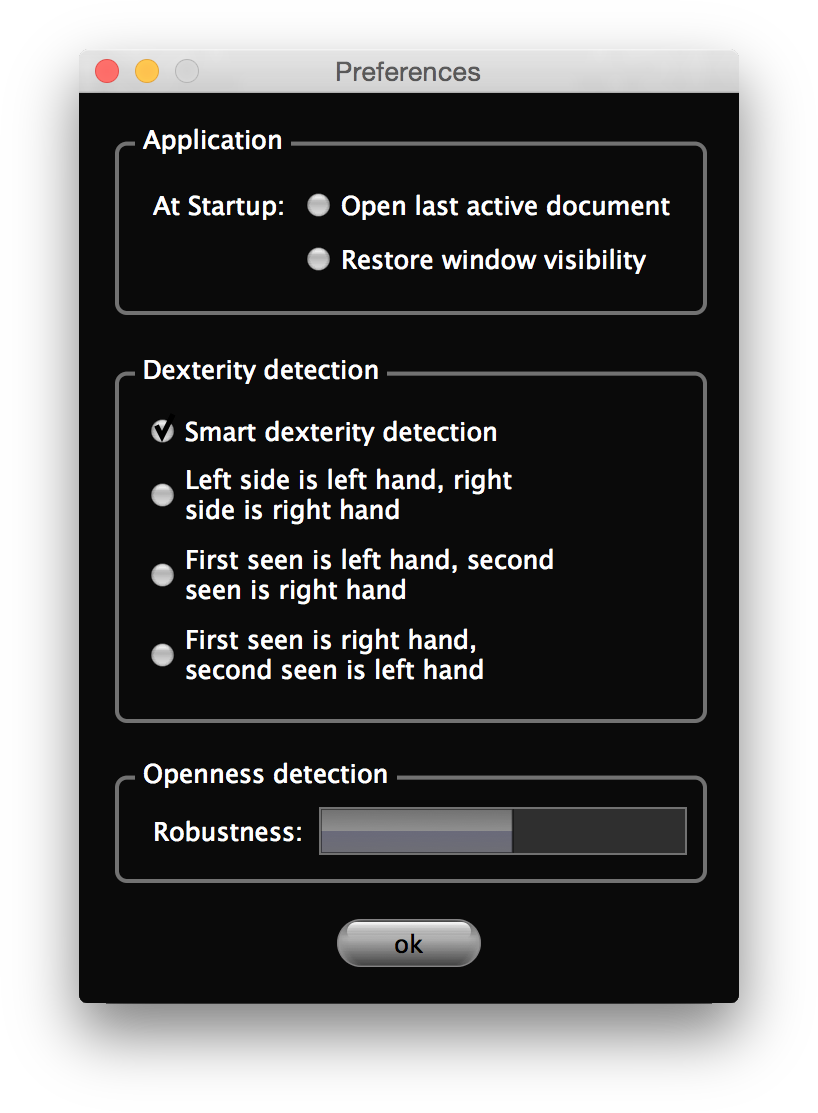
Since GECO can't technically look at the shapes of your hands to determine which one is your left and which one is your right, we implemented several dexterity detection methods. If the default smart dexterity detection doesn't suit you, maybe one of the others correspond more closely to how you're using GECO.
- Smart dexterity detection:
GECO uses a smart algorithm to determine what the dexterity of your hand is, this relies on the Leap Motion Controller being placed in front of you, in between both of your hands while holding them out straight - Left side is left hand, right side is right hand:
A hand that is first seen to the left of the Leap Motion Controller is considered your left hand and a hand that is first seen to the right of the Leap Motion Controller is considered your right hand. - First seen is left hand, second seen is right hand:
The hand that was seen first is considered your left hand and the hand that was seen second is considered your right hand. - First seen is right hand, second seen is left hand:
The hand that was seen first is considered your right hand and the hand that was seen second is considered your left hand.
Openness detection
In certain situations, the hand open or closed detection can be unreliable and GECO might intermittently switch between openness states. Increasing this slider makes the openness detection more robust, but at the expense of additional latency between openness changes.
When the slider is fully to the left, the openness changes are instant but might have erroneous detections. When the slider is fully to the right, the openness changes are very robust but the latency between changes is clearly noticeable.